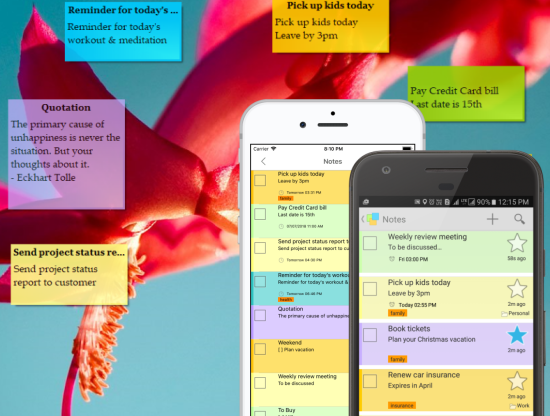
Working with sticky notes is addictive. Once you get used to working with digital sticky notes, you create notes for almost everything, from a short task to a long term plan.
If you are one of those people, then you will often find your desktop cluttered with sticky notes at all places. It might get difficult to access things on the desktop, including the sticky notes.
You might manually arrange them once or twice, but let’s admit, we all feel lazy to arrange the notes, especially if there are lots. We therefore have a quick option for you- automatically arrange all the Notezilla sticky notes on your desktop in an organized manner.
What is Notezilla?
Notezilla is a professional, elegant & highly rated sticky notes app for Windows & Phones (Android, iOS, iPhone, iPad etc). You can also access your sticky notes from a Mac.
Notezilla helps you organize various tiny bits of information you would need through out your life. It keeps all your notes, tasks & reminders handy where ever you are. With sticky notes, you hardly have to put effort to take notes, set reminders, etc. Quickly jot down & move on with your task at hand.
Here are some features of Notezilla:
- Sticky notes with reminders
- Attach sticky notes to websites, documents, folders & apps
- Organize sticky notes inside folders to keep your Windows desktop clean.
- Pin sticky notes on top of other apps
- Sync sticky notes between Windows, Android, iPhone, iPad
- Add pictures inside sticky notes
- Checklist sticky notes
- Lock sticky notes (password protect)
- Markdown support
- Send notes over local network (LAN) or across the globe
- Tag sticky notes
- Fully transparent sticky notes
- Dark mode
Automatically arranging desktop notes
Here’s a short video on this feature:
Right-click on the Notezilla icon and select ‘Desktop notes’-> ‘Arrange notes’.
The following box will appear where you can choose to arrange your notes based on different criteria like date created, modified, accessed, due date and note title, in either ascending or descending order.
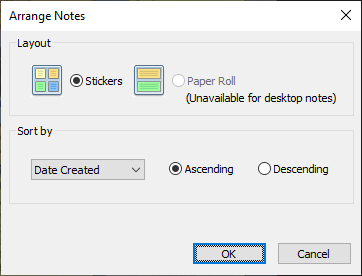
Click on OK and the notes will be instantly arranged in a neat manner.
The desktop now looks clean and helps you stay productive.
The best part of Notezilla is that it can sync notes between your mobile and PC or laptop! Therefore, you have the exact notes at both places! Try the sync feature today! You will surely love it.
Download it from the Play Store or App Store today and sync all your sticky notes with the Windows version of Notezilla.
Learn more about Notezilla.
Subscribe to our YouTube channel for interesting videos.
Check out our other cool products.
Have a good day!
Thank you :)