Preview files to be copied in Windows using an Xcopy alternative replacement tool

This post will show how to preview your files before copying them in windows.

Why preview files?

  • When copying lots of files, it is essential to ensure that no critical file is left behind & no unnecessary file is being copied. Be accurate right from the start by knowing which files will be copied before actually copying them by reviewing the list of files that will be copied.
  • Also, when filtering files by type, date, or size, it is essential to verify whether all the files you need will be copied successfully. Previewing files before actually copying them gives you the confidence & keeps your mind relaxed.

Let us see how this is possible with Windows Xcopy tool and an alternative software Copywhiz.

What is Copywhiz?

Enhance your file-copy experience with Copywhiz as it lets you to have more flexibility & more control over the file copying and backup process. Here is how Copywhiz makes file copying a breeze:

  • Copy only new or modified files
  • Easily pick files by name, extension, folder etc from bunch of folders
  • Automatically organize files based on file attributes and metadata
  • Copy files to multiple folders/computers
  • Copy files from multiple folders and paste them at once
  • Sync files between source and destination
  • Pick files from multiple folders and compress in single .zip file
  • Schedule file backups
  • Several more hidden nuggets designed to make your file-copy task easier.

Generate file Preview

Using Xcopy

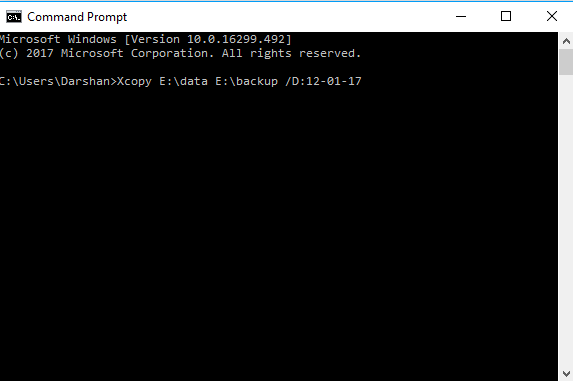
Xcopy Source [Destination] /L command displays a list of files that are to be copied.

For Ex: To display a list of files that are to be copied, the following command line will be used:

xcopy / C:\Your Folder C:\New Folder /L

However, using Xcopy commands is not straightforward. System administrators may be able to use it. But Xcopy is difficult for everyday users.

Let us look at an easier and faster way to do this.
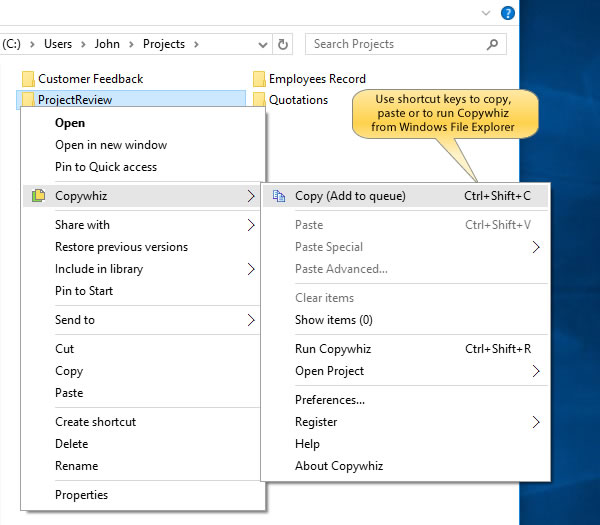
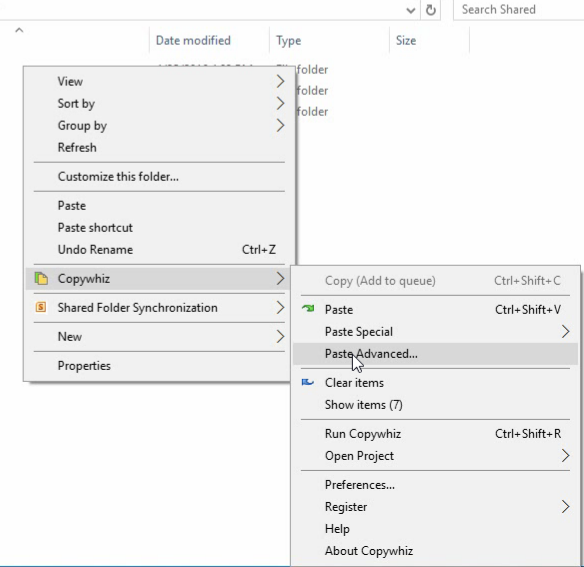
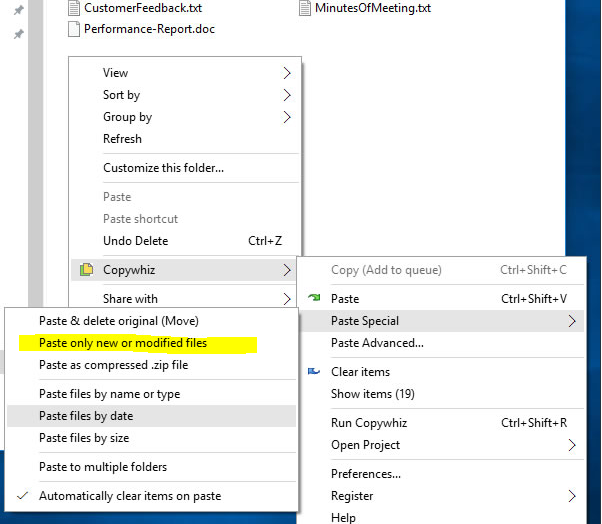
Using Copywhiz

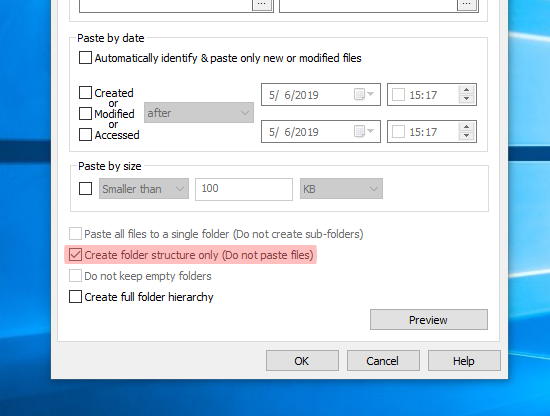
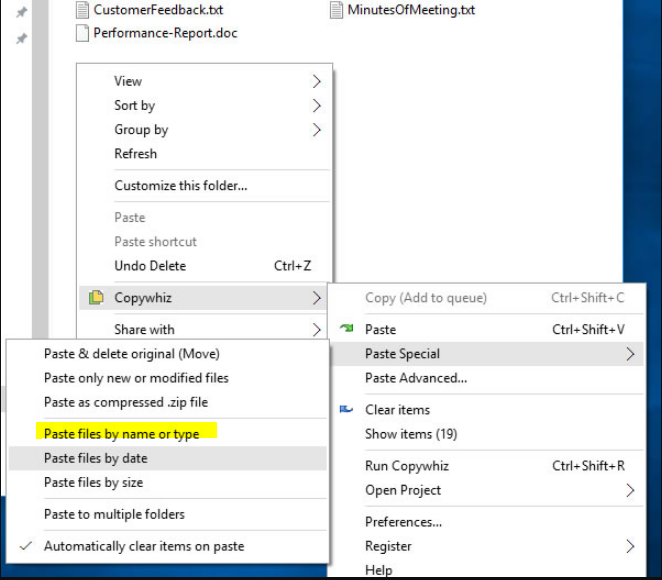
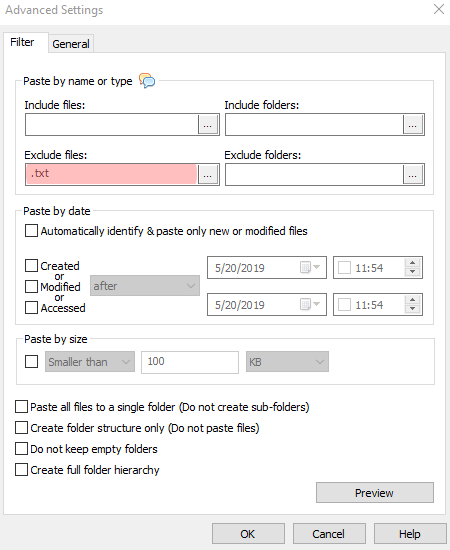
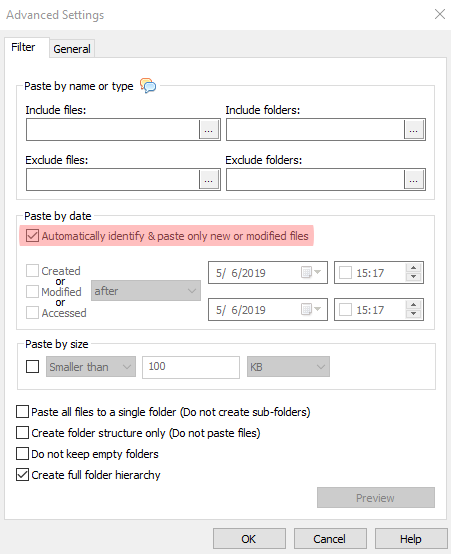
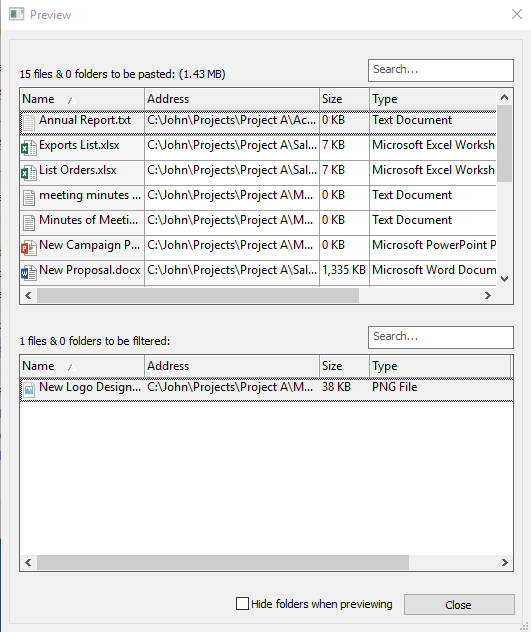
Copywhiz is an alternative that allows you to preview files before copying them. You can alter different filter options (file type, date, or size) and ensure that the right files are copied. This avoids mistakes, incorrect files to be copied & important files to be left out. This feature ensures accuracy. You can also use this feature to view the list of new & modified files in a folder.

Here is how Copywhiz Preview Window appears:

The preview feature is depicted briefly in this video:

For the tutorial videos, check out this page. Subscribe to our YouTube channel for some interesting videos.

Learn more about Copywhiz. Download the free trial from here.

Have a good day.

Thanks for reading till the end :)

Create Directory structure only, without files in Windows using an Xcopy alternative replacement tool

Many times we want to replicate the directory structure of a particular folder to another location. It is, therefore okay to skip copying files in those folders. But this is a very tedious and error-prone task if done manually. Therefore it is advised to use any software that will do it for you.

This post will show you how to create the whole folder structure without files in Windows. It is useful when you want to create lots of folders for different types of files in an easier and faster way.

Let us look at how to do this with Windows Xcopy tool, and an alternative software, Copywhiz.

What is Copywhiz?

Enhance your file-copy experience with Copywhiz as it lets you to have more flexibility & more control over the file copying and backup process. Here is how Copywhiz makes file copying a breeze:

  • Copy only new or modified files
  • Easily pick files by name, extension, folder etc from bunch of folders
  • Automatically organize files based on file attributes and metadata
  • Copy files to multiple folders/computers
  • Copy files from multiple folders and paste them at once
  • Sync files between source and destination
  • Pick files from multiple folders and compress in single .zip file
  • Schedule file backups
  • Several more hidden nuggets designed to make your file-copy task easier.

Create Directory structure only

Using Xcopy

Xcopy Source [Destination] /t command lets us to replicate the whole directory structure without copying the files inside them. To copy empty directories, you must include the /e command-line option.

For Ex: To copy the directory structure without files, the following command line will be used:

xcopy C:\Your Folder C:\New Folder /t /e

However, Xcopy commands are not straightforward. System administrators may be able to use it. But everyday users would generally find it confusing.

Let us look at a simpler and easier way to do this.

Using Copywhiz:

Watch a short video depicting this feature:

Video Transcription

1. Select files using Windows Explorer, right-click on them and choose Copywhiz->Copy from the menu as shown below :

2. Go to the destination folder, right-click inside the folder and select Copywhiz–>Paste Advanced as shown below:

3. Copywhiz Window will open. Click on the ‘Advanced Settings’ button and select ‘Create folder structure only, do not paste files’ as shown below, and click on ‘Ok’.

Create-Folder-Structure-Only-No-Files

Conclusion

Copywhiz is an alternative that allows you to create the complete directory (folder) structure without copying files in them.

This feature can be useful in a multi-user scenario where the system administrator wishes to create the same standard template folder structure without files for different users from an existing structure.

The biggest advantage of using Copywhiz is that you can take automatic backups of your files and folders! Read more about it here:

For more tutorial videos, click here .

Subscribe to our YouTube channel for regular updates and interesting videos!

Learn more about Copywhiz.

Download the free trial from here.

Check out our other cool products.

Have a good day.

Thanks for your time :)

Exclude specific type of files when copying in Windows using an Xcopy alternative replacement tool

We don’t copy every file during our file copy each time. If there is a long list of files and you wish to copy files only of a specific type or extension, it becomes tedious to filter them manually.

This article will, therefore, help you have a choice in the file copy by letting you exclude certain files from being copied.

Here we will look at this feature using Xcopy and an alternative software, Copywhiz.

What is Copywhiz?

Enhance your file-copy experience with Copywhiz as it lets you to have more flexibility & more control over the file copying and backup process. Here is how Copywhiz makes file copying a breeze:

  • Copy only new or modified files
  • Easily pick files by name, extension, folder etc from bunch of folders
  • Automatically organize files based on file attributes and metadata
  • Copy files to multiple folders/computers
  • Copy files from multiple folders and paste them at once
  • Sync files between source and destination
  • Pick files from multiple folders and compress in single .zip file
  • Schedule file backups
  • Several more hidden nuggets designed to make your file-copy task easier.

An image showing one of the features of Copywhiz

Steps to exclude specific files when copying in Windows

Using Xcopy

xcopy Source Destination /EXCLUDE:file1[+file2][+file3]… command lets us to specify a list of files containing strings to be excluded. These strings are not entered directly in the command switch. They are one or more text files that list the strings to be excluded.

Here is the command that is actually being used:

xcopy source destination /EXCLUDE:file1[+file2][+file3]… exclude: {path}list_of_exclusions.txt.

For Ex: To copy files from ‘C:\project’ to the folder ‘c:\backup,’ by excluding certain type of files, the following command line will be used:

xcopy c:\project c:\backup /Exclude: list of excluded files

However, Xcopy commands are not easy to use. System administrators may be able to use it. But Xcopy is not for ordinary users.

Using Copywhiz:

Watch a short video depicting this feature:

Video Transcription

1. Select files using Windows Explorer, right-click on them and choose Copywhiz->Copy from the menu as shown below :

2. Go to the destination folder, right-click inside the folder and select Copywhiz–>Paste special–>Paste files by name or type as shown below:

3. The Advanced Settings dialog box will open. You can include or exclude files/folders to be copied by typing their names, file extensions, or folder names. You can also preview the list of files that will be copied and files that will be skipped by clicking on the Preview button. After confirming, press the Ok button in the Advanced Settings dialog box. All the required files will be copied successfully.

Screenshot-Exclude-Files

Conclusion

Copywhiz lets you to choose which type of files to copy & which to ignore i.e, it lets you to do ‘Selective File Copy’.

Pick only those files that are important & avoid files that are not required (Eg. Files that occupy too much space) with Copywhiz. Easily filter files by name, extension, folder, etc. from a bunch of folders.

Complete big file copy tasks with few clicks & save manual effort with Copywhiz.

The most significant advantage of using Copywhiz is that you can take automatic backups of your files and folders! Read more about it here:

For more tutorial videos, click here .

Subscribe to our YouTube channel for regular updates and interesting videos!

Learn more about Copywhiz.

Download the free trial from here.

Check out our other cool products.

Have a good day.

Thanks for reading till the end :)

Copy only new & modified files in Windows using an Xcopy alternative replacement tool

Copying files and taking file backups is a crucial part of our work schedule. We often take backups or copy files only that are required and leave out the rest. At that, we mostly need only the modified files. Maybe to refer to what we had worked on and modified last time or what more changes are to be made to that file according to work progress.

Even while taking backups, it does not make sense to take a backup of files that already exist in the destination. It would be wise to take backups of only the recently modified files, and if a file with the same name already exists, we can replace it with the latest version.

This might sound too technical, but it is very easy.

Now, you have many ways to do this. You can do it manually, which requires a lot of time and effort. So that option is immediately ruled out. The other option is to use the Xcopy command. The final option is to use software that will do it quickly for you.

So let us first see how you can do it using Xcopy. And then look at how you can do it even better using an alternative software, Copywhiz.

What is Copywhiz?

Enhance your file-copy experience with Copywhiz as it lets you to have more flexibility & more control over the file copying and backup process. Here is how Copywhiz makes file copying a breeze:

  • Copy only new or modified files
  • Easily pick files by name, extension, folder etc from bunch of folders
  • Automatically organize files based on file attributes and metadata
  • Copy files to multiple folders/computers
  • Copy files from multiple folders and paste them at once
  • Sync files between source and destination
  • Pick files from multiple folders and compress in single .zip file
  • Schedule file backups
  • Several more hidden nuggets designed to make your file-copy task easier.
Copy only new & modified files

An image showing one of Copywhiz’s feature

Using Xcopy

Xcopy Source [Destination] /d copies all Source files that are newer than existing Destination files. This command-line option allows you to update files that have changed.

For Ex: To copy all the files in the directory ‘data’ that are modified on or after 1 st December 2017 to the folder ‘backup‘, the following command line will be used:

Xcopy E:\data E:\backup /D:12-01-17

However, these Xcopy commands are not straightforward. System administrators may be able to use it. But Xcopy is quite difficult for common users.

Which is why Copywhiz is an easier and faster alternative

Using Copywhiz

Here is a short video that depicts how to do it quickly and conveniently:

Video Transcription

1. Right-click on the folder from which only new or modified files need to be copied and choose Copywhiz–>Copy from the menu as shown below:

2. Go to the destination folder, right-click on it and select Copywhiz–>Paste Special- ->Paste only new & modified files

3. If the same folder already exists in the destination, then only new or modified files will be replaced, others will be skipped, saving a lot of time.

Paste-Only-New-Modified-Files

Conclusion

Copywhiz automatically detects new & changed files making the whole process very quick. Alternatively, you can copy files based on specific dates (date modified, date created, date accessed).

What could take several hours if done manually, Copywhiz completes it in few seconds. Just specify the file date type and date range so that the files are copied based on the date criteria.

This feature is very useful while sharing/uploading only recently modified files or taking backup of just new & modified files, especially when there are several files to copy or backup. Or even to pick the latest music/pictures from multiple folders.

The biggest advantage of using Copywhiz is that you can take automatic backups of your files and folders! Read more about it here:

For more tutorial videos, click here .

Subscribe to our YouTube channel for regular updates and interesting videos!

Learn more about Copywhiz.

Download the free trial from here.

Check out our other cool products.

Have a good day.

Thanks for reading till the end :)

Attaching sticky notes to Microsoft Word Document and PDFs in Windows using Notezilla

We create sticky notes for various purposes. One of them is to jot down information related to any document or PDF we are working with. While we create notes related to the word document, we have to find and open that note again and again whenever we open that particular document. This is a clear waste of our time and effort.

Notezilla therefore has a fix for this. It offers a unique feature to attach sticky notes to any document, folder, app, and website. The note will open along with the file, folder, or program it is stuck to and will disappear when you don’t access it.

What is Notezilla?

Notezilla is a professional, elegant & highly rated sticky notes app for Windows & Phones (Android, iOS, iPhone, iPad, Windows Phone, etc.). It can help you organize your life by keeping all the notes, tasks & reminders that you may need when-ever and where-ever you are.

With sticky notes, you hardly have to put effort to take notes, set reminders, etc. Just jot down & move on with your task at hand. Notezilla allows you to create attractive and realistic sticky notes to make the desktop look more colorful and beautiful.

It works smoothly on both phones & tablets.

Here are some features of Notezilla:

  • Sticky notes with reminders
  • Attach sticky notes to websites, documents & folders
  • Pin sticky notes on top of other apps
  • Sync sticky notes between Windows, Android, iPhone, iPad
  • Add pictures inside sticky notes
  • Organize sticky notes inside memoboards (folders)
  • Checklist sticky notes
  • Lock sticky notes (password protect)
  • Markdown support
  • Send notes over local network or across the globe
  • Tag sticky notes
  • Dark mode support

Attaching sticky note to MS Word Document

With Notezilla, you can attach sticky notes to Microsoft Word documents and PDFs. This way, you will have the right information at the right time automatically, without any effort from your side. The sticky note will pop up automatically whenever you access that particular document or PDF.

This feature will help you access related information and accomplish your tasks faster and without added confusion. Moreover, you also have a wildcard (*) to support a sticky note to multiple word documents of a single folder.

Attaching a sticky note

Watch a short video on how to attach notes to Microsoft Word documents:

To stick a note to any Microsoft word document, right-click on the note title and choose the “Stick To Window” option from the menu, as shown in the below picture. Alternatively, press Ctrl+W from within the sticky note.

Stick to Window_

A list of all the currently opened windows will be shown, which includes Websites, Programs, documents. Select the Microsoft word document to which you wish to attach the sticky note, as shown in the below image and press OK. The note will stick to the particular word document.

Note: To directly stick a note to the underlying word document, Press Ctrl+Shift+W keys from the note.

Stick to Window

This is how it will appear on the Microsoft word document:

Matching only a part of the window title (Wildcards)

Notezilla uses the title of the window to show or hide a particular sticky note. Sometimes, you may want to stick a note to documents of a similar kind. In such cases, you would need to use the ‘wildcard’ method.

To match only a part of the window title, double click on any window title that is listed (shown in the above picture) and prefix or suffix the title with the * wildcard. As per this, the sticky note will appear on all the documents of a particular folder.

Also, the sticky note is just attached to the document in this system. It is not embedded in the document; therefore, it does not go along with the document if you share it with any other system or via email.

Learn more about Notezilla sticky notes app for Windows, iPhone, Android etc. Download free trial.

Subscribe to our YouTube channel for interesting videos.

Check out our other cool products.

Have a good day

Thank you :)

Attaching sticky notes to Microsoft Excel spreadsheet in Windows

Whoever you are, be it a small business, a mid-size firm, or a large business organization, you have to use Excel Spreadsheets. For tracking trends, project reports, work schedules, customer data, and other financial and marketing aspects.

For this reason, MS Excel hasn’t lost it’s importance in today’s technologically advanced world.

While we create multiple spreadsheets in Excel every day, we also have certain notes to make regarding the information or decisions relating to it. The quickest and most sought after place for these notes are sticky notes. You can quickly create a sticky note on your desktop and jot down things related to the doc.

But then, how many sticky notes will you create? And how will you find and access the required sticky note for a particular document among the hundreds of notes?

The answer to this is Notezilla sticky notes app. Why? Because of the feature to attach a sticky note to a particular document, website, folder, or program. Just create a note and attach it to the excel sheet. The note will automatically appear when you open the sheet and disappear when you are not using that sheet.

Sounds cool, right? Well, it is. Notezilla does this using the title of the Window. It associates a sticky note to the title of a particular window, and therefore this feature can work smoothly.

Moreover, you also have a wildcard (*) to support a sticky note to multiple excel spreadsheet documents of a single folder.

What is Notezilla?

Notezilla is a professional, elegant & highly rated sticky notes app for Windows & Phones (Android, iOS, iPhone, iPad, Windows Phone, etc.). It can help you organize your life by keeping all the notes, tasks & reminders that you may need when-ever and where-ever you are.

With sticky notes, you hardly have to put effort to take notes, set reminders, etc. Just jot down & move on with your task at hand. Notezilla allows you to create attractive and realistic sticky notes to make the desktop look more colorful and beautiful.

It works smoothly on both phones & tablets.

Here are some features of Notezilla:

  • Sticky notes with reminders
  • Attach sticky notes to websites, documents & folders
  • Pin sticky notes on top of other apps
  • Sync sticky notes between Windows, Android, iPhone, iPad
  • Add pictures inside sticky notes
  • Organize sticky notes inside memoboards (folders)
  • Checklist sticky notes
  • Lock sticky notes (password protect)
  • Markdown support
  • Send notes over local network or across the globe
  • Tag sticky notes
  • Dark mode support

A visual depicting how this works!

Attaching a sticky note

Watch this short video on how to attach notes to Microsoft Excel Sheets:

To stick a note to any excel spreadsheet document, right-click on the note title and choose the “Stick To Window” option from the menu, as shown in the below picture. Alternatively, press Ctrl+W from within the sticky note.

Stick to Window_

A list of all the currently opened windows will display, which includes Websites, Programs, documents. Select the excel spreadsheet document to which you wish to attach the sticky note. The note will stick to the particular excel spreadsheet document.

Stick to Window

Note: To directly stick a note to the underlying excel spreadsheet, Press Ctrl+Shift+W keys from the note.

This is how it will appear on the excel spreadsheet document:

Matching only a part of the window title (Wildcards)

As mentioned earlier, Notezilla uses the title of the window to show or hide a particular sticky note. Sometimes, you may want to stick a note to documents of a similar kind. In such cases, you would need to use the ‘wildcard’ method.

To match only a part of the window title, double click on any window title that is listed and prefix or suffix the title with the * wildcard. As per this, the sticky note will appear on all the documents of a particular folder.

So how about giving it a try today. It perfectly boosts your productivity by saving your time and efforts!

The best part of Notezilla is that it can sync notes between your mobile and PC or laptop! Therefore, you have the exact notes at both places! Try the sync feature today! You will surely love it.

Learn more about Notezilla.

Subscribe to our YouTube channel for interesting videos.

Check out our other cool products.

Have a good day!

Thanks :)