Delete only specific type of files from folder tree in Windows using Copywhiz

This post will tell how to delete certain files from specific folders without much efforts and time.

I recently came across an old folder on my system, which had a lot of my old songs and essential pictures. I don’t need the songs — just the photos.

I now had two options:

1. Go to each folder of the whole folder tree, and manually delete all the pictures.

2. Use Copywhiz, a file copy app for Windows.

What is Copywhiz?

Enhance your file-copy experience with Copywhiz as it lets you to have more flexibility & more control over the file copying and backup process. Here is how Copywhiz makes file copying a breeze:

  • Copy only new or modified files
  • Easily pick files by name, extension, folder etc from bunch of folders
  • Automatically organize files based on file attributes and metadata
  • Copy files to multiple folders/computers
  • Copy files from multiple folders and paste them at once
  • Sync files between source and destination
  • Pick files from multiple folders and compress in single .zip file
  • Schedule file backups
  • Several more hidden nuggets designed to make your file-copy task easier.

The trick is moving specific types of files (only pictures in our case) to another folder. Moving means deleting from the source folder after copying it to the destination folder. Later we can delete the destination folder. This way, we are achieving our goal to eliminate specific types of files from the whole folder tree.

Steps to delete specific type of files

Here is a short video depicting this feature:

  1. Go to Windows File Explorer, select the files from the source folder, right-click and choose Copywhiz–>Copy as shown below:

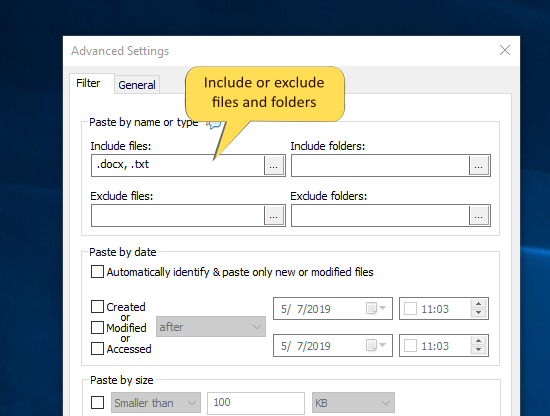
  2. Go to the destination folder, click Copywhiz–> Paste Advanced. The Copywhiz main window will open. Click on the Advanced Settings tab and type the name or type of files to copy under “Include Files.” (in our case, the file extension of the pictures)

    Tip: You can even preview the files that will be copied before actually copying them to stay safe. Just click on the “Preview” button in the bottom right corner.

    Paste-Files-By-Name-Type

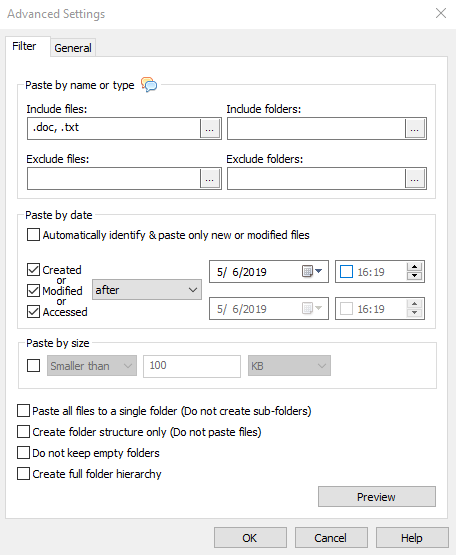
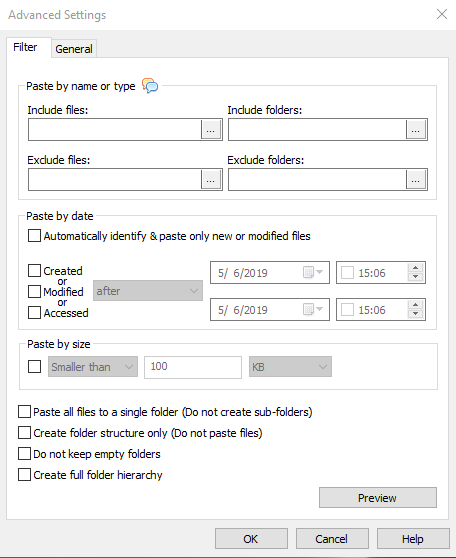
  3. Also enable the option “Paste all files to a single folder”.
    Paste-All-Files-To-A-Single-Folder
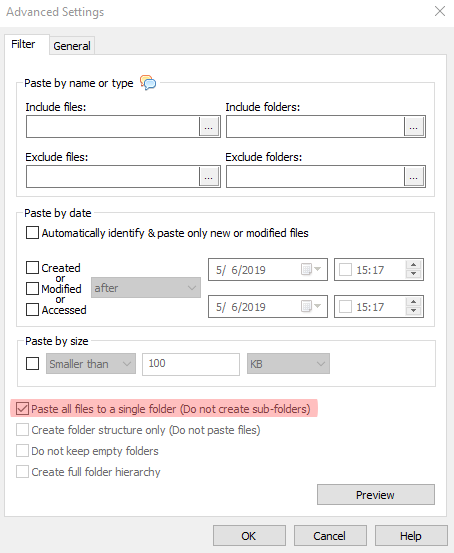
  4. Click OK. You will come back to the Copywhiz main window. Under the paste options, select, “Paste and delete original (move).” Click on “Paste Now”.
    Paste-And-Delete-Original

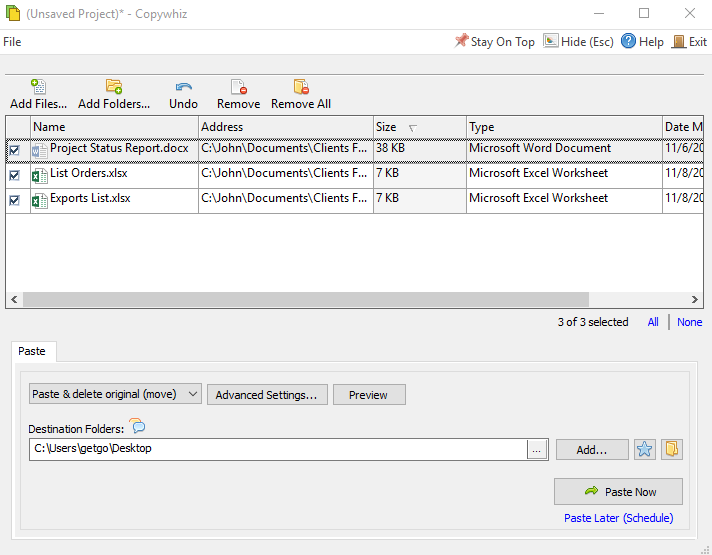
  5. Your files will be copied to the destination folder all at once and also automatically deleted from the source folder.
  6. You can now delete the destination folder since the files not required are all in that. So the source folder will be left with only the files you require.

Through this method, your important files are left untouched, and all the unwanted files deleted together! Thus Copywhiz easily helped copy my files from a large number of folders and sub-folders. Thus saving me from the tedious task of scrolling through multiple files and folders.

Learn more about Copywhiz. You can download the free trial from here.

For tutorial videos, check out this page.

Subscribe to our YouTube channel for interesting videos.

Have a good day!

Thanks for making it to the end :)

Exclude specific folders when copying files in Windows using a Robocopy alternative replacement tool

Excluding certain folders when copying files has several advantages. You can save disk space, get rid of unwanted and temporary files, and save time in copying & backing up of files. Also, handling a smaller file set is much more comfortable.

Let us see how to do this using Robocopy, and an alternative software , Copywhiz which does the same thing in a much user friendly manner.

What is Copywhiz?

Enhance your file-copy experience with Copywhiz as it lets you to have more flexibility & more control over the file copying and backup process. Here is how Copywhiz makes file copying a breeze:

  • Copy only new or modified files
  • Easily pick files by name, extension, folder etc from bunch of folders
  • Automatically organize files based on file attributes and metadata
  • Copy files to multiple folders/computers
  • Copy files from multiple folders and paste them at once
  • Sync files between source and destination
  • Pick files from multiple folders and compress in single .zip file
  • Schedule file backups
  • Several more hidden nuggets designed to make your file-copy task easier.
Screenshot_Copy_Only_Specific_Type_Of_Files

An image depicting one of the features of Copywhiz

Steps to exclude specific folders when copying files

Using Robocopy

Robocopy Source Destination/XD dirs [dirs]… command lets us to specify a list of directories (folders) containing strings to be excluded. These strings are not entered directly in the command switch. They are one or more text files that list the strings to be excluded.

For Ex: To copy files from “projects” folder to the folder “backup”, by excluding certain type of folders, say, the ones having your personal information, the following command line will be used:

Robocopy c:\projects c:\backup xd list-of-excluded-folders

But these Robocopy commands are not straightforward. System administrators may be able to use it. Robocopy is quite difficult for ordinary users. Instead, let me show you a more comfortable and faster way to do this.

Using Copywhiz

Watch a short video describing this feature:

Video Transcription

1. Go to Windows File Explorer, select the files from the source folder, right-click and choose Copywhiz–>Copy as shown below:

2. Go to the destination folder, right-click, and choose Copywhiz–> Paste Advanced. The Advanced Settings dialogue box will open.

Advanced Settings

3. You can include or exclude files/folders to be copied by typing their names, file extensions, or folder names. You can then select the “Exclude folders” option. You can also preview the list of files that will be copied and files that will be skipped by clicking on the Preview button. After confirming, press the OK button in the Advanced Settings dialog box.

Exclude-Folders

4. Click on “OK” and then “Paste Now” to complete file copying.

Conclusion

Copywhiz lets you choose which type of files to copy and which to ignore – i.e, it lets you to do ‘Selective File Copy’. Pick only those files and folders that are important and avoid the ones not required with Copywhiz. Easily filter files by name, extension, folder, etc. from a bunch of folders.

Complete big file copy tasks with just a few clicks and save manual effort with Copywhiz.

The biggest advantage of using Copywhiz is that you can take automatic backups of your files and folders! Read more about it here:

Learn more about Copywhiz.

Download the free trial from here.

For more tutorial videos, click here .

Subscribe to our YouTube channel for regular updates and interesting videos!

Check out our other cool products.

Have a good day.

Thanks for reading :)

Windows: Sending sticky notes to another computer using the IP address

This post will tell you how to send a sticky note to other PC (computers) in Windows using it’s IP address. We will be using Notezilla for this purpose.

What is Notezilla?

Notezilla is a professional, elegant & highly rated sticky notes app for Windows & Phones (Android, iOS, iPhone, iPad, Windows Phone etc). It can help you organize your life by keeping all the notes, tasks & reminders that you may need when-ever and where-ever you are.

With sticky notes you hardly have to put effort to take notes, set reminders, etc. Just jot down & move on with your task at hand. Notezilla allows you to create attractive and realistic sticky notes to make desktop look more colorful and attractive.

It works smoothly on both phones & tablets.

Here are some features of Notezilla:

  • Sticky notes with reminders
  • Attach sticky notes to websites, documents & folders
  • Pin sticky notes on top of other apps
  • Sync sticky notes between Windows, Android, iPhone, iPad
  • Add pictures inside sticky notes
  • Organize sticky notes inside memoboards (folders)
  • Checklist sticky notes
  • Lock sticky notes (password protect)
  • Markdown support
  • Send notes over local network or across the globe
  • Tag sticky notes
  • Dark mode support

Send sticky notes through LAN

One really helpful feature of Notezilla is that you can send sticky notes to any contact across the globe. Your contact may be in the same network (LAN) or over the Internet. You can also send sticky notes to a group of contacts at once.

This is easier and faster than communication through the mail. Also, to maintain privacy & security, the sticky notes will be sent internally over the local network using the recipient’s computer name or IP address.

Sending notes through the computer name is a good option when you have a lot of computers to send notes. But what if you don’t know the names of all the computers? Just specify the IP address. You may even want to send the note to a particular computer rather than one specific person. You are thereby ensuring that the note reaches the computer regardless of who is using it.

Watch a short video that shows how you can do this:

To send a Notezilla sticky note using the IP address:

  1. Select a sticky note in Notezilla, right click on its title/toolbar and choose ‘Send To->Computer’ from the menu.
  1. A ‘Computers’ window will be displayed. Click on the ‘Manage Computers’ button to add a new computer or edit the existing ones.
Computers-Window-Without-Computers
  1. Click on the ‘Add Computer’ button and add computer details in the text box. The format will be – First name, Last name, computer name. Here, instead of the computer name, you can specify IP address also.
Computers-Window-Add-Computers
  1. Click on ‘Next -> Finish’ and finally select the ‘Send Now’ option.
  2. Your sticky notes will be instantly sent to the computer(s).

Allow Notezilla through Windows Firewall

Here are some points to ensure that the sticky note reaches successfully on another PC.

Notezilla should be installed on another PC also to receive the sticky note.

If you are sending a note from Computer A to Computer B. Then Computer A should have Computer B in its computers list. It ensures that the firewall is configured correctly. On Computer B, go to a sticky note and select “Send To Computers” and ensure that you have added Computer A. Only then you must attempt to send the note from Computer A to Computer B.

To troubleshoot further, make sure to configure your PC firewall to allow the running of Notezilla. The firewall on the PC might sometimes not allow to send or receive notes.

You can search ‘firewall’ in the Windows search box, and you will see “Allow an app through Windows Firewall.” Choose this option and enable Notezilla. If Notezilla is not listed, then click on ‘Allow another app’ and add Notezilla.

If you are using any other Firewall tool (usually included with Anti-Virus software), then you will have to configure that firewall.

Make sure you do this on both sending and receiving computer.

This way your contacts will receive the sticky note right on their desktop if they are a Notezilla user. If not, they will receive the note as an email. The note will reach safely even if the receiving computer is turned off.

For more tutorial videos, check out this page.

Subscribe to our YouTube channel for interesting videos.

Check out our other cool products.

Have a good day!

Thanks for your time :)