Sync files between source and destination folders using Copywhiz for Windows

Copywhiz has recently added the feature to keep your source and destination files in sync. This means that Copywhiz will ensure that the source and destination folders are exactly the same by copying only the difference (copy only new or modified files) and also by deleting anything from the destination that has been deleted from the source folder.

What is Copywhiz?

Enhance your file-copy experience with Copywhiz as it lets you to have more flexibility & more control over the file copying and backup process. Here is how Copywhiz makes file copying a breeze:

  • Copy only new or modified files
  • Easily pick files by name, extension, folder etc from bunch of folders
  • Automatically organize files based on file attributes and metadata
  • Copy files to multiple folders/computers
  • Copy files from multiple folders and paste them at once
  • Sync files between source and destination
  • Pick files from multiple folders and compress in single .zip file
  • Schedule file backups
  • Several more hidden nuggets designed to make your file-copy task easier.

Keep source and destination folders in sync using Copywhiz

Here’s a short video on this feature:

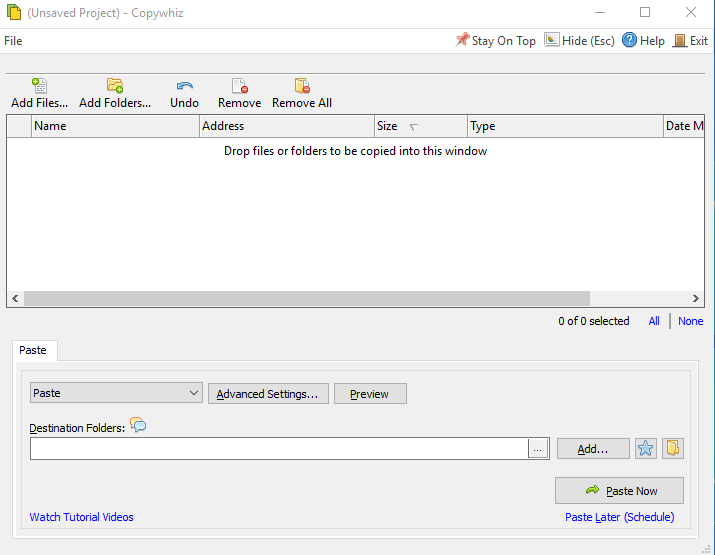
1. After you select your files in Copywhiz, go to the destination folder and Choose ‘Copywhiz -> Paste Advanced’.

2. The Copywhiz main window will open. Choose the Advanced Settings Tab from there.
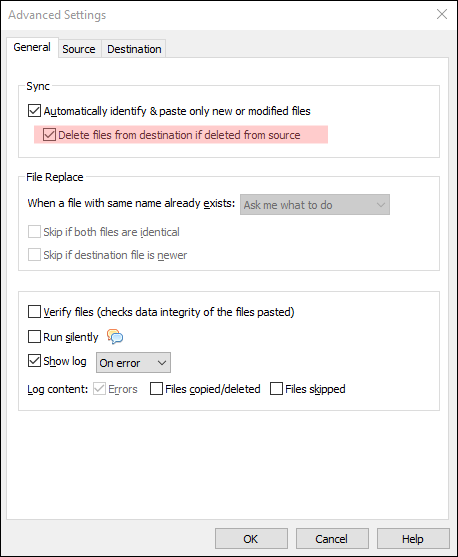
3. Go to the General Tab and choose the option ‘Automatically identify & paste only new or modified files’. After that, select the option ‘Delete files from destination if deleted from source’.
4. Click on OK and proceed with ‘Paste Now’ option. The files will be pasted and the folders will be set to sync.

5. Save the project to run it again in the future.

The next time you make any changes in the source folder, run the saved project file. The folders will sync and the changes will be reflected in the destination folder as well.

Closing comments

This is a really handy feature and very easy to understand and use.

You can also schedule automatic file backups and take incremental backups using Copywhiz.

Learn more about Copywhiz. Download the free trial from here.

For short tutorial videos, Check out this page.

Subscribe to our YouTube channel for interesting videos.

Check out our other cool products.

Have a good day!

Thanks :)
Automatically organize files in separate folders based on file attributes

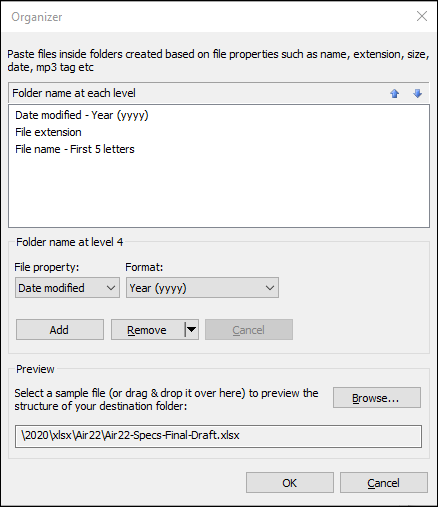
Here is an exciting feature of Copywhiz. It can now automatically copy files in a folder structure based on file properties such as file name, file extension, file type, file size, date modified/created/access and also mp3 metadata like artist, album, genre, title etc.

If you have your project documents, pictures, music files, video files scattered all over your hard drive, this tool will set it all right in few minutes.

Manually copying these files and then pasting them to folders is very time consuming, especially if they are large in number.  For this reason, we just dump these files in a few limited folders and end up in a clutter. This reduces our productivity.

What is Copywhiz?

Enhance your file-copy experience with Copywhiz as it lets you to have more flexibility & more control over the file-copying process. Here is how Copywhiz makes file copying a breeze:

  • Copy only new or modified files
  • Easily pick files by name, extension, folder etc from bunch of folders
  • Automatically organize files based on file attributes and metadata
  • Copy files to multiple folders/computers
  • Copy files from multiple folders and paste them at once
  • Sync files between source and destination
  • Pick files from multiple folders and compress in single .zip file
  • Schedule file backups
  • Several more hidden nuggets designed to make your file-copy task easier.

Organize files by attributes

Here is a short video to guide you:

  1. After you select your files in Copywhiz, go to the destination folder and Choose ‘Copywhiz -> Paste Advanced’.

2. The Copywhiz main window will open. Choose the Advanced Settings Tab from there.

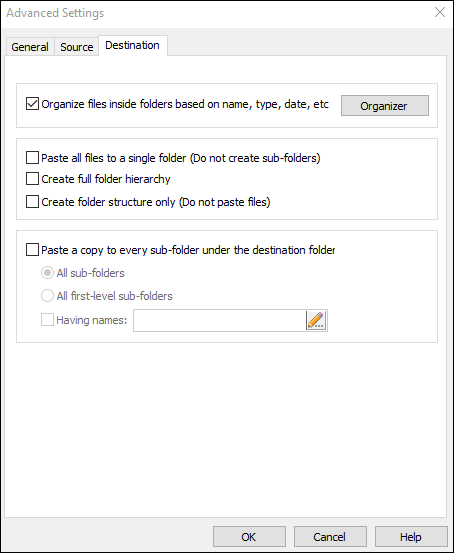
3. Go to the Destination Tab and choose the ‘Organize files inside folders based on name, type, date, etc.’ option.

4. Open the Organizer window. Choose the file property from the drop-down. You can also add multiple criteria and easily reorder, update or remove the criteria.

There is also a Preview option so you can view a sample folder structure.

5. Click on OK and proceed with ‘Paste Now’ option.

Why this feature?

This feature saves a lot of time and effort. You don’t have to sit down and sort your files anymore. Copywhiz does it for you in a matter of seconds.

You can also schedule the project to automatic organize your files at specific intervals using Copywhiz.

Learn more about Copywhiz. Download the free trial from here.

For short tutorial videos, Check out this page.

Subscribe to our YouTube channel for interesting videos.

Check out our other cool products.

Have a good day!

Thanks for reading :)

Tag files and folders directly from Windows File Explorer using RecentX

Tagging items is a great option to organize your content. The same goes for the files and folders in your system as well.

We have another good news for you. RecentX now supports tagging of files and folders directly from Windows File Explorer.

Most of us don’t tag our files and folders in Windows since either we don’t know how to or it is a complicated procedure for us.

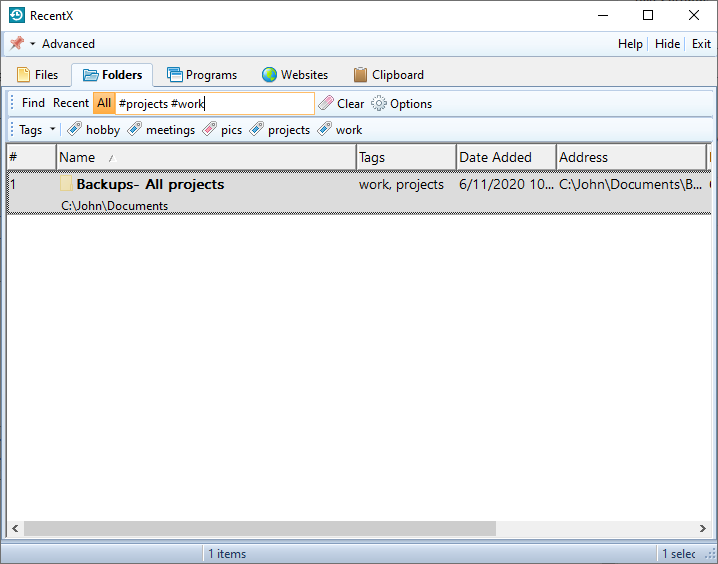
This is not the case with RecentX. Tagging anything, be it files, folders, programs, website history, or clipboard history, is smooth.

Read this blog post for more clarity:

This post will provide you more details into this.

What is RecentX?

RecentX is a smart launcher for Windows designed to make your computing life joyful. Here are some of the many cool things you can do with RecentX:

  1. Effortlessly access any file, folder or program on Windows in less than 5 seconds!
  2. Assign tags to frequently used files/folders. Makes things even faster.
  3. Integrates with Windows File open/save window so that you don’t have to navigate any folder when opening or saving a document.
  4. It has a clipboard manager too that remembers all the text & pictures copied to a clipboard so that you can quickly pick & paste them again.
Tags

Tagging Files & Folders

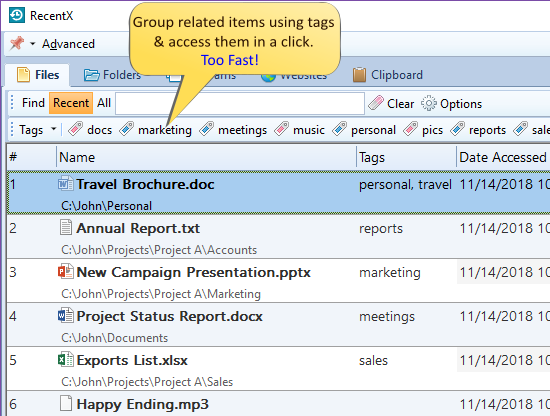
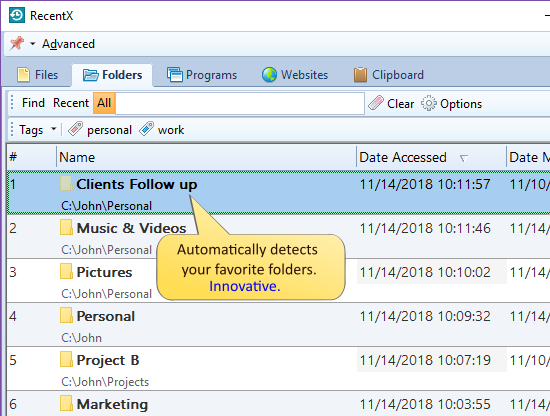
Tags or labels are one of the most used features of RecentX because you can easily group items based on projects, topics, etc.

Here’s a short video depicting this feature:

These are the steps to tag files and folders directly from Windows file explorer, using RecentX:

  1. Go to Windows File Explorer.
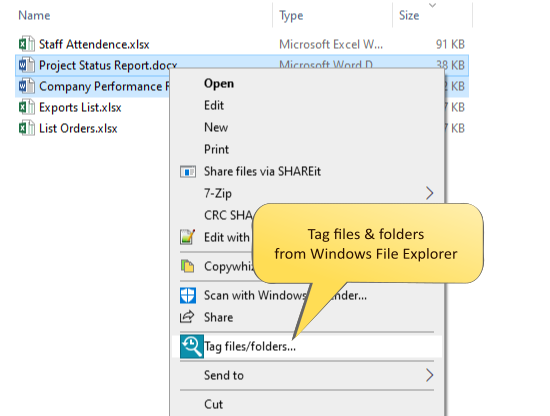
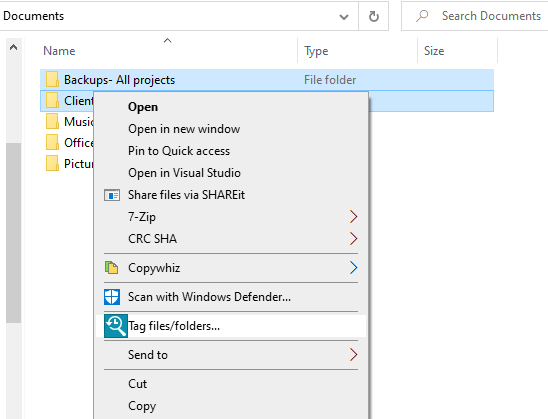
  2. Right-click on the file(s) you wish to tag and choose the ‘Tag files/folders’ option.

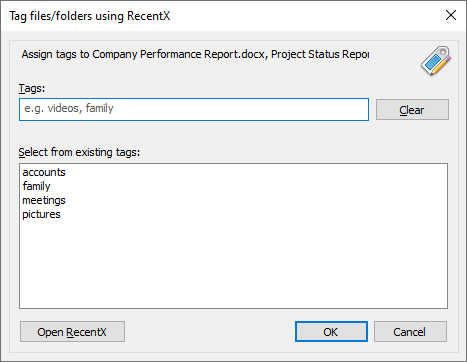
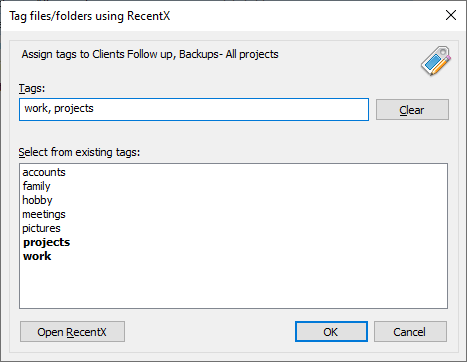
3. The RecentX Tags window will open where you can assign tags.

4. Click on ‘OK’ and the tag will be assigned immediately.

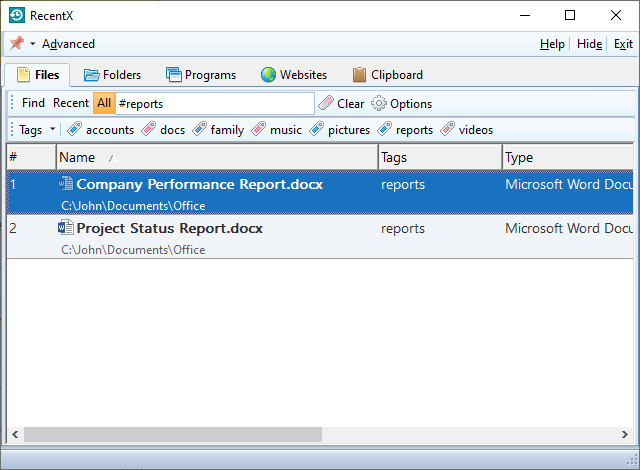
5. You can go to RecentX and click on the tags to find your files there.

Tagging folders is also done in the same way as files.

An easier way to tag files and folders is to drag and drop it from within RecentX over the tag button to assign that tag. You can also drag and drop from Windows File Explorer over the tag button to assign that tag.

Why RecentX?

You now have seen how easy it is to assign tags using RecentX. Unlike Windows, the procedure is much simpler.

Another limitation that Windows has is that it only permits tagging of images, videos, and documents. You might not see the tagging option even on supported file types on rare occasions, depending on the file format.

Also, if you use a different file system, or transfer or shift your files to other computers or external hard drives and thumb drives, then the tags do not stay. Tagging of folders is also not supported in Windows.

All these factors make RecentX a good alternative to Windows File Explorer when you want to tag files and folders.

Another cool thing about RecentX is that it allows searching by multiple tags also. Hold the Ctrl key and select the second tag button from the toolbar in RecentX. You will see the second tag being added automatically.

Download RecentX for free, from here.

For tutorial videos, check out this page.

Check out our YouTube channel.

Have a good day.

Thanks for reading :)

RecentX update: Dark mode introduced!

We love using apps in dark mode. Apps like Twitter, Instagram and even YouTube have rolled out dark modes.

I think we all can agree that there is something really soothing and visually appealing about the dark mode. It also gives relief to our eyes that might get strained looking at the bright light of our PC and mobile screens. Another good thing is that dark mode reduces battery usage of devices and therefore ensures longer battery life.

Joining this trend is RecentX. After requests from users, we have finally introduced a dark mode option in RecentX.

What is RecentX?

RecentX is a smart launcher for Windows designed to make your computing life joyful. Here are some of the many cool things you can do with RecentX:

  1. Effortlessly access any file, folder or program on Windows in less than 5 seconds!
  2. Assign tags to frequently used files/folders. Makes things even faster.
  3. Integrates with Windows File open/save window so that you don’t have to navigate any folder when opening or saving a document.
  4. It has a clipboard manager too that remembers all the text & pictures copied to a clipboard so that you can quickly pick & paste them again.
This is how it will look

How to activate dark mode?

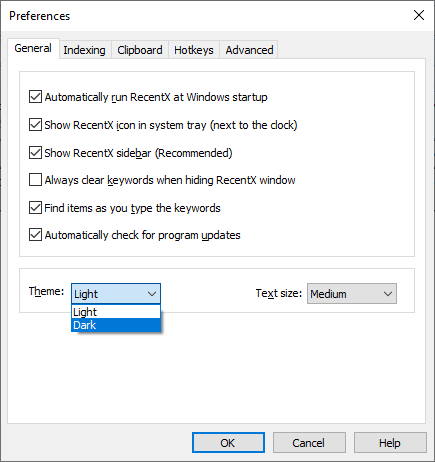
Open the RecentX Window and go to the ‘Advanced’ tab on the top.

Select the ‘Preferences’ option and you will find the setting there.

You can switch back to the normal light mode anytime.

Hope you enjoy using RecentX even more after this update.

Download RecentX for free, from here.

For tutorial videos, check out this page.

Check out our YouTube channel.

Have a good day.

Thanks for your time :)

Tag/label folders in Windows using a Windows File Explorer alternative

We have hundreds of folders in our systems. And it gets really hectic to look for specific files lost somewhere in the lot.

Tagging folders is therefore what i would suggest. Just like how you tag files, tagging folders will help you stay organized and makes things more accessible.

In our previous post, we gave steps on how to tag files directly from Windows File explorer, using RecentX, and why it is better than Windows.

Windows offers the ability to tag files. But it only permits tagging of images, videos, and documents. You cannot tag any other type of file in Windows. Plus Windows doesn’t let you tag a folder.

This post will show you how you can tag folders in Windows using the Windows File Explorer and an alternative software, RecentX. RecentX lets you tag any file or folder. This is the most important difference between RecentX and Windows tagging system.

This post will tell you how to tag folders directly from File Explorer using RecentX. You will be able tag even files in the same way.

What is RecentX?

RecentX is a smart launcher for Windows designed to make your computing life joyful. Here are some of the many cool things you can do with RecentX:

  1. Effortlessly access any file, folder or program on Windows in less than 5 seconds!
  2. Assign tags to frequently used files/folders. Makes things even faster.
  3. Integrates with Windows File open/save window so that you don’t have to navigate any folder when opening or saving a document.
  4. It has a clipboard manager too that remembers all the text & pictures copied to a clipboard so that you can quickly pick & paste them again.
Folder Launcher

Tagging folders using Windows File Explorer

Sadly, Windows does not have a direct way to tag folders. You have to use third party apps to do that.

But don’t worry. RecentX has you covered.

Tagging folders from Windows File Explorer using RecentX

Here’s a short video about this feature:

Here are the steps to follow:

  1. Go to Windows File Explorer.
  2. Right-click on the folder(s) you wish to tag and choose the ‘Tag files/folders’ option.

3. The RecentX Tags window will open where you can assign tags.

Click on ‘OK’ and the tag will be assigned immediately.

5. You can go to RecentX and click on the tags to find your files there.

We also have an easier way to tag whereby you can drag and drop the folders from within RecentX over the tag button or drag and drop from Windows File Explorer over the tag button to assign that tag.

Conclusion

Tagging things with RecentX is fast and easy. All your items can be accessed quickly.

You can do a lot more with RecentX. It has amazing features you should definitely try.

Another cool thing about RecentX is that it allows searching by multiple tags also. Hold the Ctrl key and select the second tag button from the toolbar in RecentX. You will see the second tag being added automatically.

Download RecentX for free, from here.

For tutorial videos, check out this page.

Check out our YouTube channel.

Have a good day.

Thank you :)

Tag/label files in Windows using a Windows File Explorer alternative

Tags or labels are very important when working with files. They help you stay organized and increase productivity by saving your time and effort on looking for things.

We know that Windows offers the ability to tag files. But it only permits tagging of images, videos, and documents. You cannot tag any file in Windows. Plus Windows doesn’t let you tag a folder.

This post will show you how you can tag files in Windows using the Windows File Explorer and an alternative software, RecentX. RecentX lets you tag any file or folder. This is the most important difference.

What is RecentX?

RecentX is a smart launcher for Windows designed to make your computing life joyful. Here are some of the many cool things you can do with RecentX:

  1. Effortlessly access any file, folder or program on Windows in less than 5 seconds!
  2. Assign tags to frequently used files/folders. Makes things even faster.
  3. Integrates with Windows File open/save window so that you don’t have to navigate any folder when opening or saving a document.
  4. It has a clipboard manager too that remembers all the text & pictures copied to a clipboard so that you can quickly pick & paste them again.
Tags

Tagging files using Windows File Explorer

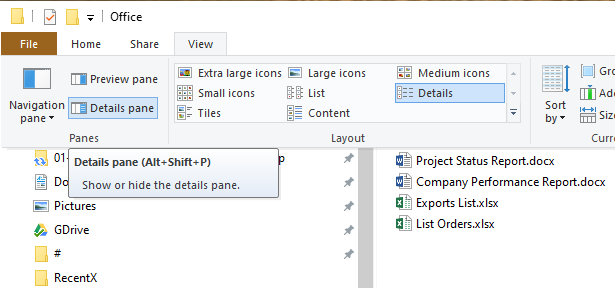
Windows has two methods to tag files. One is from the Properties Windows and the other from the Details Pane.

Since tagging from the Details Pane is a bit easier than the former, we will see the steps for this.

  1. Open the File Explorer using the keyboard shortcut ‘Windows+E’.
  2. In the File Explorer click on the “View” tab and select the “Details Pane” option from the navigation pane. The Details pane will appear on the right side of the File Explorer.

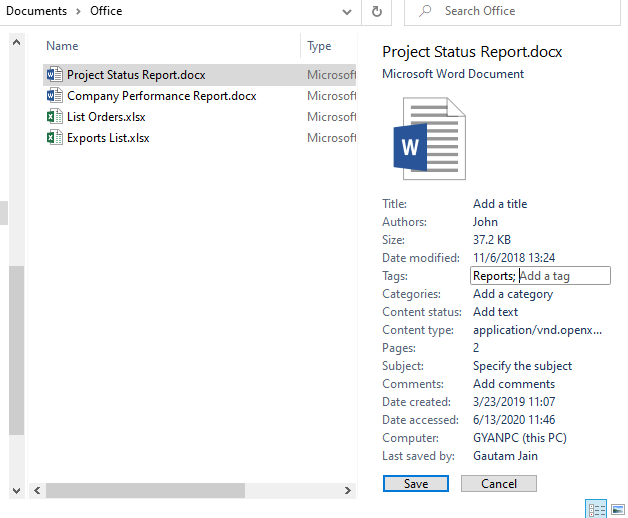
3. To tag a file, select the file from the main window and then add tags in the Tags field appearing in the Details panel. Click on Save.

That’s it.

Tagging files from Windows File Explorer using RecentX

Before we look at the steps, here’s a short video depicting the steps:

Let us look at the steps to do this using RecentX:

  1. Go to Windows File Explorer.
  2. Right-click on the file(s) you wish to tag and choose the ‘Tag files/folders’ option.

3. The RecentX Tags window will open where you can assign tags.

4. Click on ‘OK’ and the tag will be assigned immediately.

5. You can go to RecentX and click on the tags to find your files there.

We also have an easier way to tag whereby you can drag and drop the files from within RecentX over the tag button or drag and drop from Windows File Explorer over the tag button to assign that tag.

Our Verdict

Both Windows and RecentX have minimal steps to tag files.

However, there’s a twist here. Windows has a limitation so it only permits tagging of images, videos, and documents. You might not see the tagging option even on supported file types on rare occasions, depending on the file format.

Also, if you use a different file system, or transfer or shift your files to other computers or external hard drives and thumb drives, then the tags are removed.

Thereby, we would definitely go with something reliable like RecentX.

Another cool thing about RecentX is that it allows searching by multiple tags also. Hold the Ctrl key and select the second tag button from the toolbar in RecentX. You will see the second tag being added automatically.

Download RecentX for free, from here.

For tutorial videos, check out this page.

Check out our YouTube channel.

Have a good day.

Thanks for your time :)

Windows app to popup a reminder message at specific intervals

Missing deadlines and schedules is something every person dreads. One missed deadline can cause serious loss. Therefore it is really important to set reminders so as not to miss any deadline.

Today’s post will tell you how you can set reminder messages to pop-up on your PC at the scheduled time. Not just that, the reminders will also repeat at specific intervals if you set it up to.

We will see how to do that using the Task Scheduler and an alternative app- Notezilla sticky notes for Windows.

What is Notezilla?

Notezilla is a professional, elegant & highly rated sticky notes app for Windows & Phones (Android, iOS, iPhone, iPad, Windows Phone, etc.). It can help you organize your life by keeping all the notes, tasks & reminders that you may need when-ever and where-ever you are.

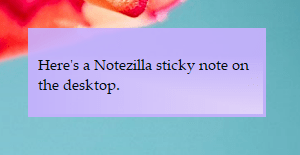
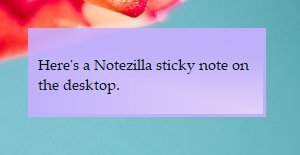
With sticky notes, you hardly have to put effort to take notes, set reminders, etc. Just jot down & move on with your task at hand. Notezilla allows you to create attractive and realistic sticky notes to make the desktop look more colorful and beautiful.

It works smoothly on both phones & tablets.

Here are some features of Notezilla:

  • Sticky notes with reminders
  • Attach sticky notes to websites, documents & folders
  • Pin sticky notes on top of other apps
  • Sync sticky notes between Windows, Android, iPhone, iPad
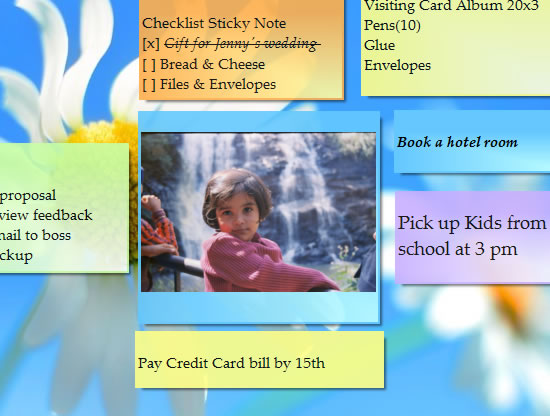
  • Add pictures inside sticky notes
  • Organize sticky notes inside memoboards (folders)
  • Checklist sticky notes
  • Lock sticky notes (password protect)
  • Markdown support
  • Send notes over local network or across the globe
  • Tag sticky notes
  • Dark mode support
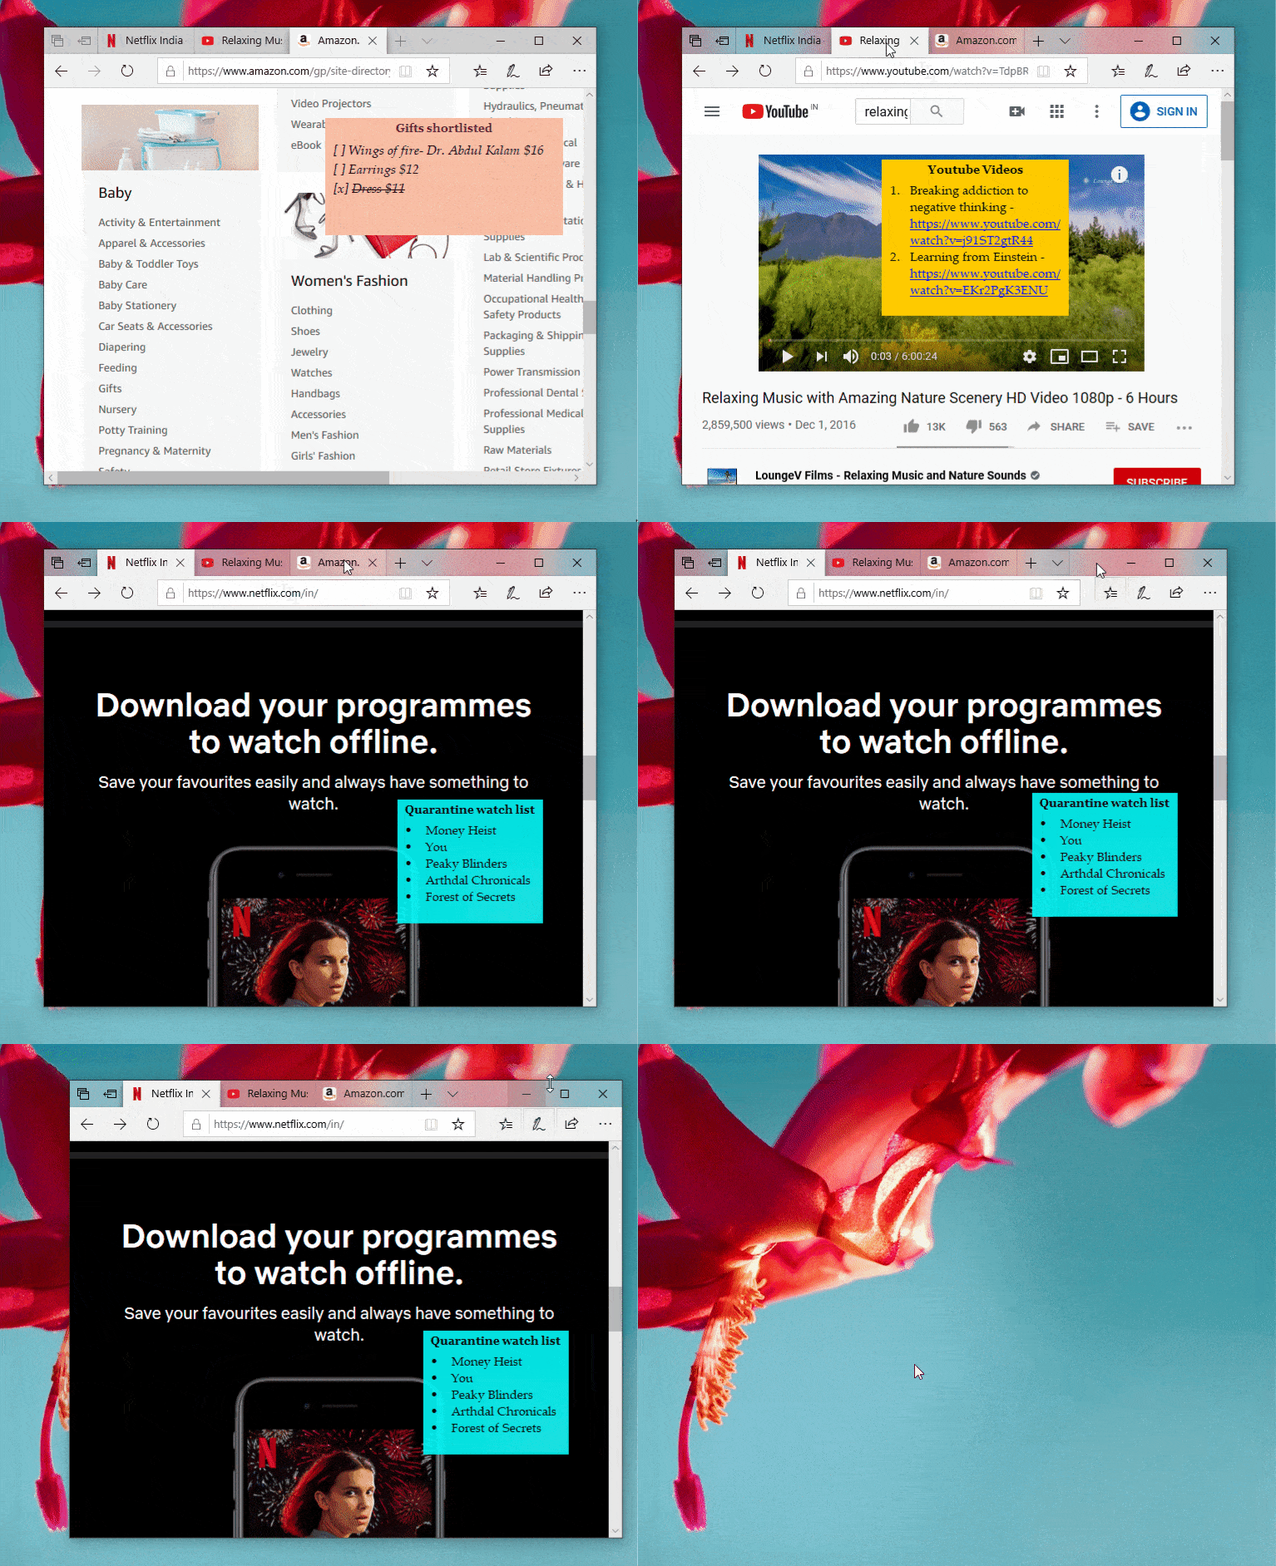
Insert Pictures Inside Sticky Notes

Windows Task Scheduler

Windows task scheduler is a free tool to create and run tasks and is inbuilt in your Windows PC. With this, you can start a program, run commands and execute scripts at a specific time.

Reminder message at specific intervals using Notezilla

  1. Create a Notezilla sticky note.

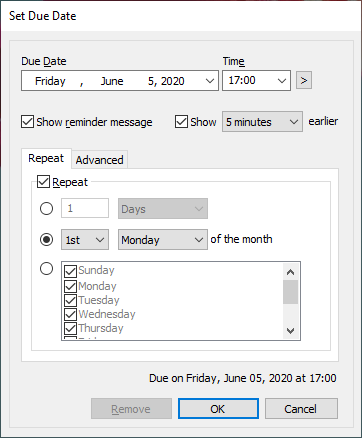
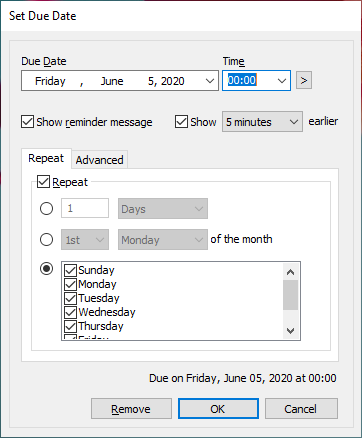
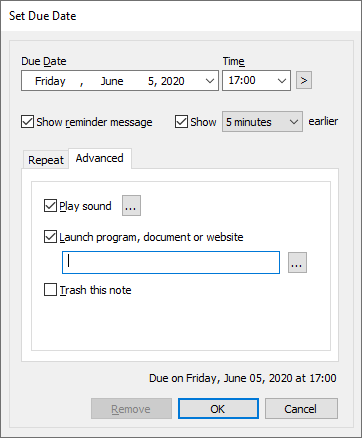
2. To set a reminder, right-click on the note title or note toolbar and choose Due Date from the menu. For faster access, press the shortcut key Ctrl+R. Add a reminder to this sticky note.

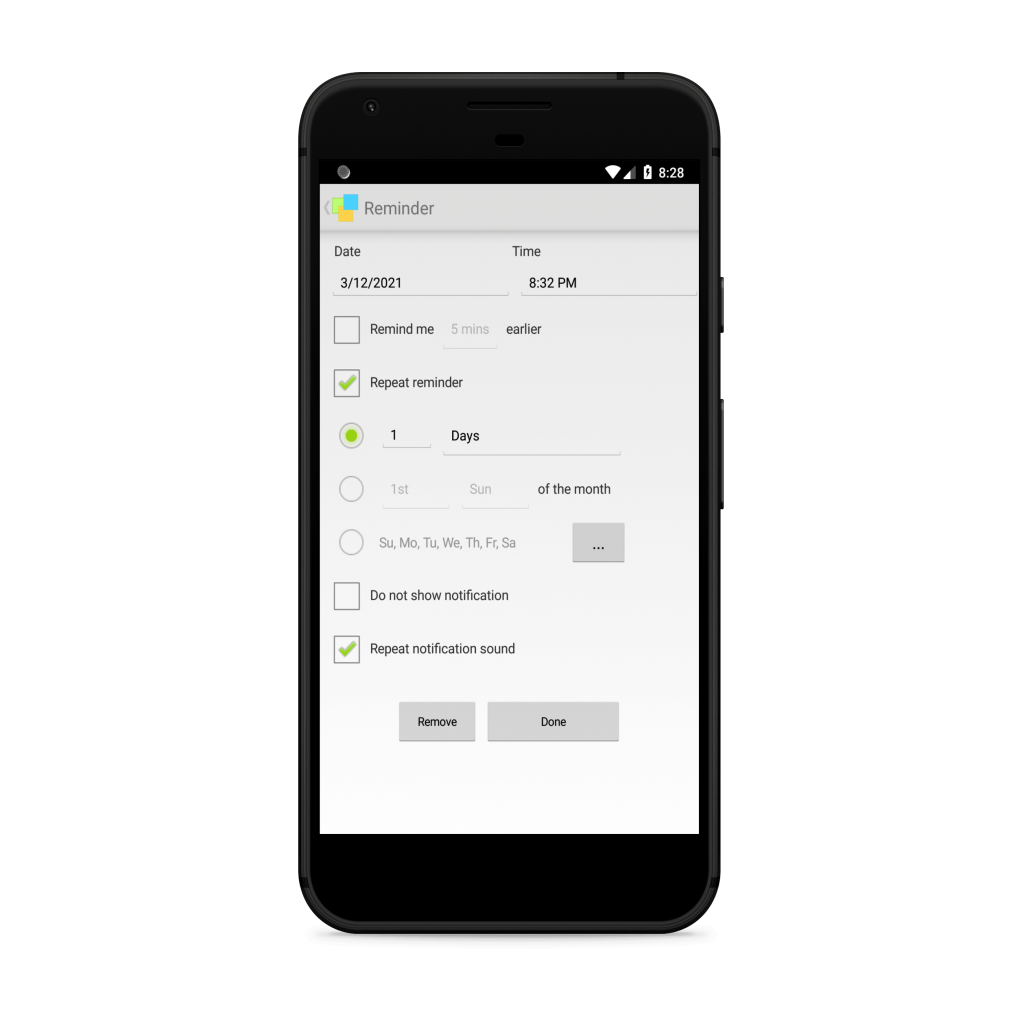
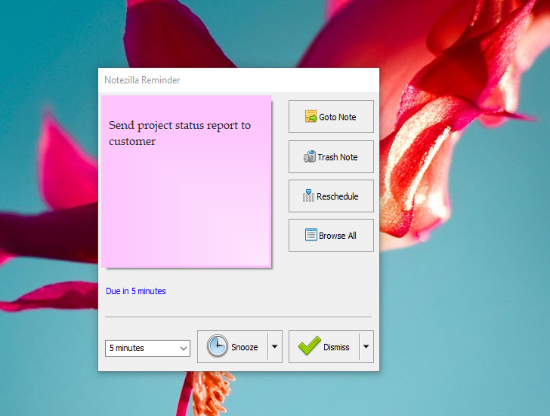
3. Click OK. The reminder alarm will pop-up at the specified time . You can also set the reminder to repeat at your desired time.

We also have a short video regarding this feature:

Reminder message at specific intervals using Notezilla

1.Search for ‘Task Scheduler’ in the Windows search bar and open it.

2. Under the ‘Actions’ section, choose ‘ Create Basic Task’.

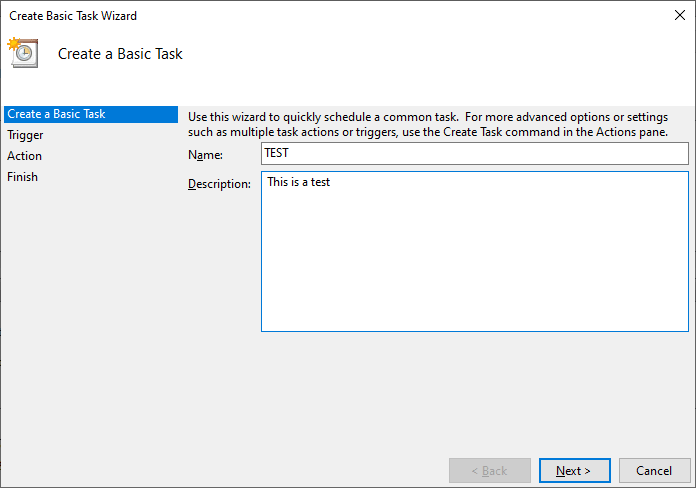
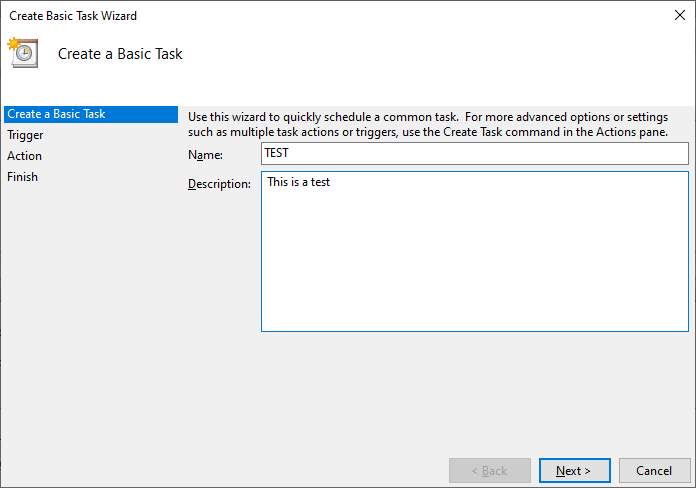
3. Give your task a name and a description(optional) and click Next.

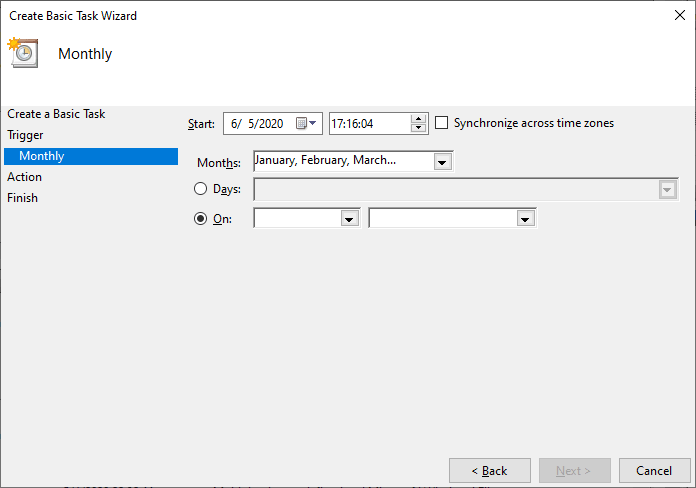
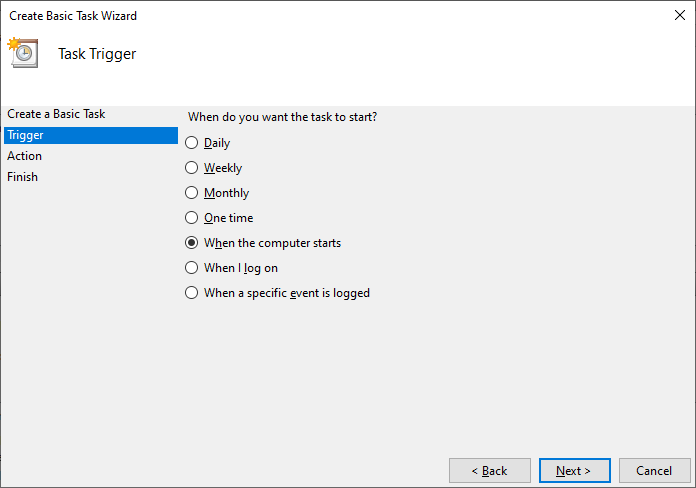
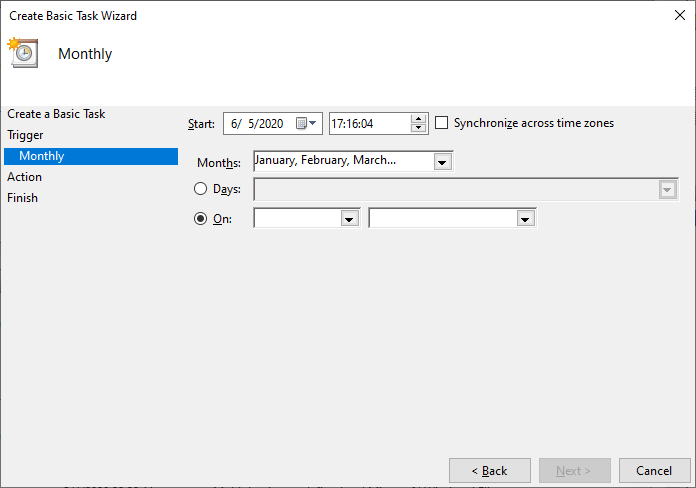
4. Choose the Trigger frequency. This basically means choosing when you want to start the task. Here, you can also choose to set repeat trigger. Click Next.

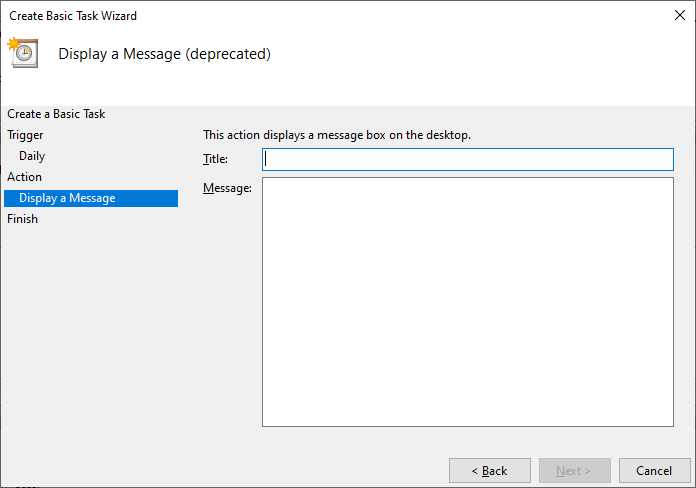
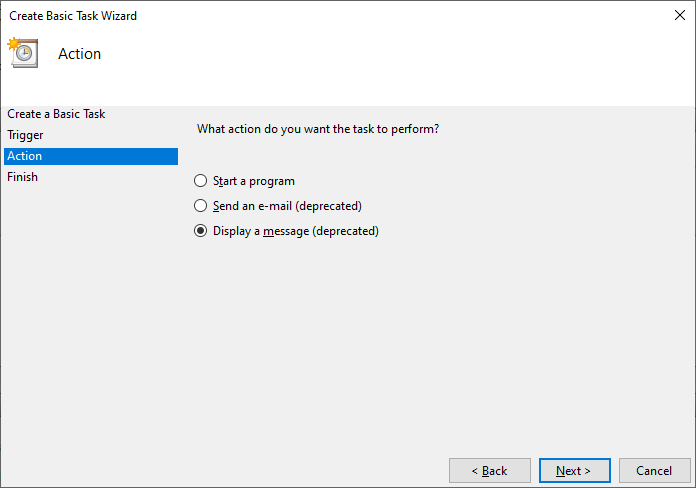
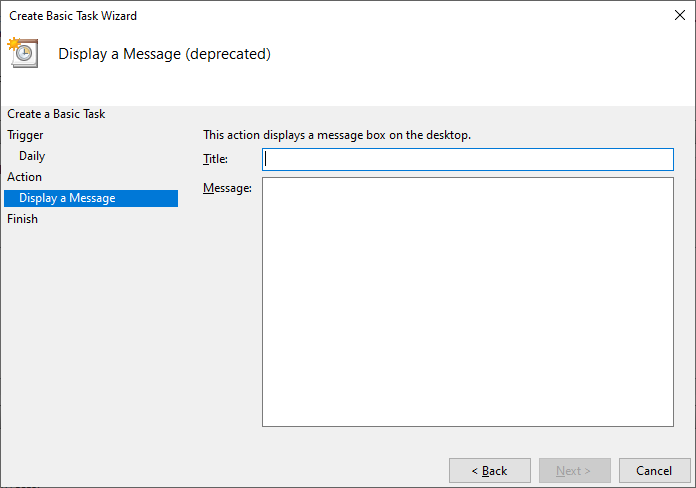
5. Choose the action you wish to perform. In this case, it is ‘Display a message (deprecated)’.

6. Click on Finish and you are all set.

To Conclude

The Task Scheduler is free and inbuilt in your system. But not many people are even aware of its existence. It actually takes a lot of time and effort to configure for the simple reason that it has multiple windows you need to go through.

Also, it is a deprecated feature. So it may or may not function because it is no longer supported by Microsoft.

Notezilla is simple and quick to configure. You can set reminders and move on with your work. No worries, no errors.

So how about giving it a try today. It’s free and also perfectly boosts your productivity by saving your time and efforts!

The best part of Notezilla is that it can sync notes between your mobile and PC or laptop! Therefore, you have reminders even on your phone.

Go download it from the Play store or app store today and sync all your sticky notes with the Windows version of Notezilla.

Learn more about Notezilla.

Subscribe to our YouTube channel for interesting videos.

Check out our other cool products.

Have a good day!

Thanks :)
Windows app to popup a reminder message at startup/logon

This article will show you how to set a reminder message to pop-up on your desktop as soon as you startup or log-on to your PC.

We will see how to do this using two apps- Task Scheduler and an alternative app, Notezilla sticky notes for Windows.

What is Notezilla?

Notezilla is a professional, elegant & highly rated sticky notes app for Windows & Phones (Android, iOS, iPhone, iPad, Windows Phone, etc.). It can help you organize your life by keeping all the notes, tasks & reminders that you may need when-ever and where-ever you are.

With sticky notes, you hardly have to put effort to take notes, set reminders, etc. Just jot down & move on with your task at hand. Notezilla allows you to create attractive and realistic sticky notes to make the desktop look more colorful and beautiful.

It works smoothly on both phones & tablets.

Here are some features of Notezilla:

  • Sticky notes with reminders
  • Attach sticky notes to websites, documents & folders
  • Pin sticky notes on top of other apps
  • Sync sticky notes between Windows, Android, iPhone, iPad
  • Add pictures inside sticky notes
  • Organize sticky notes inside memoboards (folders)
  • Checklist sticky notes
  • Lock sticky notes (password protect)
  • Markdown support
  • Send notes over local network or across the globe
  • Tag sticky notes
  • Dark mode support
Screenshot_Sticky_Note_Reminder_Window

Windows Task Scheduler

Windows task scheduler is a free tool to create and run tasks and is inbuilt in your Windows PC. With this, you can start a program, run commands and execute scripts at a specific time.

Pop-up a reminder message at Startup using Notezilla

Notezilla does not have a direct option for this but you can still set it up easily to receive reminders when you start your system for the day.

Here are the steps:

  1. Create a Notezilla sticky note.

2. Add a reminder to this sticky note. Set the reminder time to midnight and click OK.

3. You can also set the reminder to repeat at the specific time like everyday or first Monday of the Month etc.

Tip: If you want to configure it to start when you log-in to your system, just mention a time when your system will be switched off. When you log-in later, the reminder will launch.

Pop-up a reminder message at Startup using Task Scheduler

The Task Scheduler has a direct option for this, but you need to go through multiple steps to configure it:

1.Search for ‘Task Scheduler’ in the Windows search bar and open it.

2. Under the ‘Actions’ section, choose ‘ Create Basic Task’.

3. Give your task a name and a description(optional) and click Next.

4. Choose the Trigger frequency. This basically means choosing when you want to start the task. Here, you can also choose to set repeat trigger. Click Next.

5. Choose the action you wish to perform at the set time. In this case, select ‘Display a message (deprecated)’. Click Next.

6. Type the message you want to be displayed on the desktop screen and click Next.

6. Click on Finish and you are all set.

Conclusion

As you can see, the Task Scheduler takes multiple steps to configure the message and thereby takes a lot of time and effort. Also, the feature is a deprecated feature. This means that it may or may not function because it is no longer supported by Microsoft. If you are using it, you are taking a chance.

Notezilla on the other hand, is reliable, simple and quick to configure. All the options are under a single window so you do not have to go back and forth through multiple windows.

So how about giving it a try today. It’s free and also perfectly boosts your productivity by saving your time and efforts!

The best part of Notezilla is that it can sync notes between your mobile and PC or laptop! Therefore, you have the reminders even on your phone!

Go download it from the Play store or app store today and sync all your sticky notes with the Windows version of Notezilla.

Learn more about Notezilla.

Subscribe to our YouTube channel for interesting videos.

Check out our other cool products.

Have a good day!

Thank you :)

Windows app to popup a reminder message at specific time

It’s really important to set reminders for our tasks so we don’t miss our deadlines and stay on track.

I earlier used to use the Task Scheduler inbuilt in my Windows PC to display a message on my desktop at the specified time. It is also free.

But then i moved on to a much easier and faster app- Notezilla sticky notes for Windows.

Why? Let me explain the steps to set reminders at specific time using both the above apps and you will understand it clearly.

What is Notezilla?

Notezilla is a professional, elegant & highly rated sticky notes app for Windows & Phones (Android, iOS, iPhone, iPad, Windows Phone, etc.). It can help you organize your life by keeping all the notes, tasks & reminders that you may need when-ever and where-ever you are.

With sticky notes, you hardly have to put effort to take notes, set reminders, etc. Just jot down & move on with your task at hand. Notezilla allows you to create attractive and realistic sticky notes to make the desktop look more colorful and beautiful.

It works smoothly on both phones & tablets.

Here are some features of Notezilla:

  • Sticky notes with reminders
  • Attach sticky notes to websites, documents & folders
  • Pin sticky notes on top of other apps
  • Sync sticky notes between Windows, Android, iPhone, iPad
  • Add pictures inside sticky notes
  • Organize sticky notes inside memoboards (folders)
  • Checklist sticky notes
  • Lock sticky notes (password protect)
  • Markdown support
  • Send notes over local network or across the globe
  • Tag sticky notes
  • Dark mode support
Screenshot_Sticky_Note_Reminder_Window

Reminder message at specific time using Notezilla

  1. Create a Notezilla sticky note.

2. To set a reminder, right-click on the note title or note toolbar and choose Due Date from the menu. For faster access, press the shortcut key Ctrl+R. Add a reminder to this sticky note.

3. Click OK. The reminder alarm will pop-up at the specified time . You can also set the reminder to repeat at your desired time.

Tip: You can also run a program automatically at a specific time through these reminders.

Reminder message at specific time using Task Scheduler

1.Search for ‘Task Scheduler’ in the Windows search bar and open it.

2. Under the ‘Actions’ section, choose ‘ Create Basic Task’.

3. Give your task a name and a description(optional) and click Next.

4. Choose the Trigger frequency. This basically means choosing when you want to start the task. Here, you can also choose to set repeat trigger. Click Next.

5. Choose the action you wish to perform. In this case, it is ‘Display a message (deprecated)’.

6. Click on Finish and you are all set.

Closing comments

Even though the Task Scheduler is free and inbuilt in your system, not many people are aware of its existence. It is not used that often for the simple reasons that it is confusing with multiple windows and steps to configure.

Also, two features- the reminder and email features are deprecated features. That means they may or may not function because they are no longer supported by Microsoft.

Therefore it is better to go for something more trustworthy like Notezilla. Notezilla’s reminders work perfectly and is easy to configure under a single window. It also has other amazing features like sync, password protect notes, insert pictures in notes, attach sticky notes to websites, documents etc.

So how about giving it a try today. It’s free and also perfectly boosts your productivity by saving your time and efforts!

Learn more about Notezilla.

Subscribe to our YouTube channel for interesting videos.

Check out our other cool products.

Have a good day!

Thanks for your time :)

Windows app to run a program automatically at specific intervals

For our work, we frequently access certain programs regularly and sometimes at the same time. Example, taking file backups or updating your drive with latest changes. For such repeated tasks, it is wise to schedule your system to automatically run the program at the mentioned time.

There are many tools that can do this. One of them is the Task Scheduler of Windows which is free and inbuilt in your Windows PC. But most of these tools are often confusing with multiple steps required to set up.

This article will tell you how you can do this easily and quickly using the Notezilla sticky notes app for Windows. We will also list the steps using the Task Scheduler and then let you decide which to choose.

What is Notezilla?

Notezilla is a professional, elegant & highly rated sticky notes app for Windows & Phones (Android, iOS, iPhone, iPad, Windows Phone, etc.). It can help you organize your life by keeping all the notes, tasks & reminders that you may need when-ever and where-ever you are.

With sticky notes, you hardly have to put effort to take notes, set reminders, etc. Just jot down & move on with your task at hand. Notezilla allows you to create attractive and realistic sticky notes to make the desktop look more colorful and beautiful.

It works smoothly on both phones & tablets.

Here are some features of Notezilla:

  • Sticky notes with reminders
  • Attach sticky notes to websites, documents & folders
  • Pin sticky notes on top of other apps
  • Sync sticky notes between Windows, Android, iPhone, iPad
  • Add pictures inside sticky notes
  • Organize sticky notes inside memoboards (folders)
  • Checklist sticky notes
  • Lock sticky notes (password protect)
  • Markdown support
  • Send notes over local network or across the globe
  • Tag sticky notes
  • Dark mode support

Schedule programs to run automatically using Notezilla

There is no particular option in Notezilla to do this but you can quickly configure it using the reminder feature of Notezilla sticky notes.

Following are the steps to follow:

  1. Create a Notezilla sticky note.

2. Add a reminder to this sticky note. Set the repeat frequency for the reminder. You can customize the repeat using the options given.

3. Go the the Advanced tab of this reminder window and choose the option ‘Launch program, document or website.’

4. Type the program name or browse and choose the program and click OK.

5. The reminder alarm will pop-up at the specified time and the program will also launch along with it. Since it’s a repeat reminder, the program will launch at specific intervals.

Using the Task Scheduler

1.Search for ‘Task Scheduler’ in the Windows search bar and open it.

2. Under the ‘Actions’ section, choose ‘ Create Basic Task’.

3. Give your task a name and a description(optional) and click Next.

4. Choose the Trigger frequency. This basically means choosing when you want to start the task. Here, you can also choose to set repeat trigger. Click Next.

5. Type or browse the program you wish to launch and click Next.

6. Click on Finish and you are all set.

To Conclude:

You now have read the steps of both the apps. The choice is now yours. Would you chose an app like the Task Scheduler that involves multiple steps and going through multiple windows or a simple and easy app like Notezilla that can be configured in just a few clicks in a single window?

Here’s another cool thing you can do with Notezilla- schedule a program to run at startup. When you switch on your system, the program will launch.

Although there’s no direct option for this, we do have a simple hack. Just set the reminder time for the sticky note to midnight. So when you turn on your PC in the morning, the reminder will immediately pop-up along with the specified program.

So how about giving it a try today. It’s free and also perfectly boosts your productivity by saving your time and efforts!

Learn more about Notezilla.

Subscribe to our YouTube channel for interesting videos.

Check out our other cool products.

Have a good day!

Thanks for reading till the end :)