Tags or labels are very important when working with files. They help you stay organized and increase productivity by saving your time and effort on looking for things.
We know that Windows offers the ability to tag files. But it only permits tagging of images, videos, and documents. You cannot tag any file in Windows. Plus Windows doesn’t let you tag a folder.
This post will show you how you can tag files in Windows using the Windows File Explorer and an alternative software, RecentX. RecentX lets you tag any file or folder. This is the most important difference.
What is RecentX?
RecentX is a smart launcher for Windows designed to make your computing life joyful. Here are some of the many cool things you can do with RecentX:
- Effortlessly access any file, folder or program on Windows in less than 5 seconds!
- Assign tags to frequently used files/folders. Makes things even faster.
- Integrates with Windows File open/save window so that you don’t have to navigate any folder when opening or saving a document.
- It has a clipboard manager too that remembers all the text & pictures copied to a clipboard so that you can quickly pick & paste them again.
Tagging files using Windows File Explorer
Windows has two methods to tag files. One is from the Properties Windows and the other from the Details Pane.
Since tagging from the Details Pane is a bit easier than the former, we will see the steps for this.
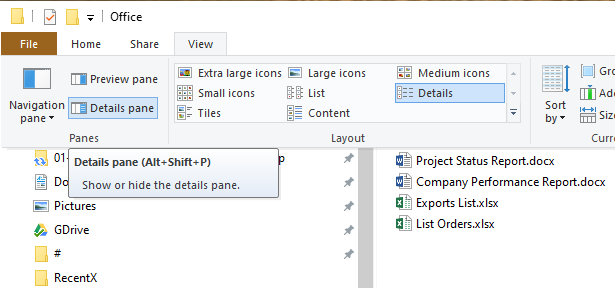
- Open the File Explorer using the keyboard shortcut ‘Windows+E’.
- In the File Explorer click on the “View” tab and select the “Details Pane” option from the navigation pane. The Details pane will appear on the right side of the File Explorer.
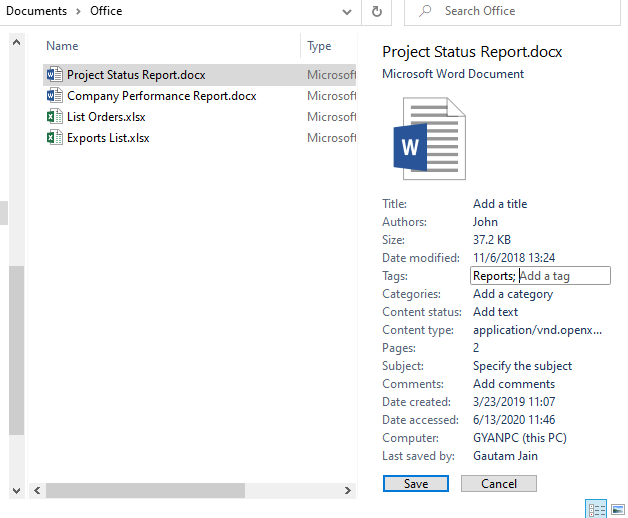
3. To tag a file, select the file from the main window and then add tags in the Tags field appearing in the Details panel. Click on Save.
That’s it.
Tagging files from Windows File Explorer using RecentX
Before we look at the steps, here’s a short video depicting the steps:
Let us look at the steps to do this using RecentX:
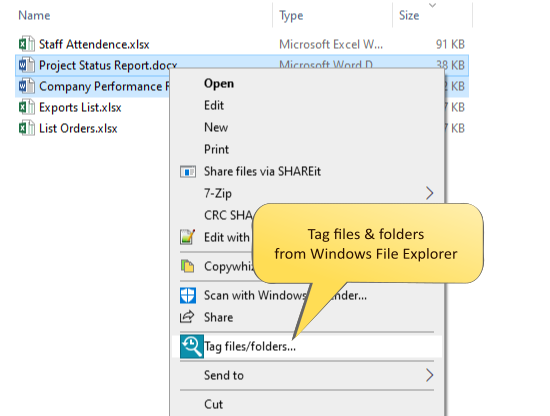
- Go to Windows File Explorer.
- Right-click on the file(s) you wish to tag and choose the ‘Tag files/folders’ option.
3. The RecentX Tags window will open where you can assign tags.
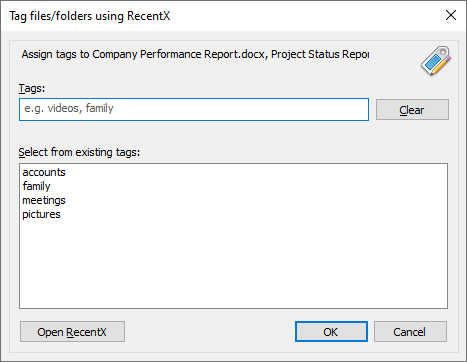
4. Click on ‘OK’ and the tag will be assigned immediately.
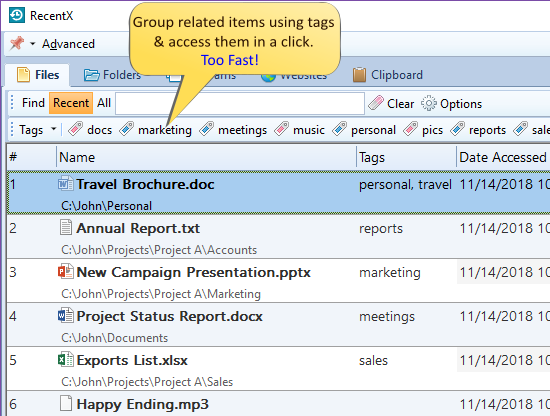
5. You can go to RecentX and click on the tags to find your files there.

We also have an easier way to tag whereby you can drag and drop the files from within RecentX over the tag button or drag and drop from Windows File Explorer over the tag button to assign that tag.
Our Verdict
Both Windows and RecentX have minimal steps to tag files.
However, there’s a twist here. Windows has a limitation so it only permits tagging of images, videos, and documents. You might not see the tagging option even on supported file types on rare occasions, depending on the file format.
Also, if you use a different file system, or transfer or shift your files to other computers or external hard drives and thumb drives, then the tags are removed.
Thereby, we would definitely go with something reliable like RecentX.
Another cool thing about RecentX is that it allows searching by multiple tags also. Hold the Ctrl key and select the second tag button from the toolbar in RecentX. You will see the second tag being added automatically.
Download RecentX for free, from here.
For tutorial videos, check out this page.
Check out our YouTube channel.
Have a good day.
Thanks for your time :)