We need to have a checklist for every task in life. A checklist ensures that we have not missed out on anything. Why not have a checklist in your digital sticky notes as well?
While this is not possible in the majority of the sticky notes software, including Windows sticky notes, you can do this with alternative software, Notezilla.
What is Notezilla?
Notezilla is a professional, elegant & highly rated sticky notes app for Windows & Phones (Android, iOS, iPhone, iPad etc). You can also access your sticky notes from a Mac.
Notezilla helps you organize various tiny bits of information you would need through out your life. It keeps all your notes, tasks & reminders handy where ever you are. With sticky notes, you hardly have to put effort to take notes, set reminders, etc. Quickly jot down & move on with your task at hand.
Here are some features of Notezilla:
Sticky notes with reminders
Attach sticky notes to websites, documents, folders & apps
Organize sticky notes inside folders to keep your Windows desktop clean.
Pin sticky notes on top of other apps
Sync sticky notes between Windows, Android, iPhone, iPad
Add pictures inside sticky notes
Checklist sticky notes
Lock sticky notes (password protect)
Markdown support
Send notes over local network (LAN) or across the globe
Tag sticky notes
Fully transparent sticky notes
Dark mode
An image showing one of the features of Notezilla.
Here is a short video perfectly depicting this feature:
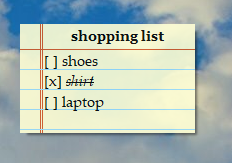
Enabling checklist shows a checkbox before each line of a sticky note, that you can check and uncheck. To enable checklist, choose Checklist from the Formatting menu.
This unique checklist feature allows you to create a to-do-list with checkboxes that you can tick-off. It’s also fun to mark the tasks completed :)
Why Notezilla?
Notezilla helps you stay focused on the journey towards your goals without you having to compromise on productivity.
Stay on track anywhere and everywhere. How? Notezilla has free apps for iPhone, iPad & Android to let you access your sticky notes anytime and anywhere! Install it on your phone from App Store or Google Play Store & sync all your sticky notes with the Windows version of Notezilla.
Today you will learn about a quick shortcut using which Handy way to replace an existing file with another file keeping the file name same. With this feature, we reduce 5 long steps to just 2 quick steps. This is possible using the file copy software Copywhiz.
What is Copywhiz?
Copywhiz enhances your file-copy experience by letting you to have more flexibility & control over the file copying and backup process.
Before you proceed to read the steps, check this short video perfectly depicting this feature:
Steps:
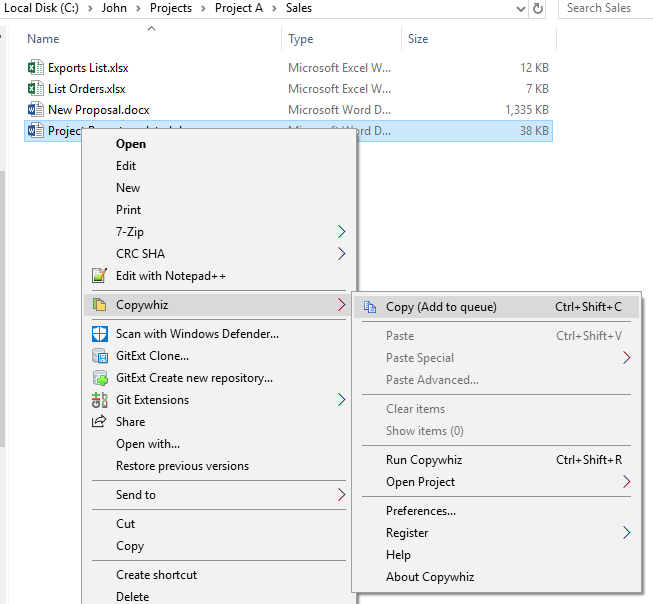
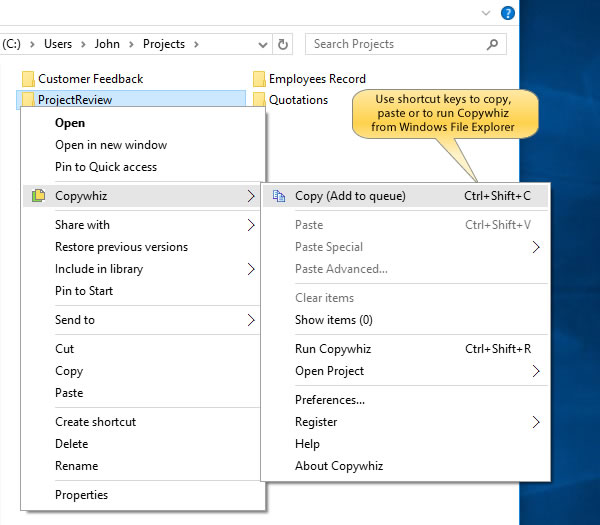
1. Right-click on the file that needs to be copied and choose Copywhiz–>Copy from the menu as shown below:
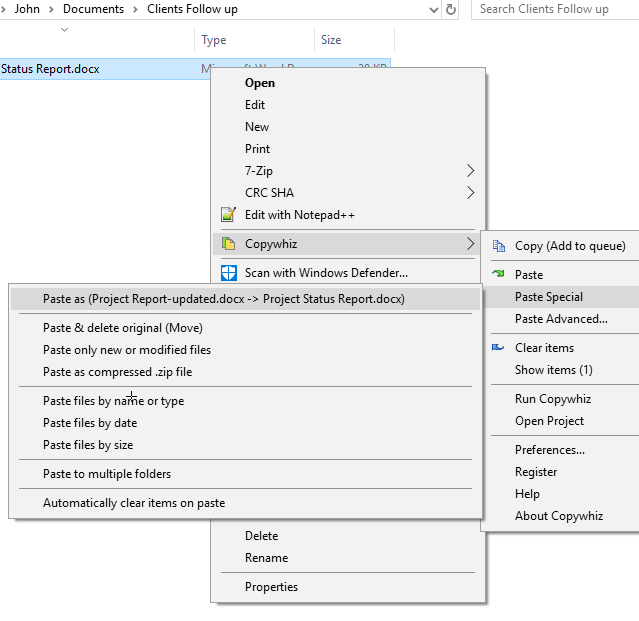
2. Go to the destination folder, right-click on the file that needs to be replaced and select Copywhiz–>Paste Special.
3. Under the Paste Special, you will find the option ‘Paste as (new file -> old file)’ as shown below.
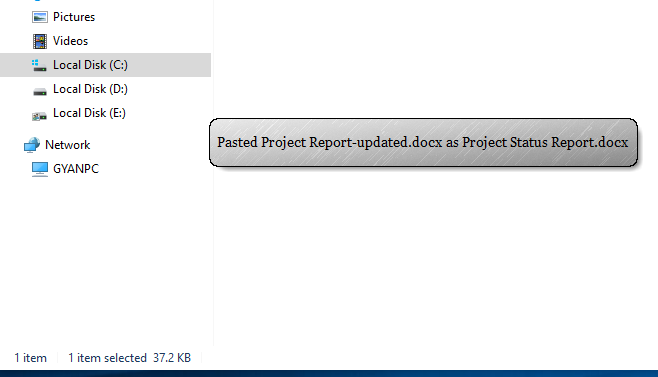
4. The old file will be replaced, keeping its name intact. You will be intimidated with a pop-up, and also, a sound plays indicating successful completion of a file copy task.
Conclusion
What took a lot of time earlier using the Windows file copy, Copywhiz does the same task in just a few clicks. It reduces all the extra steps and lets you copy one file as another file and also keeps the name of the old file unchanged.
It’s that simple and easy.
It is thus a convenient tool for file copy and automatically taking scheduled & incremental backups.
GTD or Getting Things Done is the work-life management system that has helped countless individuals and organizations bring order to chaos. GTD enables higher performance, capacity, and innovation. It alleviates the feeling of overwhelm—instilling focus, clarity, and confidence. You can sort out not only your professional life but also your personal life using this concept.
Your mind is for having ideas, not holding them. That’s why David Allen created Getting Things Done®. He has even written a book on the same. It is a great help when multitasking and relieving the workload.
There are 5 steps on this journey of achieving your goals:
Capture- Collect all that requires your attention.
Clarify- Process them into achievable or not.
Organize- Prioritize your achievables.
Reflect- Keep a check on the progress.
Engage- Put the tasks into action.
Let’s look at this through an example.
You are on your way home from the office and suddenly realize that you forgot to wish your friend, Mike, “happy birthday.” Also, you had to prepare a grocery shopping list for this weekend.
You decide to go home and do this but forget it among the long pile of work. There were lots of unread emails, texts to answer, and house chores too. The next day you ponder on as to why you could not take out time to make just one call to your friend or take out only 10 min to create a list.
This is because you did not capture that thought as soon as you had it.
Capture (collect)
You should have written it down on a piece of paper or your pocket diary or even in your phone for that matter.
All the things that require your attention need to be jotted down or recorded somewhere for you to remember them. The key is to keep it unfiltered and write 100% of everything. Writing down creates a sense of responsibility within you.
However, If you are writing it for yourself then you can simply write them on Notezilla sticky notes.
What is Notezilla?
Notezilla is a professional, elegant & highly rated sticky notes app for Windows & Phones (Android, iOS, iPhone, iPad etc). You can also access your sticky notes from a Mac.
Notezilla helps you organize various tiny bits of information you would need through out your life. It keeps all your notes, tasks & reminders handy where ever you are. With sticky notes, you hardly have to put effort to take notes, set reminders, etc. Quickly jot down & move on with your task at hand.
Here are some features of Notezilla:
Sticky notes with reminders
Attach sticky notes to websites, documents, folders & apps
Organize sticky notes inside folders to keep your Windows desktop clean.
Pin sticky notes on top of other apps
Sync sticky notes between Windows, Android, iPhone, iPad
Add pictures inside sticky notes
Checklist sticky notes
Lock sticky notes (password protect)
Markdown support
Send notes over local network (LAN) or across the globe
Tag sticky notes
Fully transparent sticky notes
Dark mode
Whenever you get a thought, create a sticky note on your desktop and write it down there or jot it in the mobile phone app. It may be anything like tasks or ideas or even problems. It could be anything like preparing a presentation for the meeting the next day or a simple thing like spending time with your kids.
You can create sticky notes of different sizes and colors.
Don’t know how to create sticky notes? Just watch this video to learn:
Clarify (process)
Now that you have written down all that you have in your mind, ask yourself the following questions: Is it actionable? If yes, then again ask,” Can it be achieved immediately?” If yes, then go ahead. Do it and clear the task from your list. There may be some tasks that can be put into action, but not immediately. Add such tasks to a “to-do” list. If not, trash it and move on or maybe keep it for future reference.
Organize (place)
Now that you have grouped tasks as actionable and non-actionable, focus on the actionable. They need to be prioritized based on: project, time, and context.
Actions related to a particular project need to be grouped. E.g., party, furniture, and birthdays.
With Notezilla, you can create notes into different folders(memo boards) like “party”, “furniture” and “birthdays”.
Time-specific actions say Mike’s birthday should go on your calendar to achieve them when the time comes. Add the note to the “birthdays” folder where you store all birthday dates. But then what if you forget after storing it there? Don’t worry because you can set reminders to Notezilla sticky notes, which will remind you beforehand.
You can also group actions under a specific context such as people to call or groceries to buy.
Ex: All the things to buy while going out to the mall, can we grouped under the context “things to buy.” It can be related to different projects, like organizing a party and designing your new furniture.
When you go out shopping, you may have things to buy related to many of these folders. To not forget to buy anything, add tags to those notes like “buy,” “call,” etc.
So when you go out, you need to search for notes with the tag “buy,” and all the notes will be displayed together. You can do the same for calls to be made for your different projects.
Reflect (review)
You are bound to forget tasks among your other activities. Come back to your lists once in a while. Check their progress, make changes wherever needed, and review your current status for the goal.
Trash sticky notes once you have finished. They will still be safe on your system under the “trash” memo board, and you can always move them back to your favorite memo boards. You can move notes quickly from one memo board to another.
Engage (Don’t think. Just do it)
And finally, motivate yourself to go out there and achieve your goals.
Tick the grocery list once you are done shopping, call Mike, and offer your wishes.
But you constantly have new tasks coming up under the actionable list. Don’t worry. All you need to do is start the whole process again for each task.
For more information about this concept, check out the official website of Getting Things Done
Do you ever make goals and then have a hard time trying to fulfill them? Well, this is because you don’t pen them down. A written goal or dream always brings a passion for fulfilling it.
Personal kanban can be an excellent source for you to do this.
What is Personal Kanban?
Despite our best intentions, life has a way of becoming complicated. People, tasks, responsibilities, deadlines, and even recreation all compete for our attention. The human brain, however, does not respond well to the stress of juggling multiple priorities.
That’s where Personal Kanban can help. Adaptable to all ages and situations, and accessible to all learning styles, personal kanban allows us to visualize the amount of work we have, and the way the work carries out. It is useful for everyone, whether you are a homemaker or an employee or a business owner or even a student.
The only key is to visualize. It gives you a sense of responsibility once you envision and jot it down.
What better way than using Notezilla sticky notes.
What is Notezilla?
Notezilla is a professional, elegant & highly rated sticky notes app for Windows & Phones (Android, iOS, iPhone, iPad etc). You can also access your sticky notes from a Mac.
Notezilla helps you organize various tiny bits of information you would need through out your life. It keeps all your notes, tasks & reminders handy where ever you are. With sticky notes, you hardly have to put effort to take notes, set reminders, etc. Quickly jot down & move on with your task at hand.
Here are some features of Notezilla:
Sticky notes with reminders
Attach sticky notes to websites, documents, folders & apps
Organize sticky notes inside folders to keep your Windows desktop clean.
Pin sticky notes on top of other apps
Sync sticky notes between Windows, Android, iPhone, iPad
Add pictures inside sticky notes
Checklist sticky notes
Lock sticky notes (password protect)
Markdown support
Send notes over local network (LAN) or across the globe
There are three important heads to your kanban board:
To do- Your list of dreams and goals
Doing- Things you are currently doing to achieve them.
Done- Things done to ensure success.
To begin with, Create a folder(memo board) for each head in Notezilla.
If you work in a team, you could even add a “backlog” column wherein the initial “to-do” is jotted down before assigning it to each member of the team. You could write the name of the member as a title or below the note too.
This makes it more organized and ensures that everyone knows what they need to do, and tasks don’t overlap.
Ex: The task assigned to Member A and Member B can be put up in separate sticky notes having their name as the title. You can send the note to that member on his system, provided you both use Notezilla.
Also, your memo board will now have an additional column of “backlog,” which has the notes having tasks delegated.
To-do.
Everything you need to do, start writing it down onto sticky notes. Things you plan on doing or goals you want to achieve, go under this head. They may be personal or professional, depending on your nature of use. Big tasks, small tasks, get them all down. Be true to yourself when you write them down. You would initially be surprised at how long the list goes.
For example, your goals would be to present a proposal for the upcoming meeting and also to renovate your house. Also, you want to achieve both within a month. They both will go under your “To do” memo board of Notezilla.
Since they both are goals of different natures, you can separate them by adding tags to them like “office” and “home.” You can also add an extra tag like “this month” so that they don’t get mixed up among your other goals in the memo board. It would be easy to find them too. You need to search for the tag “this month,” and all the notes that have the tag will be displayed together. This way both personal and professional goals can be achieved using Notezilla sticky notes.
Doing.
The tasks and projects you are currently working on go under this head. They were previously in the “to-do” list before you started working on the job and moved it to the “doing” board.
Ex: Visit interior designer, create a rough draft of the proposal.
You can turn your Notezilla sticky notes into checklists or numbered lists so that you can tick them off as and when you do the task. It is not enough to merely add notes to the board. You also need to ensure that you do not leave the task midway and keep track of the long pile of other tasks at hand. This is why you should add a reminder to your sticky notes that will remind you to work on the task consistently.
Done
What next? You need to keep working on your goals to achieve them. When you do that, your Notezilla notes move on to the “done” column.
You must be wondering that once the task is completed, you can forget it and move on. Why create a separate column for this? Because you can look at your success anytime and find out mistakes on the process and work on them for your future goals.
You can trash those notes after some time, say a week. Why? To make space for your next success.
You can trash the sticky notes every weekend, and don’t worry if you require them again in the future. The notes will still be stored in the Notezilla trash folder unless you permanently delete them from there. Tailor your settings accordingly so that you get intimidated whenever you trash a note. This option ensures that you don’t trash the important ones if you have clicked one by mistake.
The same process follows for every goal. Once you start practicing, it will automatically become a habit.
Want to know more about this concept? Visit the official website of PK.
And using Notezilla you will instantly feel the change in your productivity and efficiency levels. Don’t just read this, but put it to practice. So, go on and give it a try.
We like to have a preview of our documents and images before sharing or printing them or even saving the edits made. Then why not have a preview of the list of files that will be copied on your system?
You could easily exclude or include certain files forgotten or those not required. This not only saves your time and efforts but also a lot of space on your system. You can also filter them according to their date, size, etc.
This post will tell you how to preview the list of files that will be copied, before actually copying them.
In this article we will show you how this is possible using the Windows Robocopy tool and an alternative software Copywhiz, which does the same thing in a much user friendly manner.
What is Copywhiz?
Copywhiz enhances your file-copy experience by letting you to have more flexibility & control over the file copying and backup process.
Robocopy Source [Destination] /L command displays a list of files that are to be copied.
For Ex: To display a list of files that are to be copied from the folder “projects” to “backup”, the following command line will be used:
Robocopy C:\projects d:\backup /L
You can do this using Xcopy commands too. Check out this article
However, these Robocopy commands are not straightforward. System administrators may be able to use it. But Robocopy may be quite confusing for ordinary users. Instead, let me show you a more comfortable and faster method.
Using Copywhiz
1. Select files using Windows Explorer, right-click on them and choose Copywhiz->Copy from the menu as shown below :
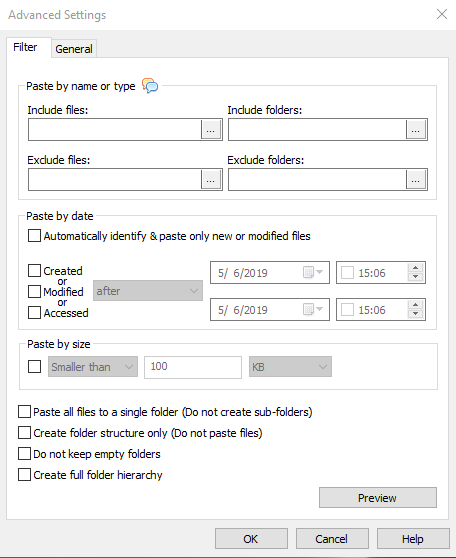
2. Go to the destination folder, right-click inside the folder and select Copywhiz–>Paste Advanced. The Advanced settings dialogue box will open.
3. Click on the “Preview” button located below in the right corner. The Preview Window will open
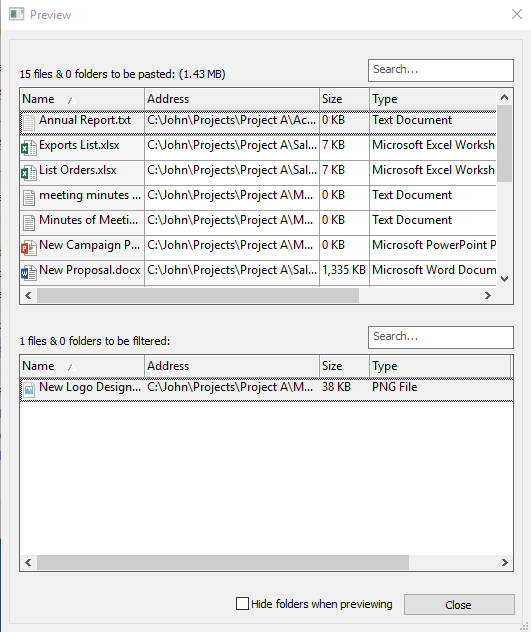
Here is how the Copywhiz Preview Window will look like:
All the files you selected will be listed down before you proceed with your file copy.
Conclusion
Copywhiz is an alternative that allows you to preview files before copying them and ensure that the right files are copied. This avoids mistakes and any incorrect files from being copied to make sure only the important files are copied. You can also use this feature to view the list of new & modified files in a folder.
Thus you stay safe and confident.
The biggest advantage of using Copywhiz is that you can take automatic backups of your files and folders! Read more about it here.
When copying a large number of files, we often see a window pop up telling that an error occurred while copying. Isn’t this very annoying? Wouldn’t it be great if instead of attending to every error message, you could skip that particular type of error and continue copying?
This article will show you how this is possible with the Windows Robocopy tool and also an alternative software , Copywhiz.
What is Copywhiz?
Copywhiz enhances your file-copy experience by letting you to have more flexibility & control over the file copying and backup process.
Robocopy source destination [file [file]…] /r:n w:n command lets us to continue file-copying even if error occurs. ‘R’ is the retries on failed copies, and ‘W’ is the waiting time between those retries. Also, n=the number of times of retry and waiting.
For Ex: To copy contents of ‘C:\project’ to the folder ‘D:\Backup’, while continuing to copy on errors, the following command line will be used:
Robocopy C:\project D:\Backup /R:0 W:0
You can do this using Xcopy too. Here is the article.
However, Robocopy commands are not straightforward. System administrators may be able to use it. But, Robocopy is quite confusing for ordinary users.
Using Copywhiz
Watch a short video that perfectly depicts this feature:
When copying files, Copywhiz does not stop on an error. Instead it lets you retry or skip that particular file and proceed.
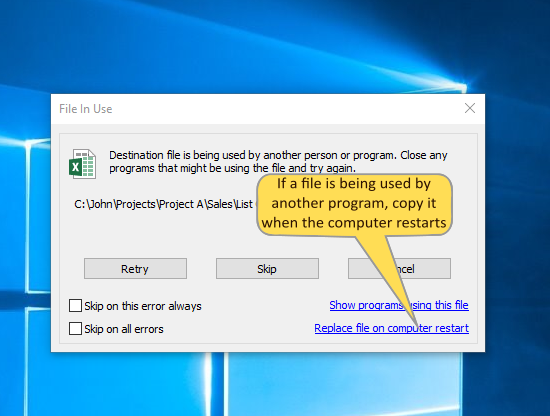
See the image below for more clarity:
Also, if a file is locked (like a file-in-use), Copywhiz will wait until you unlock the file. In fact, Copywhiz will show you which program is currently using the file so that you can close the program in order to continue with your file copy.
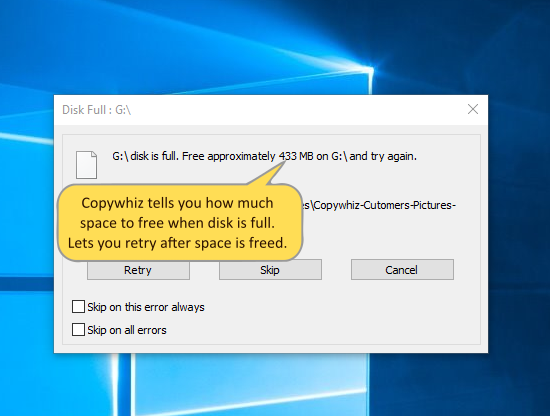
If the disk is full, Copywhiz will show you how much space you need to free in order to complete the operation successfully as shown below:
The most significant advantage of using Copywhiz is that you can take automatic backups of your files and folders! Read more about it here:
Too many sticky notes on Windows desktop can be cluttery. That’s why many users avoid using a sticky notes app. But you can keep your desktop clean if you are using Notezilla sticky notes app for Windows.
Notezilla lets you to keep only selected sticky notes on the desktop and place the others (that you don’t need all the time) in separate folders called Memoboards.
What is Notezilla?
Notezilla is a professional, elegant & highly rated sticky notes app for Windows & Phones (Android, iOS, iPhone, iPad etc). You can also access your sticky notes from a Mac.
Notezilla helps you organize various tiny bits of information you would need through out your life. It keeps all your notes, tasks & reminders handy where ever you are. With sticky notes, you hardly have to put effort to take notes, set reminders, etc. Quickly jot down & move on with your task at hand.
Here are some features of Notezilla:
Sticky notes with reminders
Attach sticky notes to websites, documents, folders & apps
Organize sticky notes inside folders to keep your Windows desktop clean.
Pin sticky notes on top of other apps
Sync sticky notes between Windows, Android, iPhone, iPad
Add pictures inside sticky notes
Checklist sticky notes
Lock sticky notes (password protect)
Markdown support
Send notes over local network (LAN) or across the globe
Tag sticky notes
Fully transparent sticky notes
Dark mode
What is a Memoboard?
A memo board is a folder inside which sticky notes can be placed. They are like containers for sticky notes. The stickies are neatly arranged in each memo board, just like a storyboard.
Why use Memo Boards?
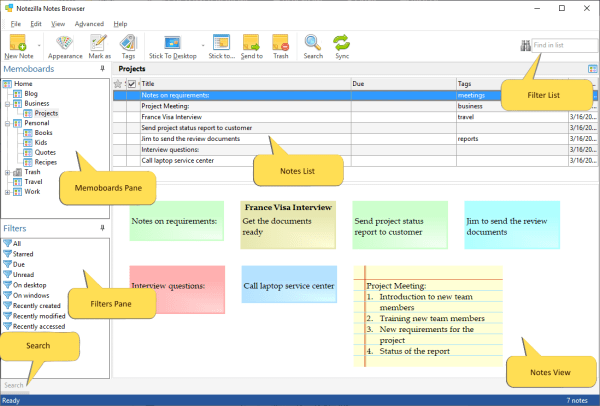
You can simultaneously view the contents of multiple sticky notes. Memo boards appear within the Notes Browser, a feature that lets you view, sort, and filter all of your notes at once. The Notes Browser enables you to keep virtually unlimited sticky notes inside memo boards.
You can arrange notes into memo boards, which in turn can be organized in a hierarchical tree structure. In Notezilla, you can choose to automatically arrange notes whenever the memo board loads for the first time. It even lets you change the background color of the memo board.
Notezilla lets you organize sticky notes simply by dragging & dropping them between memo boards.
Access your most used memo boards easily either by marking it as favorite or by activating it using a unique key combination (hotkey). Once you set a hotkey for a memo board, you can easily activate that particular memo board from any program.
The best part of Notezilla is that it can sync sticky notes between your mobile and PC or laptop! Therefore, you have the exact notes at both places! Try the sync feature today! You will surely love it.
This post will tell you how to view error logs for your file copying process using Copywhiz.
The need for an error log
We all often encounter errors when copying our files in Windows. We, at times, don’t understand where the error is or what exactly is the error. An error log (record of critical errors) is therefore necessary for such situations. This lists all your errors so that you can track down the cause.
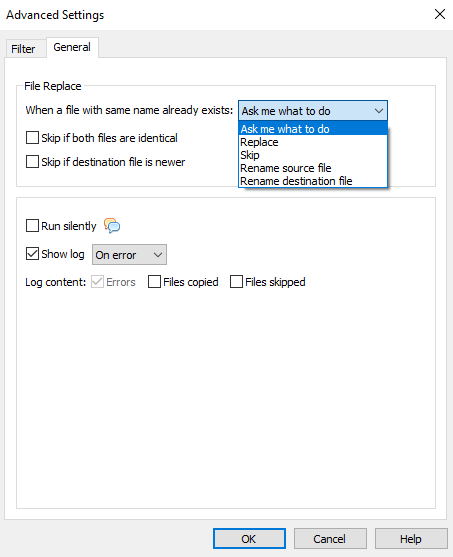
Go to Advanced Settings after selecting your files in Copywhiz.
Click on the “General” Tab which is next to the Filter Tab.
By selecting the “Show log” option, all the errors will be instantly logged, i.e., shown as a list.
Click on ‘OK’ and Paste Now.
Copywhiz helps you solve one more problem you frequently encounter: disk full. It will show you how much space is to be set free to continue your file copying without any worries.
This post will brief you on how to directly rename the file being copied when a file with the same name already exists in the destination folder. This can be magically done using the tool Copywhiz.
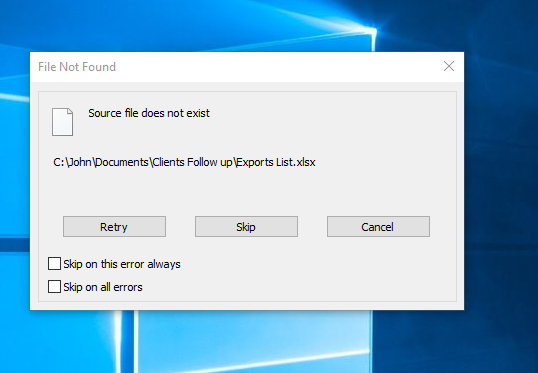
Getting an error pop up telling, “A file with the same name already exists” is common in your daily file copying process. Manually changing the name is OK when there are limited files. It is, however, not practical with a large number of files.
You should therefore try Copywhiz that lets you automatically rename the file being copied or the destination file. You can do this while the files are being copied or pre-configure it so that you are not interrupted.
What is Copywhiz?
Copywhiz enhances your file-copy experience by letting you to have more flexibility & control over the file copying and backup process.
Often, traders like to check different time-frames before taking position according to their favorite time-frame as it is very typical that the daily time-frame might show an up-trend, while the hourly time-frame can be showing a down-trend. Making notes on charts enables you to summarize vital information, focus your thoughts, and finally helps in taking the call regarding your trading transactions.
Most of the trading platforms do not allow the making of notes on the charts, even if they do, (in the form of annotations) long notes are not supported, for Ex: Metatrader 4 or MT5. Also, if you add a note to a chart, once you change the time-frames of the charts, the note disappears as it sticks to that particular Window itself. To access the note all the time-frames, we need to have several monitors or laptops or keep changing time-frames to & fro. Isn’t it very frustrating? How about accessing a single sticky note on all different time-frames.
Yes, with Notezilla, you can add a sticky note to a chart and access it even when you change the time-frames of the charts. This is an indispensable feature that makes Notezilla so good and so useful for trading. In Notezilla, the sticky notes are always shown based on the title of the website. So, if you wish to stick a note on different time-frames, you would need to use the ‘wildcard’ method.
To match only a part of the window title, double click on any window title that is listed and prefix or suffix the title with the * wildcard. As per this, the sticky note will appear on all the different time-frames of the chart. This feature is handy as it helps you to get access to the right information at the right time automatically without any effort from your side.
What is Notezilla?
Notezilla is a professional, elegant & highly rated sticky notes app for Windows & Phones (Android, iOS, iPhone, iPad etc). You can also access your sticky notes from a Mac.
Notezilla helps you organize various tiny bits of information you would need through out your life. It keeps all your notes, tasks & reminders handy where ever you are. With sticky notes, you hardly have to put effort to take notes, set reminders, etc. Quickly jot down & move on with your task at hand.
Here are some features of Notezilla:
Sticky notes with reminders
Attach sticky notes to websites, documents, folders & apps
Organize sticky notes inside folders to keep your Windows desktop clean.
Pin sticky notes on top of other apps
Sync sticky notes between Windows, Android, iPhone, iPad
Add pictures inside sticky notes
Checklist sticky notes
Lock sticky notes (password protect)
Markdown support
Send notes over local network (LAN) or across the globe
Tag sticky notes
Fully transparent sticky notes
Dark mode
See the image below for more clarity:
Here is a short video on how to attach notes to websites, documents, apps & folders on Windows PCs using Notezilla click here.