Searching for text within a digital sticky note in Windows

This post will tell you how you can search for text within a sticky note in Windows using Notezilla, a sticky notes app for Windows & Phones (Android, iOS, iPhone, iPad, Windows Phone etc).

What is Notezilla?

Notezilla is a professional, elegant & highly rated sticky notes app for Windows & Phones (Android, iOS, iPhone, iPad, Windows Phone, etc.). It can help you organize your life by keeping all the notes, tasks & reminders that you may need when-ever and where-ever you are.

With sticky notes, you hardly have to put effort to take notes, set reminders, etc. Just jot down & move on with your task at hand. Notezilla allows you to create attractive and realistic sticky notes to make the desktop look more colorful and beautiful.

It works smoothly on both phones & tablets.

Here are some features of Notezilla:

  • Sticky notes with reminders
  • Attach sticky notes to websites, documents & folders
  • Pin sticky notes on top of other apps
  • Sync sticky notes between Windows, Android, iPhone, iPad
  • Add pictures inside sticky notes
  • Organize sticky notes inside memoboards (folders)
  • Checklist sticky notes
  • Lock sticky notes (password protect)
  • Markdown support
  • Send notes over local network or across the globe
  • Tag sticky notes
  • Dark mode support

Searching for text

Sticky notes in Notezilla are not designed only for writing short notes. You can even use them as an alternative to Notepad. Notezilla allows you to work on sticky notes that are as wide as your display monitor. This way, you can use sticky notes to also store large content such as reference material, web snippets, scripts, drafts, etc. You don’t have to worry about saving your collected data to separate files.

While you store large content into the notes, you may find it difficult to manually search for a particular word or keyword in the long note. Say, you want to replace or remove a specific term but can’t find it.
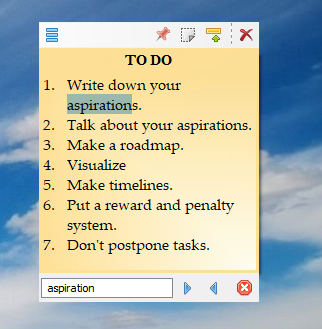
Now is when Notezilla will help you. You just have to press the “Ctrl+F” key from within a sticky note. A search box will automatically open wherein you can type the text you are looking for. The search results will highlight in the note. You can even right-click inside a sticky note and select the “Find” option to do the same.
The results filter as and when you keep typing.

Here is a short video incorporating this feature:

If the word you are looking for is repeated several times in the note, click on the right-facing arrow, and the next place where it appears highlights.

Notezilla thus saves a lot of your time and efforts on searching for text.

So how about giving it a try today. It perfectly boosts your productivity!

The best part of Notezilla is that it can sync notes between your mobile and PC or laptop! Therefore, you have the exact notes at both places! Try the sync feature today! You will surely love it.

Learn more about Notezilla.

Subscribe to our YouTube channel for interesting videos.

Check out our other cool products.

Have a good day!

Thanks :)
Perform incremental file backup in Windows using Copywhiz

Taking regular backups of your files is a really good habit.

But do you take advantage of incremental backups when backing up your files?

The Incremental Backup concept

An incremental backup is a type of backup that only copies files that have changed since the previous backup.

For example, if a full backup is performed today, the next incremental backup will only take all changed files since today’s backup. This helps reduce the time spent on taking backups and avoiding the repetition of files with the same content.

In this post, we will show you how to do incremental backup using Copywhiz.

What is Copywhiz?

Enhance your file-copy experience with Copywhiz as it lets you to have more flexibility & more control over the file copying and backup process. Here is how Copywhiz makes file copying a breeze:

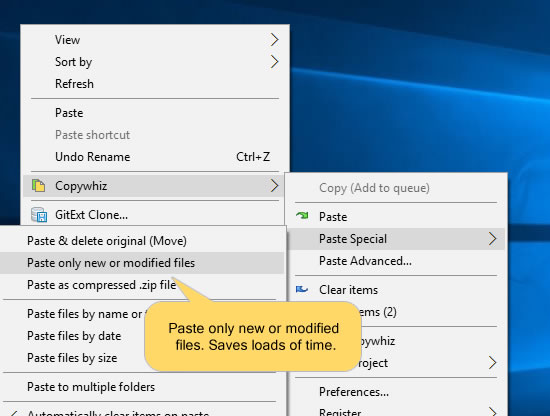
  • Copy only new or modified files
  • Easily pick files by name, extension, folder etc from bunch of folders
  • Automatically organize files based on file attributes and metadata
  • Copy files to multiple folders/computers
  • Copy files from multiple folders and paste them at once
  • Sync files between source and destination
  • Pick files from multiple folders and compress in single .zip file
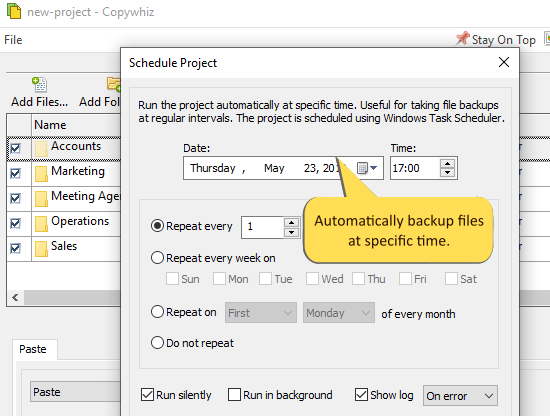
  • Schedule file backups
  • Several more hidden nuggets designed to make your file-copy task easier.

Steps to perform incremental backup

Here is a small video depicting the feature:

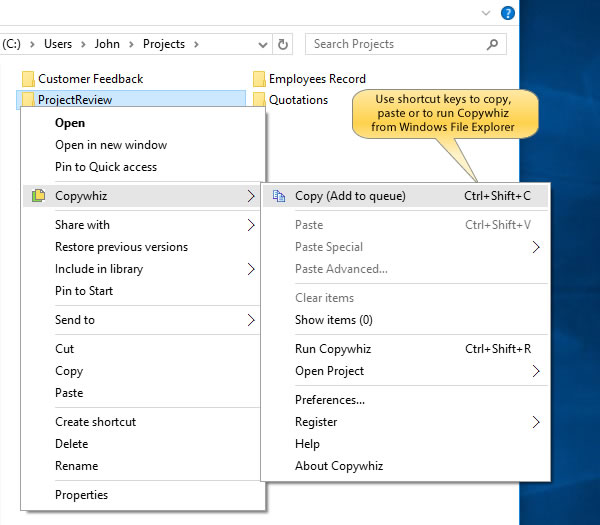
  1. Go to Windows File Explorer, select the files from the source folder, right-click and choose Copywhiz–>Copy as shown below:
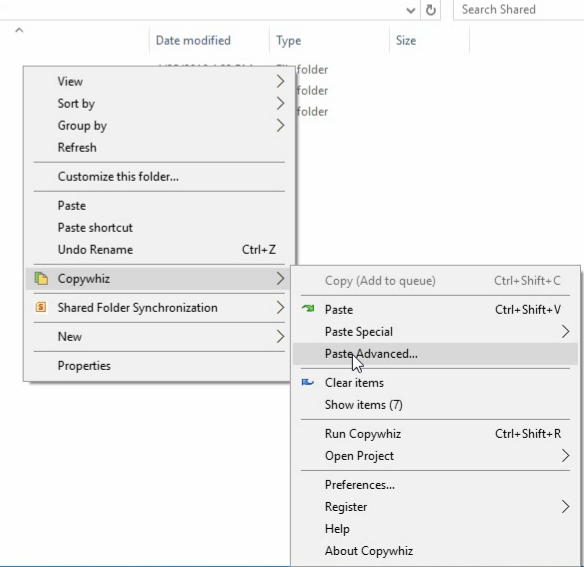
  1. Right-click inside the destination folder where you wish to copy the files and select Copywhiz–>Paste Advanced:
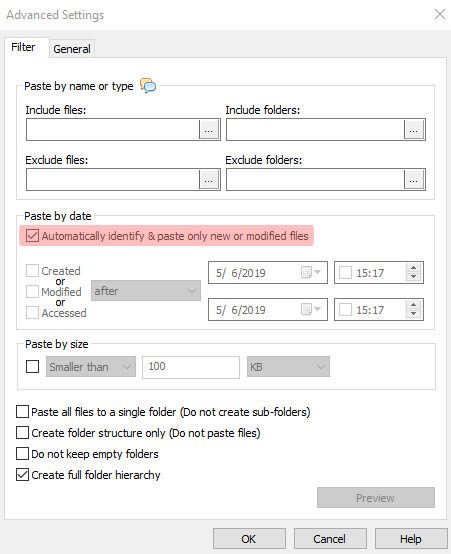
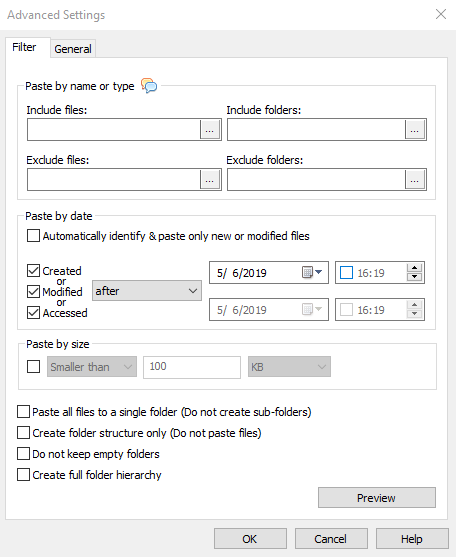
  1. Copywhiz Window will open. Click on ‘Advanced Settings’ button and select “Automatically identify & paste only new or modified files” and click ‘OK’:
Paste-Only-New-Modified-Files
  1. Click on “Paste Now,” and your files copy instantly. You can click on “Paste later” so that your files will be scheduled for copying later. Useful for backups.

That’s it. Incremental backups is very straightforward using Copywhiz.

For more tutorial videos, check out this page and our YouTube channel too.

Learn more about Copywhiz. Download the free trial from here.

Check out our other cool products.

Have a good day.

Thanks for your time :)

Copy only files newer than the day/date you want in Windows using a Robocopy alternative replacement tool

We often spend a lot of our precious time in copying the same set of files every day or every few days to take backups. It would be very convenient if we could copy only those files that have been newly added or recently modified after a particular day or date.

This is a tedious task if done manually. Therefore let us look at how this is possible using Robocopy and an alternative software Copywhiz, which does the same thing in a much user friendly manner.

What is Copywhiz?

Enhance your file-copy experience with Copywhiz as it lets you to have more flexibility & more control over the file copying and backup process. Here is how Copywhiz makes file copying a breeze:

  • Copy only new or modified files
  • Easily pick files by name, extension, folder etc from bunch of folders
  • Automatically organize files based on file attributes and metadata
  • Copy files to multiple folders/computers
  • Copy files from multiple folders and paste them at once
  • Sync files between source and destination
  • Pick files from multiple folders and compress in single .zip file
  • Schedule file backups
  • Several more hidden nuggets designed to make your file-copy task easier.

An image depicting one of the features of Copywhiz

Steps to copy newer files based on date

Using Robocopy

The Robocopy command Robocopy Source [Destination] /maxage:n (where n can be the number of days or date of format YYYYMMDD) copies all source files that are newer than the date specified.

For Ex: To copy all the files in the directory ‘E:\data’ that have been added or modified on or after 1st JAN 2018 to the folder ‘E:\backup’, the following command line will be used:

Robocopy / E:\data E:\backup/MAXAGE:20180101

However, these commands are quite confusing and difficult to understand. It is, therefore, advisable to use Copywhiz, which is faster and more straightforward.

Using Copywhiz:

Watch a short video that perfectly depicts this feature:

Video Transcription

1. Right-click on the folder from which only new or modified files need to be copied and choose Copywhiz–>Copy from the menu as shown below:

2. Go to the destination folder, right-click on it and select Copywhiz–>Paste Advanced. The advanced settings dialogue box will open.

3. Select the date option, as shown in the picture below.

Paste-By-Created-Modified-Accessed-date

Conclusion

This feature is handy while sharing/uploading only recently modified files, taking backups of just new and modified files, especially when there are several files to copy. Thus, Copywhiz proves to save a lot of time and effort and thereby increase productivity.

The most significant advantage of using Copywhiz is that you can take automatic backups of your files and folders! Read more about it here:

Learn more about Copywhiz.

Download the free trial from here.

For more tutorial videos, click here .

Subscribe to our YouTube channel for regular updates and interesting videos!

Check out our other cool products.

Have a good day.

Thanks for reading till the end :)

Copying and filtering files based on their size in Windows using a Robocopy alternative replacement tool

During our file copy, we would sometimes not want files that are too large, or sometimes we may require only large files to be copied. Whatever may be the case, the basic idea is to select the files you want to copy only based on their sizes.

Wouldn’t it be great if you could do that without much time and effort? Instead of copying all the files and later deleting the ones not required, you can just skip copying files not required altogether.

This post will show you how to copy files only of the size (small or large) you want, allowing you to exclude files not needed. Let us look at how this is possible with Windows Robocopy tool and an alternative software Copywhiz.

What is Copywhiz?

Enhance your file-copy experience with Copywhiz as it lets you to have more flexibility & more control over the file copying and backup process. Here is how Copywhiz makes file copying a breeze:

  • Copy only new or modified files
  • Easily pick files by name, extension, folder etc from bunch of folders
  • Automatically organize files based on file attributes and metadata
  • Copy files to multiple folders/computers
  • Copy files from multiple folders and paste them at once
  • Sync files between source and destination
  • Pick files from multiple folders and compress in single .zip file
  • Schedule file backups
  • Several more hidden nuggets designed to make your file-copy task easier.

Steps to copy files based on size

Using Robocopy

The Robocopy command Robocopy source [destination] /max:n lets you set the maximum limit on a file size. Which means files larger than the mentioned size would not be copied.

Similarly, the command Robocopy source [destination] /min:n lets you set the minimum file size limit so that files smaller than the mentioned size would not be copied.

For e.x: to exclude files larger than 10 KB when copying files from “projects” folder to “backup” folder, you will apply the following command :

Robocopy d:\temp\projects e:\backup /xf max:10kb

Similarly for ex: to exclude files smaller than 10 KB when copying files from “projects” folder to “backup” folder , you will apply the Command :

Robocopy d:\temp\projects e:\backup /xf min:10kb

However, these Robocopy commands are quite difficult to understand and use by ordinary users. Only system administrators find it easy.

Let me show you a more comfortable and straightforward method.

Using Copywhiz

Watch a short video depicting this feature:

Video Transcription

1. Select files using Windows Explorer, right-click on them and choose Copywhiz->Copy from the menu as shown below :

2. Go to the destination folder, right-click inside the folder and select Copywhiz–>Paste special–>Paste files by name or type as shown below:

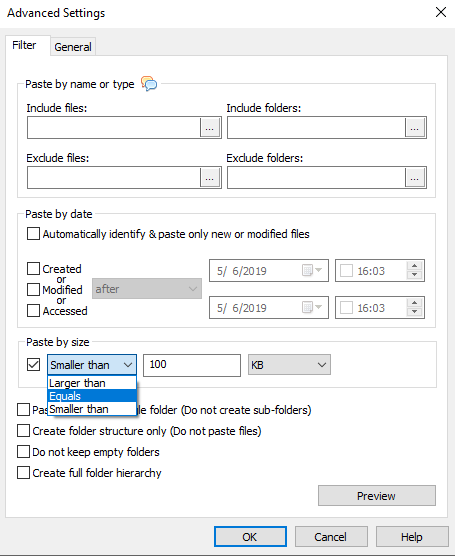
3. The Advanced Settings dialog box will open. You can include or exclude files/folders to be copied by typing /selecting file size. You can also preview the list of files that will be copied and files that will be skipped by clicking on the Preview button. After confirming, press the OK button in the Advanced Settings dialog box. All the required files will be copied successfully.

4. Click on “OK” and then “Paste Now”. Your files are instantly.

Conclusion

As you have seen above, when copying files using Copywhiz, you can exclude or include specific types of files/folders. You gain more control over what is copied. With a few clicks, you complete big file copy tasks & save manual effort.

You can avoid files that are not required, like those files that occupy too much space and only pick essential files.

The most significant advantage of using Copywhiz is that you can take automatic backups of your files and folders!

Read more about it here:

For more tutorial videos, click here .

Subscribe to our YouTube channel for regular updates and interesting videos!

Learn more about Copywhiz.

Download the free trial from here.

Check out our other cool products.

Have a good day.

Thanks :)

Silently copy files in Windows without showing error popup message box

One thing about Windows file copy is that it will continuously need your attention if there are duplicate files if a file is in use or if there is any other error.

When you are seriously working on an important task (while a background file copy is going on) and suddenly, if an error popup box appears, the whole flow of work gets disturbed. We have to stop working and attend to these messages. This is why you would wish to stop those messages from popping up or let the error get resolved silently without disturbing your work.

Here I will show how you can use Copywhiz to suppress all the message prompts, error boxes and continue with file copy. Later you can verify the error log to check if there are any errors. It is beneficial when taking backups and when you wish to copy files silently.

What is Copywhiz?

Enhance your file-copy experience with Copywhiz as it lets you to have more flexibility & more control over the file copying and backup process. Here is how Copywhiz makes file copying a breeze:

  • Copy only new or modified files
  • Easily pick files by name, extension, folder etc from bunch of folders
  • Automatically organize files based on file attributes and metadata
  • Copy files to multiple folders/computers
  • Copy files from multiple folders and paste them at once
  • Sync files between source and destination
  • Pick files from multiple folders and compress in single .zip file
  • Schedule file backups
  • Several more hidden nuggets designed to make your file-copy task easier.

Steps to silently copy files in Windows

The most common message you get is that a file already exists with the same name. Copywhiz can replace duplicate files automatically once pre-configured. Also, it will show you a list of errors (if any) after the file copy operation is complete.

Watch a short video describing this feature:

  1. Go to Windows File Explorer, select the files from the source folder, right-click and choose Copywhiz–>Copy as shown below:

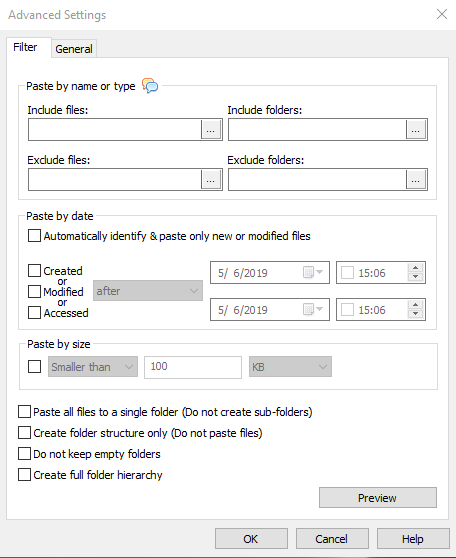
  2. Go to the destination folder, right-click and choose Copywhiz–> Paste Advanced. The advanced settings dialogue box will open.
    Advanced Settings

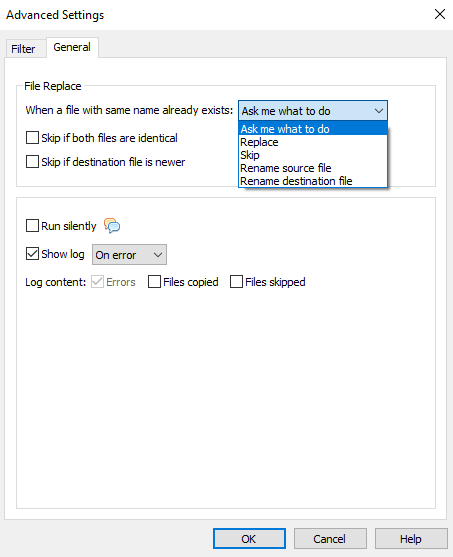
  3. Select the “General” tab and enable the option “Run silently”. This option ensures that you are not asked any questions when copying files. Duplicate files will be replaced automatically by default, and all the errors log to a separate file.
General Tab
  1. Click on OK and then Paste Now.

For more tutorial videos, check out this page.

Subscribe to our YouTube channel for more such interesting videos.

Learn more about Copywhiz. Download the free trial from here.

Have a good day.

Thanks for staying with us :)

Copy files and folders quickly from multiple folders into a single folder in Windows

Many times we have all our music and pictures scattered in different folders that we may want to store into a single folder. You might want to pick only specific types of files and copy all of them in one folder. Say your favorite songs and personal pictures.

But you always have to follow the tedious process of copy, paste, copy, paste and repeat it several times, which is very time-consuming.

This post will explain how to copy files from different folders in different places into a single folder or destination.

It can be done easily using Copywhiz

What is Copywhiz?

Enhance your file-copy experience with Copywhiz as it lets you to have more flexibility & more control over the file copying and backup process. Here is how Copywhiz makes file copying a breeze:

  • Copy only new or modified files
  • Easily pick files by name, extension, folder etc from bunch of folders
  • Automatically organize files based on file attributes and metadata
  • Copy files to multiple folders/computers
  • Copy files from multiple folders and paste them at once
  • Sync files between source and destination
  • Pick files from multiple folders and compress in single .zip file
  • Schedule file backups
  • Several more hidden nuggets designed to make your file-copy task easier.

Steps to quickly copy files from multiple folders into single folder

Watch a short video on this feature:

1. Go to Windows File Explorer, select the files/folders, right-click and choose Copywhiz–>Copy as shown below:
<src=”https: www.conceptworld.com=”” blog=”” uploads=”” 2016=”” 09=”” copy-files1.jpg”=””></src=”https:>

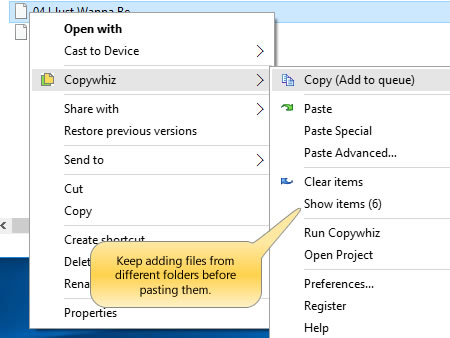
2. Keep adding files from different folders by selecting them, right-clicking, and choosing “Copy (Add to queue)” from the Copywhiz menu. You can see the total number of files copied until now in the “Show items” menu.

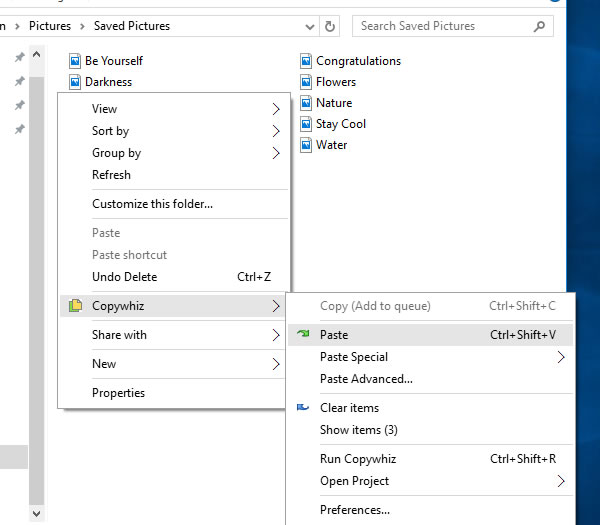
3. Right-click inside the destination folder and select Copywhiz–>Paste . You can even use Ctrl+Shift+V shortcut keys.

4. All the files (from multiple folders) are copied are once.

This is otherwise very time-consuming in Windows.

The biggest advantage of using Copywhiz is that you can take automatic backups of your files and folders! Read more about it here:

For more tutorial videos, click here .

Subscribe to our YouTube channel for regular updates and interesting videos!

Learn more about Copywhiz.

Download the free trial from here.

Check out our other cool products.

Have a good day.

Thanks for reading :)

Sticky notes widget on Android phone’s home screen now possible with Notezilla!

Many of our users are happy with the ability of Notezilla to create Notes Browser widget on the Android phone’s home screen. We also received many requests to add a sticky notes widget.

And so here it is!

Happy to announce that it is now possible to stick single sticky note on Android phone’s home screen using the Notezilla app.

What is Notezilla?

Notezilla is a professional, elegant & highly rated sticky notes app for Windows & Phones (Android, iOS, iPhone, iPad, Windows Phone, etc.). It can help you organize your life by keeping all the notes, tasks & reminders that you may need when-ever and where-ever you are.

With sticky notes, you hardly have to put effort to take notes, set reminders, etc. Just jot down & move on with your task at hand. Notezilla allows you to create attractive and realistic sticky notes to make the desktop look more colorful and beautiful.

It works smoothly on both phones & tablets.

Here are some features of Notezilla:

  • Sticky notes with reminders
  • Attach sticky notes to websites, documents & folders
  • Pin sticky notes on top of other apps
  • Sync sticky notes between Windows, Android, iPhone, iPad
  • Add pictures inside sticky notes
  • Organize sticky notes inside memoboards (folders)
  • Checklist sticky notes
  • Lock sticky notes (password protect)
  • Markdown support
  • Send notes over local network or across the globe
  • Tag sticky notes
  • Dark mode support

Widgets on home screen

Widgets are an essential part of an app. It gives users easy access to the app. Since sticky notes are an integral part of our daily phone use, we decided to add this widget feature to Notezilla sticky notes app as well.

Notezilla Widgets

Earlier, Notezilla only had the feature to create Notes Browser Widget on the home screen. For those of you who are new to Notezilla, Notes Browser lets you create, view, edit & group your sticky notes.

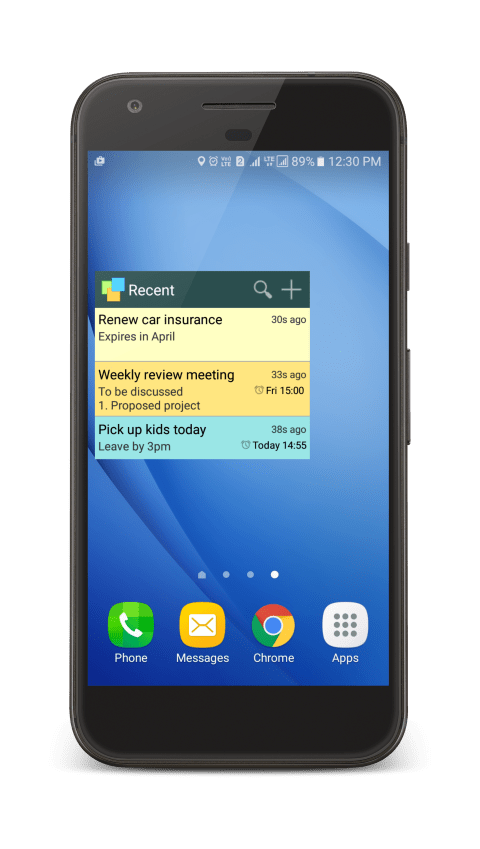
We, therefore, added a Notes Browser widget on the Android phone’s home screen, so it becomes easy to access and edit your sticky notes. You can view a list of notes (Recent, Due, Starred, etc.) on the home screen.

Notezilla now also offers the feature to create sticky note Widgets on Home Screen!

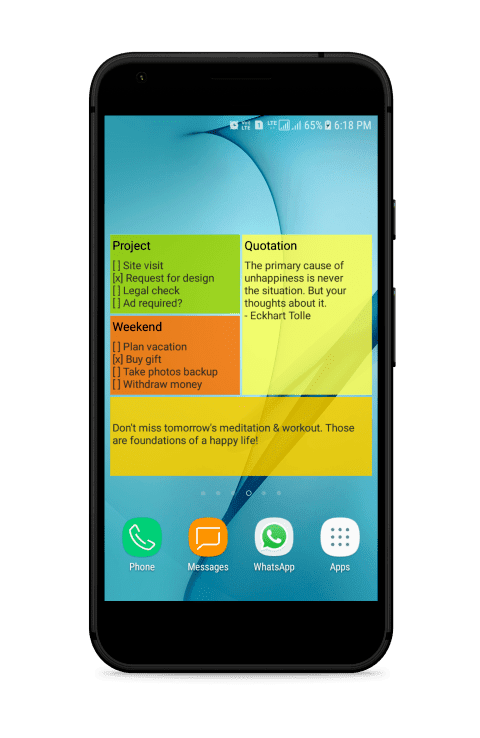
Using this ‘sticky note’ widget, you can stick an individual sticky note to the phone’s home screen.

Here is how your sticky notes would look on your Android phone.

How to add a widget?

It’s effortless. You have to long-press on the phone’s home screen and choose the ‘Widgets’ option. Scroll down to find Notezilla there.

Download the Notezilla app from the play store today and if you already have, just update it.

So how about giving it a try today. It’s free and also perfectly boosts your productivity by saving your time and efforts!

The best part of Notezilla is that it can sync notes between your mobile and PC or laptop! Therefore, you have the exact notes at both places! Try the sync feature today! You will surely love it.

Learn more about Notezilla.

Subscribe to our YouTube channel for interesting videos.

Check out our other cool products.

Have a good day!

Thanks for your time :)

Effortlessly launch any folder (Directly jump to any folder) in Windows using RecentX

Hello Friends!

This video will guide you how to instantly and effortlessly launch any folder in Windows using RecentX.

What is RecentX?
RecentX is a smart launcher for Windows designed to make your computing life joyful. Here are some of the many cool things you can do with RecentX:

  1. Effortlessly access any file, folder or program on Windows in less than 5 seconds!
  2. Assign tags to frequently used files/folders. Makes things even more faster.
  3. Integrates with Windows File open/save window so that you don’t have to to navigate any folder when opening or saving a document.
  4. It has a clipboard manager too that remembers all the text & pictures copied to a clipboard so that you can pick & paste them again.

Folder Launcher

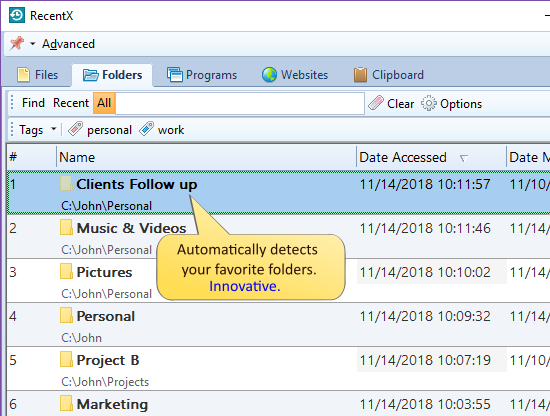
An image showing one of the features of RecentX

Check out the various features of RecentX.

One of the features of RecentX is that you can launch any Windows folder, any level deep, in a jiffy!

See how this is easily possible.

Transcription

To effortlessly launch a folder:

  • Select the “Folder” icon of RecentX. A list of all the folders on your system will be displayed.
  • Type the search keyword, and all folders having the keyword will be displayed. Ex: If you type “project,” all folders having the keyword will be displayed instantly.
  • You can even search only the “Recent” folders since RecentX automatically remembers your frequently accessed folders. “Recent” list lets to pick you folder faster.
  • Not just this. You can even access network folders along with local folders. They are the folders shared with you through another network or system.
  • When you assign tags to folders, you can quickly open related folders without typing any keywords.
  • You also have other folder options like copy, paste, command prompt, copy path, etc. You don’t need to open your file manager for common file operations. RecentX can help you complete these tasks faster.
  • That’s all for the video.

    For more tutorial videos, check out this page.

    Check out our YouTube channel.

    Have a good day.

    Thanks for your time :)

    Select files and folders faster from the File Open/Save dialog window using RecentX.

    This article will tell you how to select files and folders in the open & save window faster and easier than usual, using RecentX, an innovative file launcher for Windows.

    When you have to open a file from an application like notepad or excel or the most commonly used word, you generally have to search for the file in various folders.
    You probably won’t remember where the file is located among a large number of folders and subfolders. Also, the file may have different versions at different places if you have the habit of taking backups.

    This consumes a lot of your time and effort. This is why you should use RecentX which will open a file quickly for you.

    What is RecentX?

    RecentX is a smart launcher for Windows designed to make your computing life joyful. Here are some of the many cool things you can do with RecentX:

    1. Effortlessly access any file, folder or program on Windows in less than 5 seconds!
    2. Assign tags to frequently used files/folders. Makes things even faster.
    3. Integrates with Windows File open/save window so that you don’t have to navigate any folder when opening or saving a document.
    4. It has a clipboard manager too that remembers all the text & pictures copied to a clipboard so that you can quickly pick & paste them again.

    Integrating with the Windows File open/save dialog

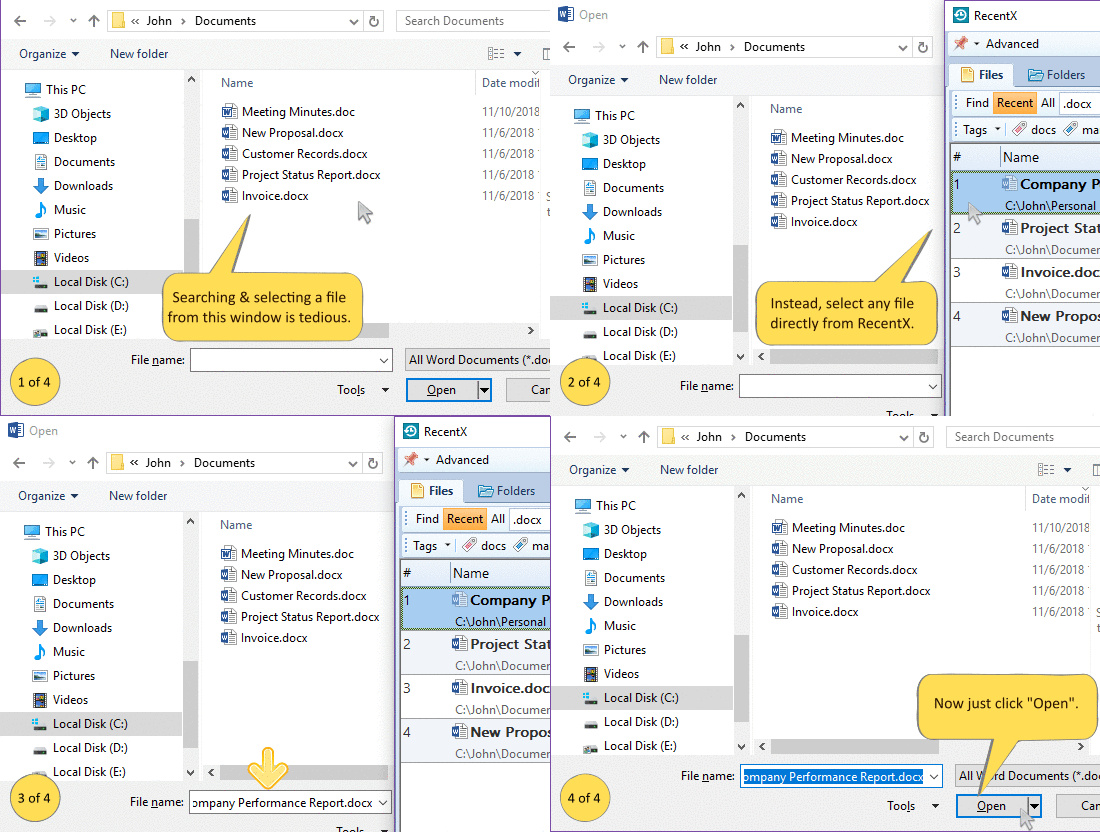
    Here is a short video showing how this works:

    All you need to do is:

    1. Open the file Open/Save window.
    2. Open the RecentX window too.
    3. In the RecentX window, search for the file quickly and select it. The file name will be automatically displayed in the File Open/Save window too.
    4. Now select “Open” in the Open/Save window and that’s it, your file will open instantly.
    Animation_File_Open

    Not just files, you can use RecentX to open folders too. You need to follow the same steps again, and the folder will open within a few seconds. This is how it saves a lot of your time and efforts.

    For more tutorial videos, check out this page.

    Check out our YouTube channel.

    Thanks :)

    Have a good day!

    Launch any program quickly (Including portable apps) in Windows using RcentX

    Hello Friends!

    This video will guide you how to instantly launch any program in Windows using RecentX.

    What is RecentX?
    RecentX is a smart launcher for Windows designed to make your computing life joyful. Here are some of the many cool things you can do with RecentX:

    1. Effortlessly access any file, folder or program on Windows in less than 5 seconds!
    2. Assign tags to frequently used files/folders. Makes things even more faster.
    3. Integrates with Windows File open/save window so that you don’t have to to navigate any folder when opening or saving a document.
    4. It has a clipboard manager too that remembers all the text & pictures copied to a clipboard so that you can pick & paste them again.

    Check out the various features of RecentX.

    One of the features of RecentX is that you can launch any program faster and easier than the Windows start menu & Windows search.

    See how you can do this.

    Transcription

  • Open the RecentX window and select the “program” icon.
  • Search for the program in the search bar. You do not have to type the whole name. With just a few letters, the results will quickly display. This is something that the Windows search cannot do
  • Unlike the Windows search, RecentX lists out all the search results and not just the top three or five.
  • Also, Windows cannot find programs from all the places in the system say your hard drive. But RecentX can do this for you.
  • Thus RecentX proves to be more efficient and convenient than Windows.

    This is it for the video.

    For more tutorial videos, check out this page.

    Check out our YouTube channel.

    Have a good day.

    Thanks :)