When copying files in Windows, it can save a lot of time if you can skip identical files. When both source and destination files are the same. This can be done using a powerful file copy/backup tool for Windows called Copywhiz.
In addition to this you can rename the source or destination file using Copywhiz. Here is a video if you want to know more:
What is Copywhiz?
Copywhiz enhances your file-copy experience by letting you to have more flexibility & control over the file copying and backup process.
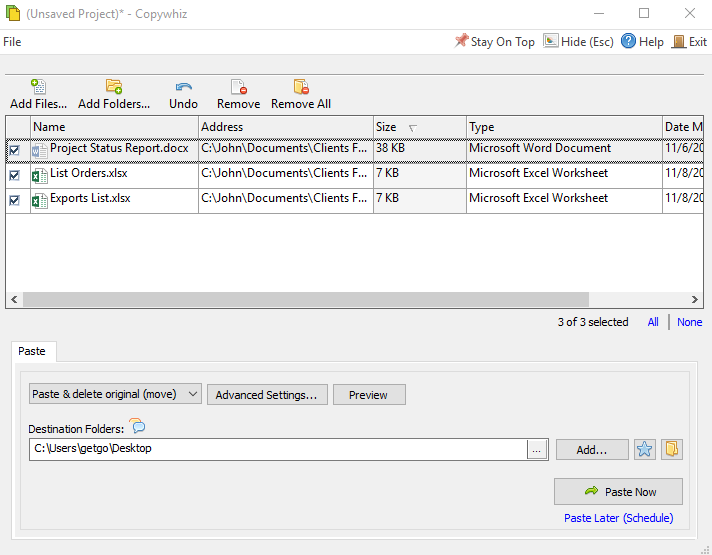
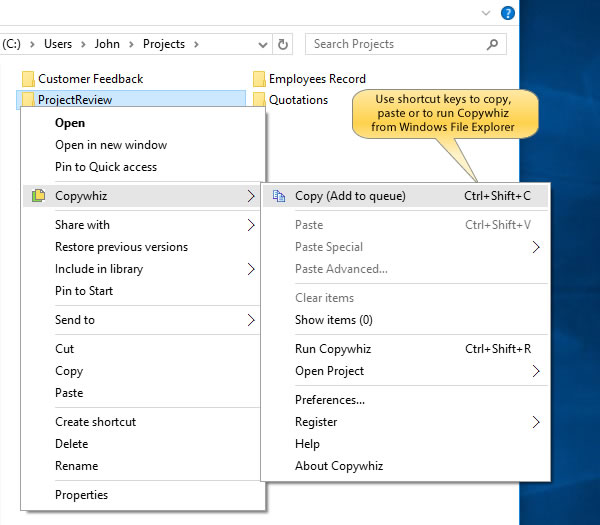
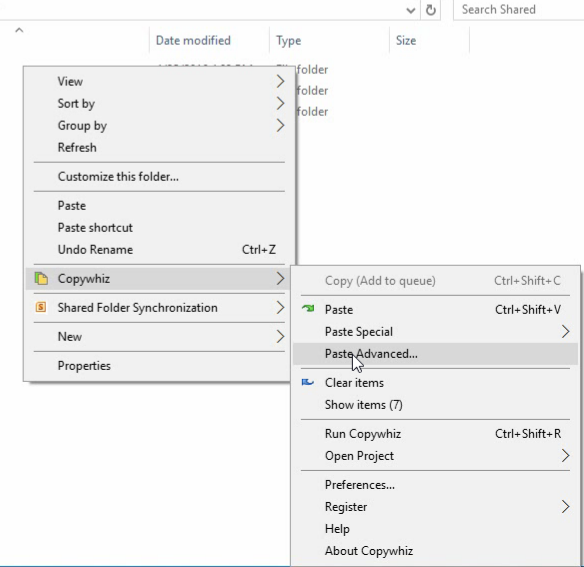
Go to Windows File Explorer, select the files from the source folder, right-click and choose Copywhiz–>Copy as shown below:
2. Right-click inside the destination folder where you wish to copy the files and select Copywhiz–>Paste Advanced:
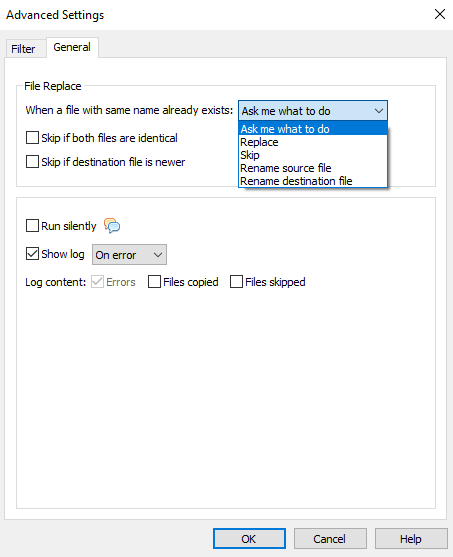
3.Click on the ‘General’ Tab which is next to the Filter Tab.
4. Under the File Replace options, select ‘Skip if both files are identical.’ This option skips all those files that already have files similar to them.
5. Click on ‘OK’ and ‘Paste Now’
It not only saves disk space by skipping extra files to be copied but also saves a lot of your time and effort. All thanks to Copywhiz.
This post will tell you how to take a backup of your important files, each time into different folder in Windows. Using Copywhiz, cool file copy and backup app for Windows.
An essential feature of a file backup tool is to take backup in a separate folder every time. This ensures that you have multiple versions of the same file set for safety.
You can watch a short video depicting this feature:
Steps to copy files to a new folder each time:
1. Go to Windows File Explorer, select the files from the source folder, right-click and choose Copywhiz–>Copy as shown below:
2. Right-click inside the destination folder where you wish to copy the files and select Copywhiz–>Paste Advanced:
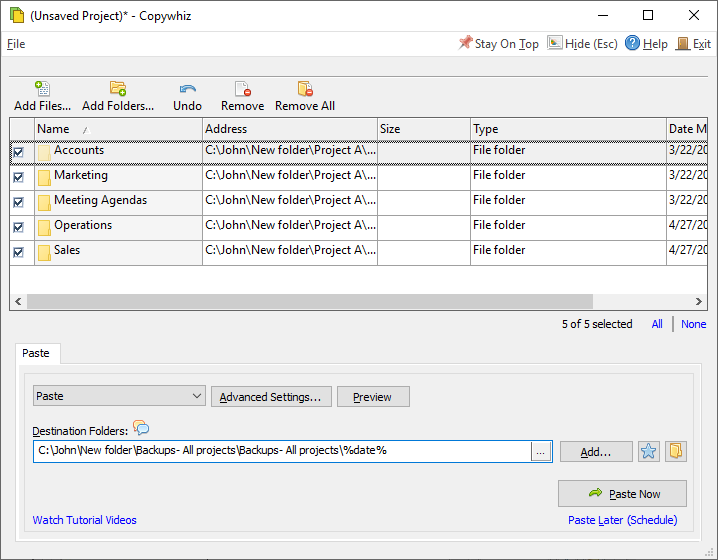
3. Copywhiz window will open with the destination folder already selected. You can suffix the destination folder with %date% or %datetime% to add current date to the folder name. This way, you can later find them using the date created.
4. Once the variables are added, click on ‘OK’ and ‘Paste Now,’ and a new folder will automatically be created based on the current date/time you specified.
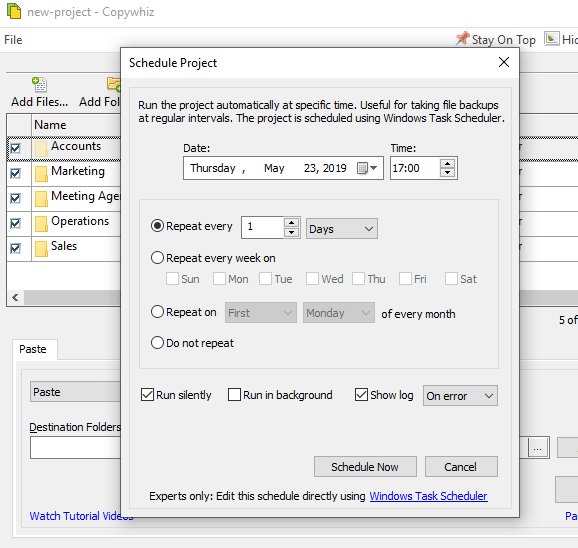
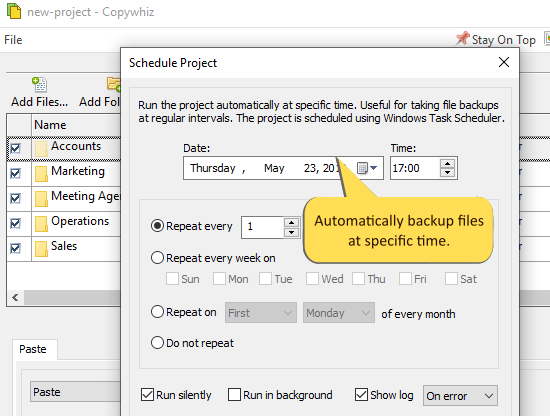
5. You can save the selected files as a Copywhiz project and schedule a backup of the same set of files by clicking on the ‘Paste later (Schedule)’ button. Once clicked, the following Window will appear that will let you set your preferred backup frequency. After setting your preferred frequency, click on ‘Schedule Now’ so that Copywhiz automatically runs the projects at a specified time for creating multiple copies.
With Copywhiz, the copies will be created from time to time automatically even after you modify the files later on. You can create copies of your files every week, every day, or even every hour. You now have a complete file backup solution.
The trick is moving specific types of files (only pictures in our case) to another folder. Moving means deleting from the source folder after copying it to the destination folder. Later we can delete the destination folder. This way, we are achieving our goal to eliminate specific types of files from the whole folder tree.
Steps to delete specific type of files
Here is a short video depicting this feature:
Go to Windows File Explorer, select the files from the source folder, right-click and choose Copywhiz–>Copy as shown below:
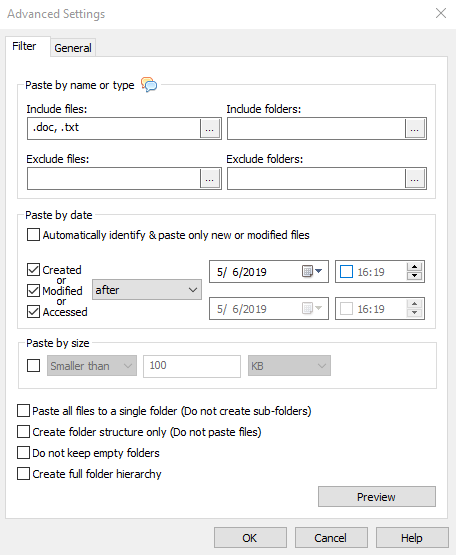
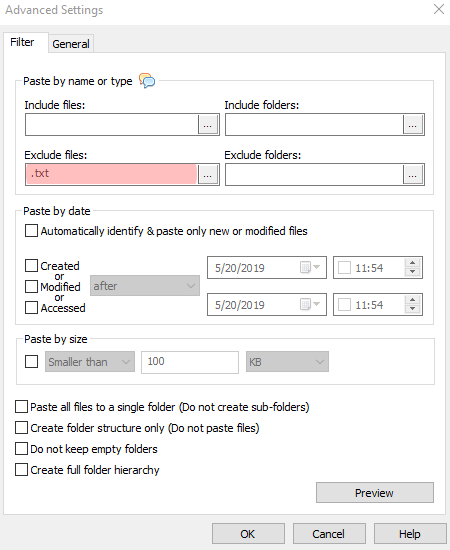
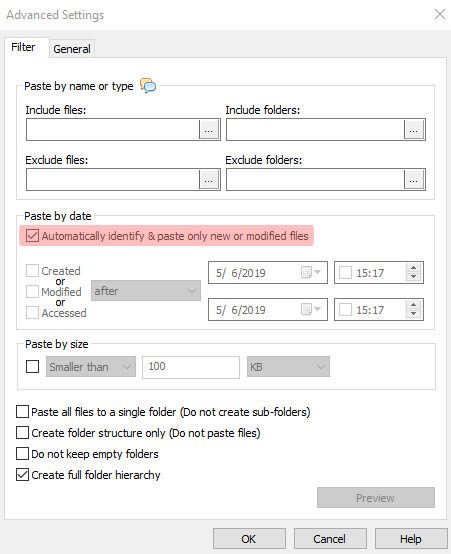
Go to the destination folder, click Copywhiz–> Paste Advanced. The Copywhiz main window will open. Click on the Advanced Settings tab and type the name or type of files to copy under “Include Files.” (in our case, the file extension of the pictures)
Tip: You can even preview the files that will be copied before actually copying them to stay safe. Just click on the “Preview” button in the bottom right corner.
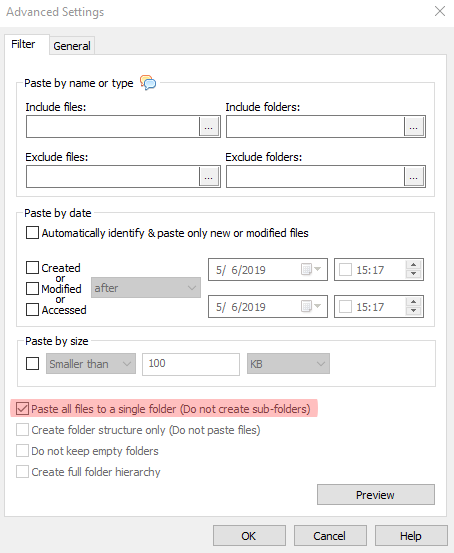
Also enable the option “Paste all files to a single folder”.
Click OK. You will come back to the Copywhiz main window. Under the paste options, select, “Paste and delete original (move).” Click on “Paste Now”.
Your files will be copied to the destination folder all at once and also automatically deleted from the source folder.
You can now delete the destination folder since the files not required are all in that. So the source folder will be left with only the files you require.
Through this method, your important files are left untouched, and all the unwanted files deleted together! Thus Copywhiz easily helped copy my files from a large number of folders and sub-folders. Thus saving me from the tedious task of scrolling through multiple files and folders.
Excluding certain folders when copying files has several advantages. You can save disk space, get rid of unwanted and temporary files, and save time in copying & backing up of files. Also, handling a smaller file set is much more comfortable.
Let us see how to do this using Robocopy, and an alternative software , Copywhiz which does the same thing in a much user friendly manner.
What is Copywhiz?
Copywhiz enhances your file-copy experience by letting you to have more flexibility & control over the file copying and backup process.
An image depicting one of the features of Copywhiz
Steps to exclude specific folders when copying files
Using Copywhiz
Watch a short video describing this feature:
Video Transcription
1. Go to Windows File Explorer, select the files from the source folder, right-click and choose Copywhiz–>Copy as shown below:
2. Go to the destination folder, right-click, and choose Copywhiz–> Paste Advanced. The Advanced Settings dialogue box will open.
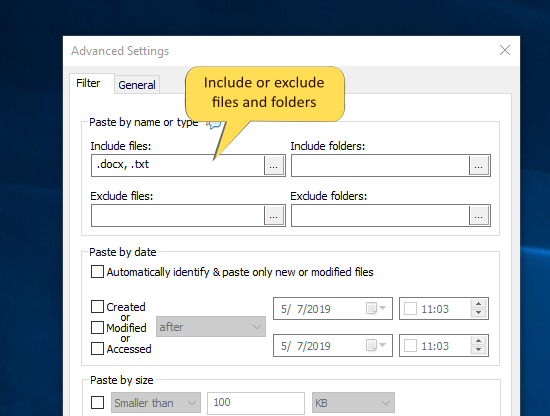
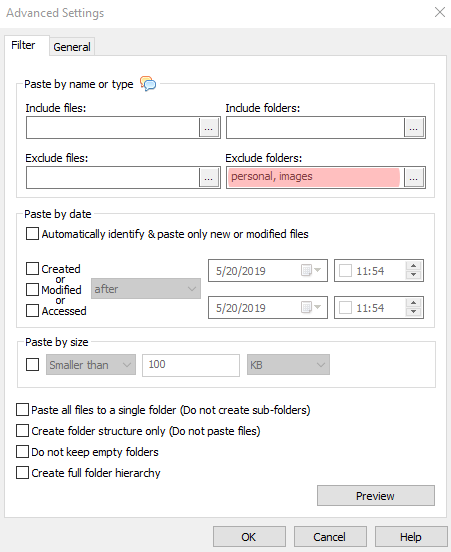
3. You can include or exclude files/folders to be copied by typing their names, file extensions, or folder names. You can then select the “Exclude folders” option. You can also preview the list of files that will be copied and files that will be skipped by clicking on the Preview button. After confirming, press the OK button in the Advanced Settings dialog box.
4. Click on “OK” and then “Paste Now” to complete file copying.
Using Robocopy
Robocopy Source Destination/XD dirs [dirs]… command lets us to specify a list of directories (folders) containing strings to be excluded. These strings are not entered directly in the command switch. They are one or more text files that list the strings to be excluded.
For Ex: To copy files from “projects” folder to the folder “backup”, by excluding certain type of folders, say, the ones having your personal information, the following command line will be used:
But these Robocopy commands are not straightforward. System administrators may be able to use it. Robocopy is quite difficult for ordinary users. Instead, let me show you a more comfortable and faster way to do this.
Conclusion
Copywhiz lets you choose which type of files to copy and which to ignore – i.e, it lets you to do ‘Selective File Copy’. Pick only those files and folders that are important and avoid the ones not required with Copywhiz. Easily filter files by name, extension, folder, etc. from a bunch of folders.
Complete big file copy tasks with just a few clicks and save manual effort with Copywhiz.
The biggest advantage of using Copywhiz is that you can take automatic backups of your files and folders! Read more about it here:
File copy occupies a lot of our time and effort every day. While this is manageable for limited files but not when there are multiple files (sometimes running to thousands).
It takes a lot of time and effort to find, sort, select, and copy files. Also, if the file with the same name already exists, it becomes even more tiring to find it and replace it with the latest version of that file. It is therefore wiser to copy only new or modified files.
It would be best if you left out the idea of doing this manually. You can try doing this using commands like Robocopy or Xcopy. Or use a file copy software that will do it easily and quickly for you. But not every software offers this feature, and even if it does, it cannot with the required flexibility and speed.
We therefore bring a file copy software that will do it for you in just a few minutes: Copywhiz. Using Copywhiz, copy only files that have been recently modified, leaving out the older ones completely.
Let us first see how to do this using Robocopy and then using Copywhiz, so that you can decide it yourself.
What is Copywhiz?
Copywhiz enhances your file-copy experience by letting you to have more flexibility & control over the file copying and backup process.
Steps to copy only changed files (new and modified)
Using Robocopy
The Robocopy command Robocopy Source [Destination] /XO :[YYYYMMDD] copies all Source files changed on or after the specified date only. This command-line option allows you to update files that have changed.
For Ex: To copy all the files in the directory ‘E:data’ that are modified on or after 1 st January 2018 to the folder ‘E:\backup’, the following command line will be used:
However, commands like Robocopy are not that easy. System administrators may be able to use it. But ordinary users will find it difficult. Instead, I will show you how to do it very quickly/easily using Copywhiz.
Using Copywhiz
Here is a short video that depicts how to do it easily in Windows using Copywhiz:
Transcription:
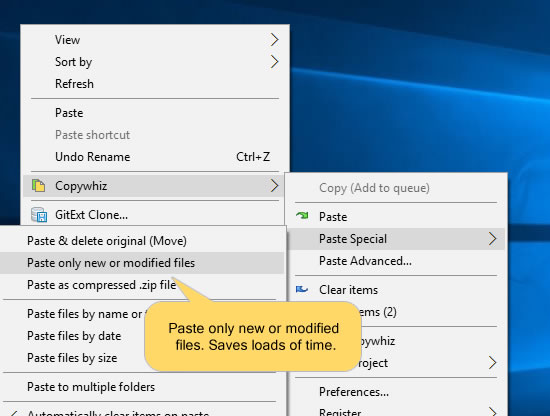
Right-click on the folder from which only new or modified files need to be copied and choose Copywhiz–>Copy from the menu.
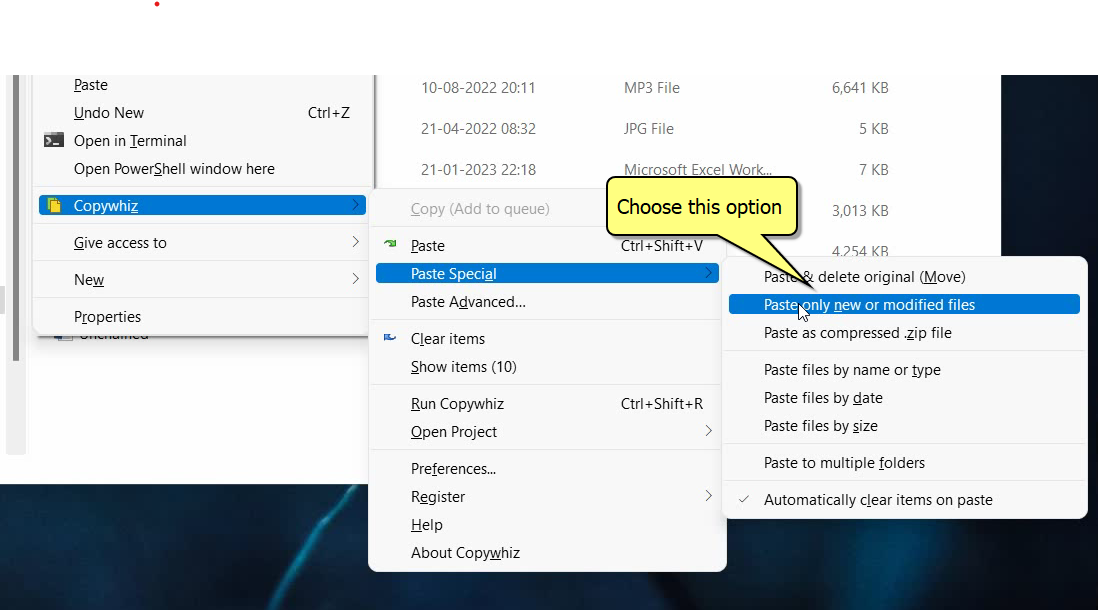
Go to the destination folder, right-click on it and select Copywhiz–>Paste Special- ->Paste only new & modified files.
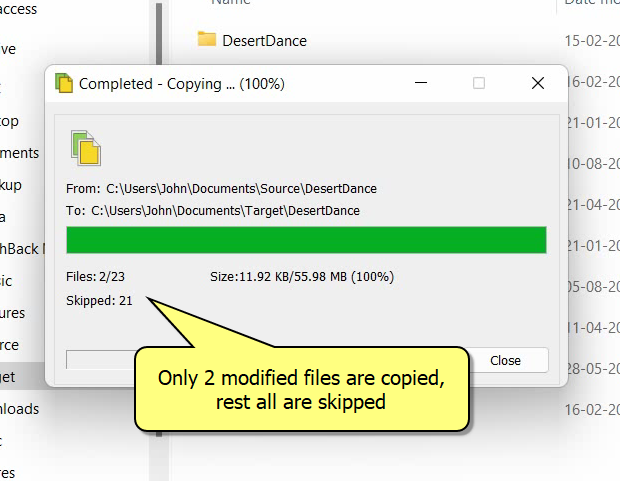
If the same folder already exists in the destination, then only new or modified files will be replaced, others will be skipped, saving a lot of time.
That’s it in this video.
Copywhiz automatically detects new & changed files making the whole process very quick.
Alternatively, you can copy files based on specific dates (date modified, date created, date accessed).
To Conclude
What could take several hours if done manually, Copywhiz completes it in few seconds! Specify the file date type and date range so that the files are copied based on the date criteria.
This feature is handy while sharing/uploading only recently modified files or even to pick the latest music/pictures from multiple folders.
The most significant advantage of using Copywhiz is that you can take automatic backups of your files and folders! Read more about it here:
This post will help you in excluding certain files of your choice from being copied.
Why exclude specific files?
By default, any copy program will copy everything (all the files) from the folder that you specify as the source. But, at times, we would like to filter and include only specific files. For Ex: Copy only pictures and not videos, only source code files and not object files, all documents except PDF files, and so on.
In this particular post, we will talk about this by comparing Robocopy to an alternative software , Copywhiz.
What is Copywhiz?
Copywhiz enhances your file-copy experience by letting you to have more flexibility & control over the file copying and backup process.
You can use Xcopy too. Here is the article you can check out.
However, Robocopy commands are not straightforward. System administrators may be able to use it. But, Robocopy is confusing for ordinary users.
Let me now show you a more comfortable and faster way to do this.
Using Copywhiz
Copywhiz makes this very user-friendly. Watch a short video depicting this feature:
Video Transcription
1. Go to Windows File Explorer, select the files from the source folder, right-click and choose Copywhiz–>Copy as shown below:
2. Go to the destination folder, right-click, and choose Copywhiz–> Paste Advanced. The Advanced Settings dialogue box will open.
3. You can include or exclude files/folders to be copied by typing their names, file extensions, or folder names. You can also preview the list of files that will be copied and files that will be skipped by clicking on the Preview button. After confirming, press the OK button in the Advanced Settings dialog box. All the required files are copied successfully.
Conclusion
Copywhiz lets you to choose which type of files to copy & which to ignore – i.e, it lets you to do ‘Selective File Copy’. Easily filter files by name, extension, folder, etc. from a bunch of folders. You can complete big file copy tasks with few clicks & save manual effort with Copywhiz.
Taking regular backups of your files is a really good habit.
But do you take advantage of incremental backups when backing up your files?
The Incremental Backup concept
An incremental backup is a type of backup that only copies files that have changed since the previous backup.
For example, if a full backup is performed today, the next incremental backup will only take all changed files since today’s backup. This helps reduce the time spent on taking backups and avoiding the repetition of files with the same content.
In this post, we will show you how to do incremental backup using Copywhiz.
What is Copywhiz?
Copywhiz enhances your file-copy experience by letting you to have more flexibility & control over the file copying and backup process.
Go to Windows File Explorer, select the files from the source folder, right-click and choose Copywhiz–>Copy as shown below:
Right-click inside the destination folder where you wish to copy the files and select Copywhiz–>Paste Advanced:
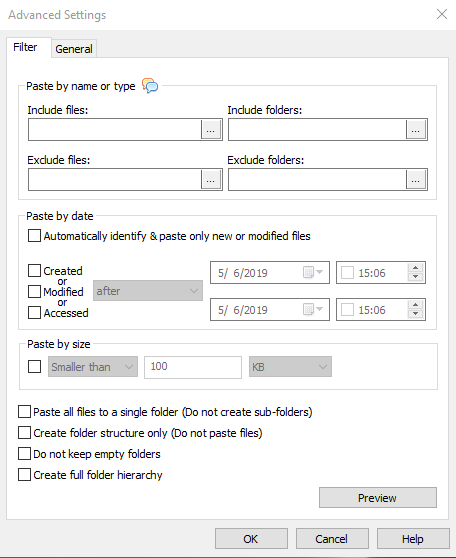
Copywhiz Window will open. Click on ‘Advanced Settings’ button and select “Automatically identify & paste only new or modified files” and click ‘OK’:
Click on “Paste Now,” and your files copy instantly. You can click on “Paste later” so that your files will be scheduled for copying later. Useful for backups.
That’s it. Incremental backups is very straightforward using Copywhiz.
We often spend a lot of our precious time in copying the same set of files every day or every few days to take backups. It would be very convenient if we could copy only those files that have been newly added or recently modified after a particular day or date.
This is a tedious task if done manually. Therefore let us look at how this is possible using Robocopy and an alternative software Copywhiz, which does the same thing in a much user friendly manner.
What is Copywhiz?
Copywhiz enhances your file-copy experience by letting you to have more flexibility & control over the file copying and backup process.
An image depicting one of the features of Copywhiz
Steps to copy newer files based on date
Using Robocopy
The Robocopy command Robocopy Source [Destination] /maxage:n (where n can be the number of days or date of format YYYYMMDD) copies all source files that are newer than the date specified.
For Ex: To copy all the files in the directory ‘E:\data’ that have been added or modified on or after 1st JAN 2018 to the folder ‘E:\backup’, the following command line will be used:
Robocopy / E:\data E:\backup/MAXAGE:20180101
However, these commands are quite confusing and difficult to understand. It is, therefore, advisable to use Copywhiz, which is faster and more straightforward.
Using Copywhiz:
Watch a short video that perfectly depicts this feature:
Video Transcription
1. Right-click on the folder from which only new or modified files need to be copied and choose Copywhiz–>Copy from the menu as shown below:
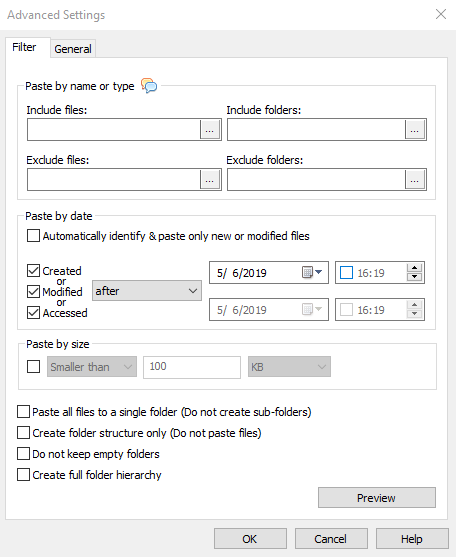
2. Go to the destination folder, right-click on it and select Copywhiz–>Paste Advanced. The advanced settings dialogue box will open.
3. Select the date option, as shown in the picture below.
Conclusion
This feature is handy while sharing/uploading only recently modified files, taking backups of just new and modified files, especially when there are several files to copy. Thus, Copywhiz proves to save a lot of time and effort and thereby increase productivity.
The most significant advantage of using Copywhiz is that you can take automatic backups of your files and folders! Read more about it here:
During our file copy, we would sometimes not want files that are too large, or sometimes we may require only large files to be copied. Whatever may be the case, the basic idea is to select the files you want to copy only based on their sizes.
Wouldn’t it be great if you could do that without much time and effort? Instead of copying all the files and later deleting the ones not required, you can just skip copying files not required altogether.
This post will show you how to copy files only of the size (small or large) you want, allowing you to exclude files not needed. Let us look at how this is possible with Windows Robocopy tool and an alternative software Copywhiz.
What is Copywhiz?
Copywhiz enhances your file-copy experience by letting you to have more flexibility & control over the file copying and backup process.
The Robocopy command Robocopy source [destination] /max:n lets you set the maximum limit on a file size. Which means files larger than the mentioned size would not be copied.
Similarly, the command Robocopy source [destination] /min:n lets you set the minimum file size limit so that files smaller than the mentioned size would not be copied.
For e.x: to exclude files larger than 10 KB when copying files from “projects” folder to “backup” folder, you will apply the following command :
Robocopy d:\temp\projects e:\backup /xf max:10kb
Similarly for ex: to exclude files smaller than 10 KB when copying files from “projects” folder to “backup” folder , you will apply the Command :
Robocopy d:\temp\projects e:\backup /xf min:10kb
However, these Robocopy commands are quite difficult to understand and use by ordinary users. Only system administrators find it easy.
Let me show you a more comfortable and straightforward method.
Using Copywhiz
Watch a short video depicting this feature:
Video Transcription
1. Select files using Windows Explorer, right-click on them and choose Copywhiz->Copy from the menu as shown below :
2. Go to the destination folder, right-click inside the folder and select Copywhiz–>Paste special–>Paste files by name or type as shown below:
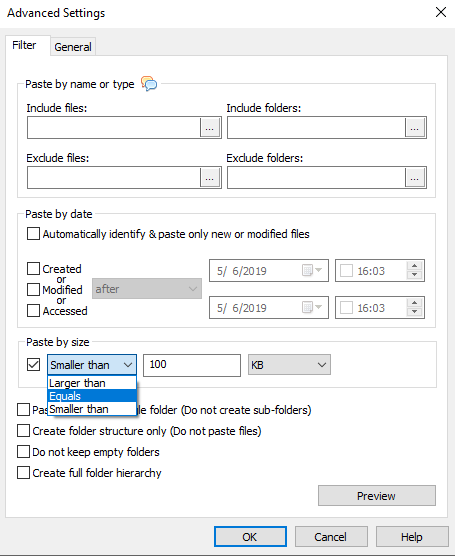
3. The Advanced Settings dialog box will open. You can include or exclude files/folders to be copied by typing /selecting file size. You can also preview the list of files that will be copied and files that will be skipped by clicking on the Preview button. After confirming, press the OK button in the Advanced Settings dialog box. All the required files will be copied successfully.
4. Click on “OK” and then “Paste Now”. Your files are instantly.
Conclusion
As you have seen above, when copying files using Copywhiz, you can exclude or include specific types of files/folders. You gain more control over what is copied. With a few clicks, you complete big file copy tasks & save manual effort.
You can avoid files that are not required, like those files that occupy too much space and only pick essential files.
The most significant advantage of using Copywhiz is that you can take automatic backups of your files and folders!
One thing about Windows file copy is that it will continuously need your attention if there are duplicate files if a file is in use or if there is any other error.
When you are seriously working on an important task (while a background file copy is going on) and suddenly, if an error popup box appears, the whole flow of work gets disturbed. We have to stop working and attend to these messages. This is why you would wish to stop those messages from popping up or let the error get resolved silently without disturbing your work.
Here I will show how you can use Copywhiz to suppress all the message prompts, error boxes and continue with file copy. Later you can verify the error log to check if there are any errors. It is beneficial when taking backups and when you wish to copy files silently.
What is Copywhiz?
Copywhiz enhances your file-copy experience by letting you to have more flexibility & control over the file copying and backup process.
The most common message you get is that a file already exists with the same name. Copywhiz can replace duplicate files automatically once pre-configured. Also, it will show you a list of errors (if any) after the file copy operation is complete.
Watch a short video describing this feature:
Go to Windows File Explorer, select the files from the source folder, right-click and choose Copywhiz–>Copy as shown below:
Go to the destination folder, right-click and choose Copywhiz–> Paste Advanced. The advanced settings dialogue box will open.
Select the “General” tab and enable the option “Run silently”. This option ensures that you are not asked any questions when copying files. Duplicate files will be replaced automatically by default, and all the errors log to a separate file.