Continue file copy/backup even if an error occurs when using Teracopy alternative replacement tool

Hi Guys! Copying or backing up file even when the error occurs can help boost output and performance. Here we have two tools Copywhiz and Teracopy which can help us achieve the same and ensure that your critical files are copied or backed up even if some files encounter issues, enhancing data protection and system reliability.

What is Copywhiz?

Copywhiz enhances your file-copy experience by letting you to have more flexibility & control over the file copying and backup process.

Here is how Copywhiz makes file copying a breeze:

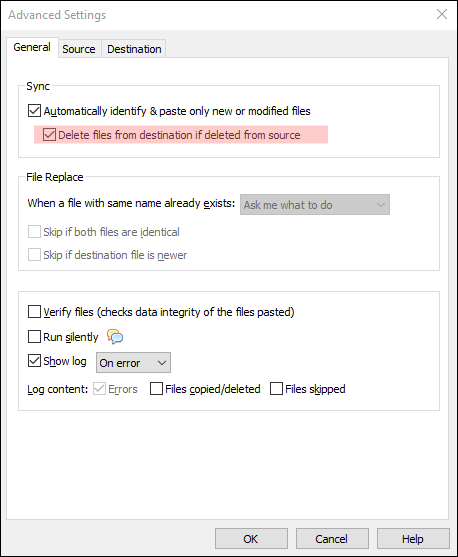
  • Copy only new or modified files
  • Easily pick files by name, extension, folder etc from bunch of folders
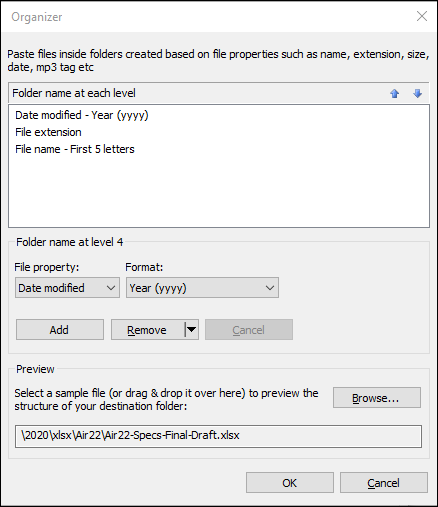
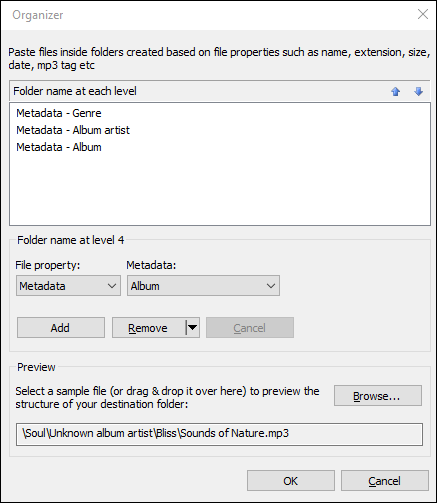
  • Automatically organize files based on file attributes and metadata
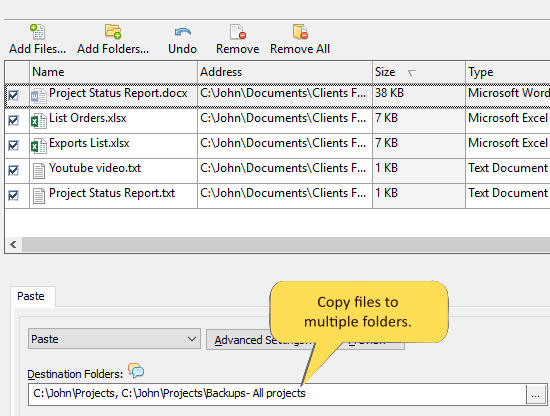
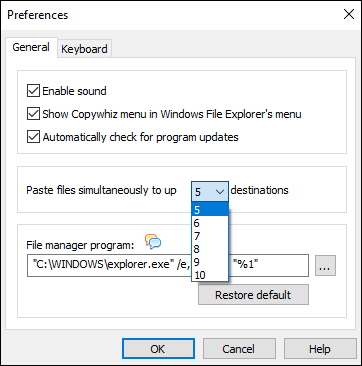
  • Copy files to multiple folders/computers
  • Copy files from multiple folders and paste them at once
  • Sync files between source and destination
  • Pick files from multiple folders and compress in single .zip file
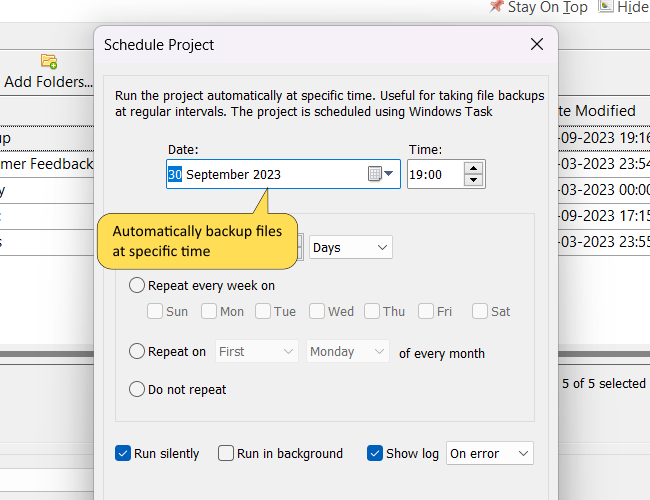
  • Schedule file backups
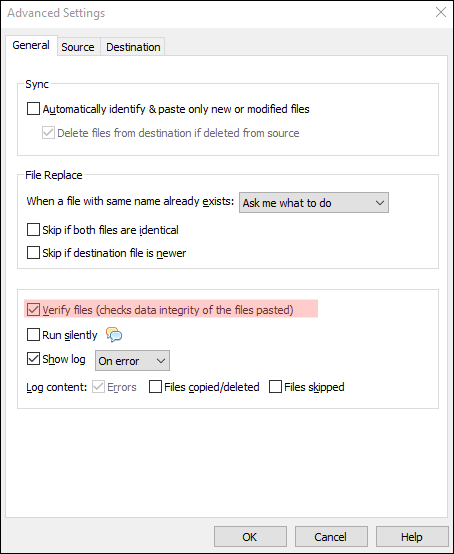
  • Verify copied files for data integrity
  • Retain security attributes of files & folders (ownership/user access)
  • Several more hidden nuggets designed to make your file-copy task easier.

Below is a video describing this feature:

Video Transcription:

  1. As shown in the video, select the files, right-click and copy using Copywhiz.
  2. Before we paste the files in destination folder we will delete a file from here.
  3. We now know that an error message will pop-up since a source file does not exist.
  4. We will now paste the files into this folder and see how Copywhiz responds.
  5. Right click and choose Paste with Copywhiz.
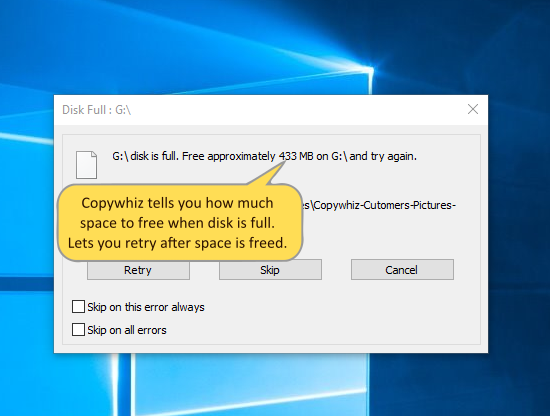
  6. As expected, an error message has popped up. We now have the option to retry copying, skip copying this file or cancel the whole copy task.
  7. After copying files, Copywhiz also generates a log with list of errors.

Using Teracopy to Handle File Copy Errors:

  1. Download and Install TeraCopy

Go to https://www.codesector.com/teracopy

Install the free or Pro version based on your needs.

  1. Open TeraCopy or use via Context Menu

Right-click the files/folders you want to copy.

Choose TeraCopy > Copy.

  1. Select Destination Folder

When the TeraCopy window opens, click “Browse” to choose your target folder.

  1. Enable Error-Skip Behavior

TeraCopy is designed to automatically skip problematic files and continue copying.

After the copy is done, you’ll see a detailed log showing any errors or skipped files.

  1. Retry or Fix Failed Files

You can retry failed files or export a list of them to check later.

Conclusion:

Copywhiz offers a user-friendly and robust solution, making it the ideal choice for professionals and everyday users alike.

Whether you’re managing backups or migrating data, choose Copywhiz to save time, reduce frustration, and ensure complete operations even when errors arise. Download Copywhiz today and experience the difference!

Learn more about Copywhiz. Download the free trial from here.

For short tutorial videos, Check out this page.

Subscribe to our YouTube channel for interesting videos.

Check out our other cool products.

Have a good day!

Thanks :)

Continue file copy/backup even if an error occurs when using Fastcopy alternative replacement tool

Hey Guys! Don’t let errors stop your backup or file transfer tasks. With the right tool, you can copy everything else and deal with the problematic files later. In this post, we’ll show you how to use Copywhiz and FastCopy to continue copying even when errors occur.

What is Copywhiz?

Copywhiz enhances your file-copy experience by letting you to have more flexibility & control over the file copying and backup process.

Here is how Copywhiz makes file copying a breeze:

  • Copy only new or modified files
  • Easily pick files by name, extension, folder etc from bunch of folders
  • Automatically organize files based on file attributes and metadata
  • Copy files to multiple folders/computers
  • Copy files from multiple folders and paste them at once
  • Sync files between source and destination
  • Pick files from multiple folders and compress in single .zip file
  • Schedule file backups
  • Verify copied files for data integrity
  • Retain security attributes of files & folders (ownership/user access)
  • Several more hidden nuggets designed to make your file-copy task easier.

Below is a video describing this feature:

Video Transcription:

  1. As shown in the video, select the files, right-click and copy using Copywhiz.
  2. Before we paste the files in destination folder we will delete a file from here.
  3. We now know that an error message will pop-up since a source file does not exist.
  4. We will now paste the files into this folder and see how Copywhiz responds.
  5. Right click and choose Paste with Copywhiz.
  6. As expected, an error message has popped up. We now have the option to retry copying, skip copying this file or cancel the whole copy task.
  7. After copying files, Copywhiz also generates a log with list of errors.

Using Fastcopy to Handle File Copy Errors:

  1. Download & Install FastCopy
  2. Launch FastCopy
    • Open the application. You’ll see a clean interface with Source and Destination fields.
  3. Choose Source and Destination
    • In the “Source” field, select the folder or files to copy.
    • In the “DestDir” field, choose your destination folder.
  4. Set Operation Mode
    • Select an operation mode from the drop-down menu (e.g., “Copy”, “Sync”, or “Move”).
  5. Enable Error Skipping
    • Check the option “Enable ACL/ADS/Error Skip”.
    • This will allow FastCopy to skip problematic files and continue with the rest of the job.
  6. Start Copying
    • Click “Execute” to start the process.
    • FastCopy will log skipped files and show summary statistics after completion.

Conclusion:

Copywhiz offers a user-friendly and robust solution, making it the ideal choice for professionals and everyday users alike.

Whether you’re managing backups or migrating data, choose Copywhiz to save time, reduce frustration, and ensure complete operations even when errors arise. Download Copywhiz today and experience the difference!

Learn more about Copywhiz. Download the free trial from here.

For short tutorial videos, Check out this page.

Subscribe to our YouTube channel for interesting videos.

Check out our other cool products.

Have a good day!

Thanks :)

Continue file copy/backup even if an error occurs when using Robocopy alternative replacement tool

Hello Everyone! Copying or backing up files should be a smooth process, but it can easily be interrupted by issues like file access errors, locked files, or corrupted data. When that happens, you don’t want the entire operation to stop especially if you’re copying a large set of files. So here we have two tools Copywhiz and Robocopy that help you achieve without any errors or interruptions.

Let’s take a look on step-by-step guide using Copywhiz tool:

What is Copywhiz?

Copywhiz enhances your file-copy experience by letting you to have more flexibility & control over the file copying and backup process.

Here is how Copywhiz makes file copying a breeze:

  • Copy only new or modified files
  • Easily pick files by name, extension, folder etc from bunch of folders
  • Automatically organize files based on file attributes and metadata
  • Copy files to multiple folders/computers
  • Copy files from multiple folders and paste them at once
  • Sync files between source and destination
  • Pick files from multiple folders and compress in single .zip file
  • Schedule file backups
  • Verify copied files for data integrity
  • Retain security attributes of files & folders (ownership/user access)
  • Several more hidden nuggets designed to make your file-copy task easier.

Below is a video describing this feature:

Video Transcription:

  1. As shown in the video, select the files, right-click and copy using Copywhiz.
  2. Before we paste the files in destination folder we will delete a file from here.
  3. We now know that an error message will pop-up since a source file does not exist.
  4. We will now paste the files into this folder and see how Copywhiz responds.
  5. Right click and choose Paste with Copywhiz.
  6. As expected, an error message has popped up. We now have the option to retry copying, skip copying this file or cancel the whole copy task.
  7. After copying files, Copywhiz also generates a log with list of errors.

Using Robocopy to Handle File Copy Errors:

Step-by-Step Guide:

  1. Open Command Prompt
    Press Win + R, type cmd, and hit Enter.
  2. Use the Robocopy command format: bashCopyEditrobocopy <Source> <Destination> [options]
  3. Add the options to continue even if errors occur:
    Here’s an example command: bashCopyEditrobocopy "C:\SourceFolder" "D:\BackupFolder" /E /R:1 /W:1 /TEE /LOG:robocopy-log.txt ? Explanation of the key options:
    • /E – Copies all subfolders, including empty ones./R:1 – Retries once on failed copies (default is 1 million!)./W:1 – Waits 1 second between retries./TEE – Displays output in the console while logging it./LOG:filename – Saves the log of operations.
    ? Robocopy will continue copying files, skipping over any that throw errors after one retry.

Conclusion:

Copywhiz offers a user-friendly and robust solution, making it the ideal choice for professionals and everyday users alike.

If you need more control, error-handling, and a smoother experience, Copywhiz is the better choice.

Whether you’re backing up a few files or managing large file operations, continuing the copy even after errors is essential to save time and avoid data loss. Hopefully, this guide helps you choose the right tool for the job.

Learn more about Copywhiz. Download the free trial from here.

For short tutorial videos, Check out this page.

Subscribe to our YouTube channel for interesting videos.

Check out our other cool products.

Have a good day!

Thanks :)

Copy Files to every sub-folder inside a folder in Windows using Robocopy alternative replacement tool

Hey Guys! Copying files to every sub-folder inside a folder can be a long and tedious task, but it can be efficiently accomplished using Copywhiz. Here we have a blog which will guide you on how to achieve this using Copywhiz and Robocopy.

First we will see how to copy files to every sub-folder inside a folder using Copywhiz.

What is Copywhiz?

Copywhiz enhances your file-copy experience by letting you to have more flexibility & control over the file copying and backup process.

Here is how Copywhiz makes file copying a breeze:

  • Copy only new or modified files
  • Easily pick files by name, extension, folder etc from bunch of folders
  • Automatically organize files based on file attributes and metadata
  • Copy files to multiple folders/computers
  • Copy files from multiple folders and paste them at once
  • Sync files between source and destination
  • Pick files from multiple folders and compress in single .zip file
  • Schedule file backups
  • Verify copied files for data integrity
  • Retain security attributes of files & folders (ownership/user access)
  • Several more hidden nuggets designed to make your file-copy task easier.

Here’s a short video on this feature:

1. After you select your files in Copywhiz, go to the destination folder and Choose ‘Copywhiz -> Paste Advanced’.

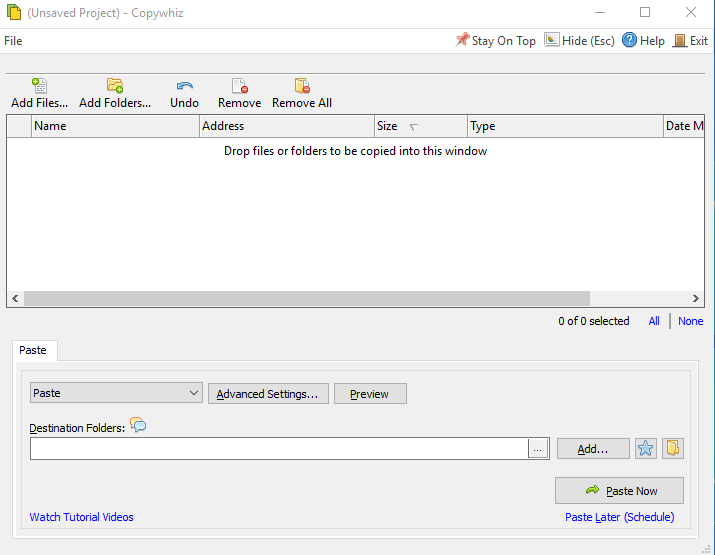
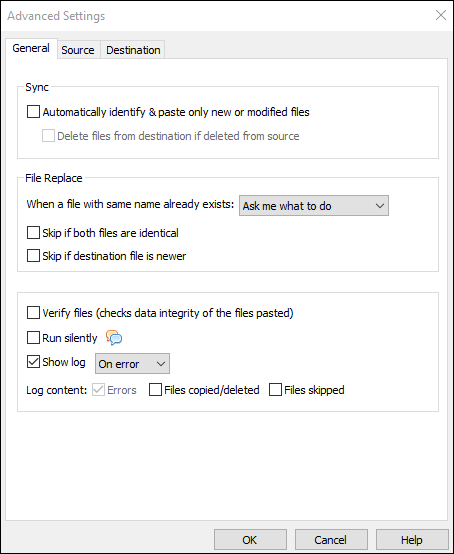
2. The Copywhiz main window will open. Choose the Advanced Settings Tab from there.

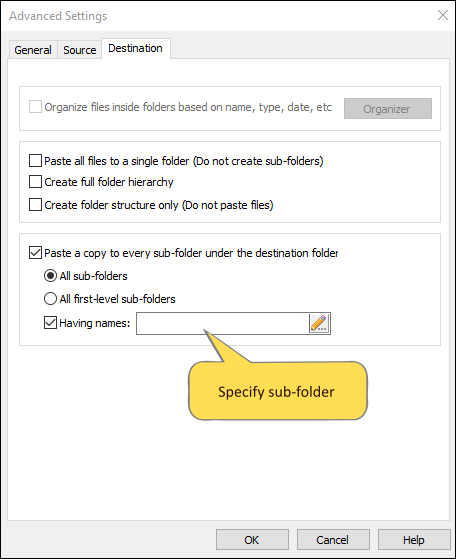
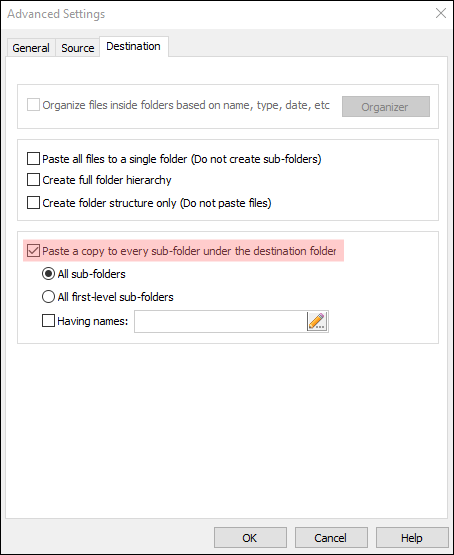
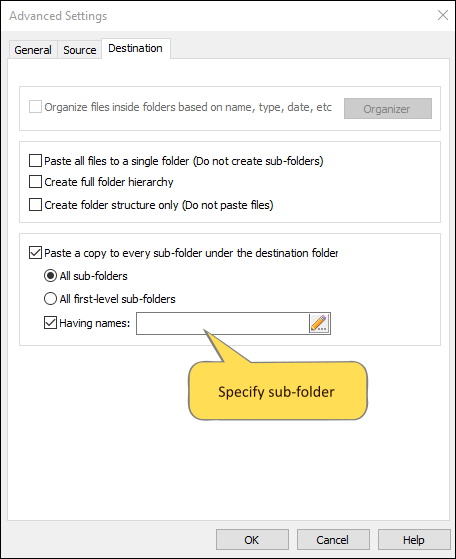
3. Go to the Destination Tab and choose the ‘Paste a copy to every sub-folder under the destination tab ’ option. Here you can choose to paste under all sub-folders, or just first-level sub-folders, in the folder structure.

4. Click on OK and then the ‘Paste Now’ option.

Method 2: Using Robocopy

  1. Place the file you want to copy (e.g., config.txt) in a folder. Let’s assume it’s in C:\SourceFiles.
  2. Open Command Prompt as Administrator.
  3. Use the following command: cmdCopyEditfor /d %f in ("C:\Projects\*") do robocopy "C:\SourceFiles" "%f" config.txt
    Explanation:
    • for /d %f in ("C:\Projects\*"): Iterates through each sub-folder in C:\Projects.
    • robocopy "C:\SourceFiles" "%f" config.txt: Copies config.txt from C:\SourceFiles to each sub-folder (%f).

Result:

config.txt is copied into each sub-folder under C:\Projects.

Advantages of Copywhiz:

  • User-Friendly Interface: No scripting knowledge required.
  • Advanced Options: Filter files by type, skip duplicates, and customize behavior.
  • Error Handling: Provides detailed logs and recovery options.
  • Time-Saving: Significantly faster for large-scale operations.

Conclusion:

If you prefer a simple, GUI-based method or want more control without writing scripts, Copywhiz makes the process incredibly easy.

Copywhiz thus is a simple and easy tool with advanced features and huge benefits!

You can also schedule automatic file backups and take incremental backups using Copywhiz.

Learn more about Copywhiz. Download the free trial from here.

For short tutorial videos, Check out this page.

Subscribe to our YouTube channel for interesting videos.

Check out our other cool products.

Have a good day!

Thanks for reading till the end :)

Copy Files to every sub-folder inside a folder in Windows using Fastcopy alternative replacement tool

Hello everyone! Copying files to every sub-folder inside a folder may seem a long process as duplicating a specific file or set of files into each sub-folder, ensuring that the contents are consistently updated across the directory structure. In this blog post we will share how to accomplish this using Copywhiz and Fastcopy.

First we will see how to achieve this using Copywhiz.

What is Copywhiz?

Copywhiz enhances your file-copy experience by letting you to have more flexibility & control over the file copying and backup process.

Here is how Copywhiz makes file copying a breeze:

  • Copy only new or modified files
  • Easily pick files by name, extension, folder etc from bunch of folders
  • Automatically organize files based on file attributes and metadata
  • Copy files to multiple folders/computers
  • Copy files from multiple folders and paste them at once
  • Sync files between source and destination
  • Pick files from multiple folders and compress in single .zip file
  • Schedule file backups
  • Verify copied files for data integrity
  • Retain security attributes of files & folders (ownership/user access)
  • Several more hidden nuggets designed to make your file-copy task easier.

Here’s a short video on this feature:

1. After you select your files in Copywhiz, go to the destination folder and Choose ‘Copywhiz -> Paste Advanced’.

2. The Copywhiz main window will open. Choose the Advanced Settings Tab from there.

3. Go to the Destination Tab and choose the ‘Paste a copy to every sub-folder under the destination tab ’ option. Here you can choose to paste under all sub-folders, or just first-level sub-folders, in the folder structure.

4. Click on OK and then the ‘Paste Now’ option.

Method 2: Using Fastcopy

  1. Install FastCopy
  2. Place the source file (e.g., Readme.txt) in a folder like D:\SourceFiles.
  3. Create a batch file (CopyToSubfolders.bat) with the following script: batCopyEdit@echo off for /d %%f in ("D:\Projects\*") do ( "C:\Program Files\FastCopy\FastCopy.exe" /cmd=diff /force_close /auto_close /speed=full /no_confirm_stop /src="D:\SourceFiles\Readme.txt" /to="%%f" ) ? Adjust the path to FastCopy.exe if it’s different on your system.
  4. Run the batch file by double-clicking it or running it from the Command Prompt.

Advantages of Copywhiz:

  • User-Friendly Interface: No scripting knowledge required.
  • Advanced Options: Filter files by type, skip duplicates, and customize behavior.
  • Error Handling: Provides detailed logs and recovery options.
  • Time-Saving: Significantly faster for large-scale operations.

Conclusion:

If you want a visual, no-code solution that’s quick and easy for anyone to use, Copywhiz is hard to beat.

Copywhiz thus is a simple and easy tool with advanced features and huge benefits!

You can also schedule automatic file backups and take incremental backups using Copywhiz.

Learn more about Copywhiz. Download the free trial from here.

For short tutorial videos, Check out this page.

Subscribe to our YouTube channel for interesting videos.

Check out our other cool products.

Have a good day!

Thanks for reading till the end :)

Copy Files to every sub-folder inside a folder in Windows using Teracopy alternative replacement tool

Hello Guys! In this blog post we will walk you through on how to Copy files to every sub-folder inside a folder. This may seem as an endless task but we have an interesting approach towards how to achieve this. Here we have two various tools Copywhiz and Teracopy which will help us.

First we have is Copywhiz we’ll walk you through how to use each tool step-by-step.

What is Copywhiz?

Copywhiz enhances your file-copy experience by letting you to have more flexibility & control over the file copying and backup process.

Here is how Copywhiz makes file copying a breeze:

  • Copy only new or modified files
  • Easily pick files by name, extension, folder etc from bunch of folders
  • Automatically organize files based on file attributes and metadata
  • Copy files to multiple folders/computers
  • Copy files from multiple folders and paste them at once
  • Sync files between source and destination
  • Pick files from multiple folders and compress in single .zip file
  • Schedule file backups
  • Verify copied files for data integrity
  • Retain security attributes of files & folders (ownership/user access)
  • Several more hidden nuggets designed to make your file-copy task easier.

Here’s a short video on this feature:

1. After you select your files in Copywhiz, go to the destination folder and Choose ‘Copywhiz -> Paste Advanced’.

2. The Copywhiz main window will open. Choose the Advanced Settings Tab from there.

3. Go to the Destination Tab and choose the ‘Paste a copy to every sub-folder under the destination tab ’ option. Here you can choose to paste under all sub-folders, or just first-level sub-folders, in the folder structure.

4. Click on OK and then the ‘Paste Now’ option.

Method 2: Using Teracopy

  1. Install TeraCopy
  2. Place the source file (e.g., Info.txt) in a folder like D:\SourceFiles.
  3. Create a batch script (e.g., TeraCopyToSubfolders.bat) with the following content: batCopyEdit@echo off for /d %%f in ("D:\ClientProjects\*") do ( "C:\Program Files\TeraCopy\TeraCopy.exe" Copy "D:\SourceFiles\Info.txt" "%%f" /Close )
    Be sure to adjust the paths to match your actual folders and TeraCopy installation directory.
  4. Run the batch file
    Double-click it or run it from Command Prompt.

Conclusion:

Copywhiz thus is a simple and easy tool with advanced features and huge benefits!

You can also schedule automatic file backups and take incremental backups using Copywhiz.

Learn more about Copywhiz. Download the free trial from here.

For short tutorial videos, Check out this page.

Subscribe to our YouTube channel for interesting videos.

Check out our other cool products.

Have a good day!

Thanks for reading till the end :)

Copy Files to every sub-folder inside a folder in Windows using Xcopy alternative replacement tool

Hey Guys! We all know how lengthy a task can be when it comes to copying files to every sub-folder inside a folder can be. We are here to help you and through this blog post we will see how these two tools that is Copywhiz and Xcopy help us achieve this feature.

The advantages of copying files to every sub-folder automatically include increased efficiency, reduced errors, and improved consistency, making it an essential skill for individuals working with complex directory structures.

What is Copywhiz?

Copywhiz enhances your file-copy experience by letting you to have more flexibility & control over the file copying and backup process.

Here is how Copywhiz makes file copying a breeze:

  • Copy only new or modified files
  • Easily pick files by name, extension, folder etc from bunch of folders
  • Automatically organize files based on file attributes and metadata
  • Copy files to multiple folders/computers
  • Copy files from multiple folders and paste them at once
  • Sync files between source and destination
  • Pick files from multiple folders and compress in single .zip file
  • Schedule file backups
  • Verify copied files for data integrity
  • Retain security attributes of files & folders (ownership/user access)
  • Several more hidden nuggets designed to make your file-copy task easier.

Here’s a short video on this feature:

1. After you select your files in Copywhiz, go to the destination folder and Choose ‘Copywhiz -> Paste Advanced’.

2. The Copywhiz main window will open. Choose the Advanced Settings Tab from there.

3. Go to the Destination Tab and choose the ‘Paste a copy to every sub-folder under the destination tab ’ option. Here you can choose to paste under all sub-folders, or just first-level sub-folders, in the folder structure.

4. Click on OK and then the ‘Paste Now’ option.

Method 2: Using Xcopy

  1. Place your source file (the file you want to copy) somewhere accessible, say C:\Source\example.txt.
  2. Identify the parent folder that contains all the sub-folders. Let’s say it’s C:\TargetFolders.
  3. Open Command Prompt:
    • Press Win + R, type cmd, and hit Enter.
  4. Run the following command: cmdCopyEditfor /d %d in (C:\TargetFolders\*) do xcopy /Y C:\Source\example.txt "%d\" What this does:
    • for /d %d in (...): Loops through each sub-directory.
    • xcopy /Y: Copies the file and suppresses overwrite confirmation.
    • "%d\": Ensures the file lands inside each sub-folder.
  5. Check your folders — your file should now appear in every sub-folder!

Advantages of Copywhiz:

  • User-Friendly Interface: No scripting knowledge required.
  • Advanced Options: Filter files by type, skip duplicates, and customize behavior.
  • Error Handling: Provides detailed logs and recovery options.
  • Time-Saving: Significantly faster for large-scale operations.

Conclusion:

If you prefer a visual, more intuitive interface with added flexibility and preview features, Copywhiz is well worth considering.

Copywhiz thus is a simple and easy tool with advanced features and huge benefits!

You can also schedule automatic file backups and take incremental backups using Copywhiz.

Learn more about Copywhiz. Download the free trial from here.

For short tutorial videos, Check out this page.

Subscribe to our YouTube channel for interesting videos.

Check out our other cool products.

Have a good day!

Thanks for reading till the end :)

Copy Files to Multiple Folders or Computers in Windows using Xcopy alternative replacement

Hey Guys! Copying files to multiple folders or computers streamlines file sharing, collaboration, and data management, saving time and boosting productivity. In this blog post we will cover how to copy files to multiple folders or computers using Copywhiz and Xcopy.

Copywhiz copies files simultaneously to multiple locations speeding up the whole process.

What is Copywhiz?

Copywhiz enhances your file-copy experience by letting you to have more flexibility & control over the file copying and backup process.

Here is how Copywhiz makes file copying a breeze:

  • Copy only new or modified files
  • Easily pick files by name, extension, folder etc from bunch of folders
  • Automatically organize files based on file attributes and metadata
  • Copy files to multiple folders/computers
  • Copy files from multiple folders and paste them at once
  • Sync files between source and destination
  • Pick files from multiple folders and compress in single .zip file
  • Schedule file backups
  • Verify copied files for data integrity
  • Retain security attributes of files & folders (ownership/user access)
  • Several more hidden nuggets designed to make your file-copy task easier.

Transcription:

  1. Select files using Windows Explorer, right-click on them and choose Copywhiz–>Copy from the menu.
  2. Right-click inside any folder and select Copywhiz–> Paste Advanced.
  3. Copywhiz window will open. You can add multiple folders by clicking on the Add button placed next to the Destination Folders text box. Alternatively, you can simply drag and drop target folders over the Destination Folders text box. When specifying the Destination Folders, you can suffix the name with %date% or %datetime% variables if you wish to have a dated folder name.
  4. Click on Paste Now. Files will now be copied to all the destination folders sequentially.

That’s it in this video.

Let’s have a look on step by step process using Xcopy.

Using Xcopy:

Step 1: Open Command Prompt

  1. Press Win + R, type cmd, and hit Enter to open the Command Prompt.

Step 2: Use Xcopy to Copy Files

To copy a file or folder to multiple destinations, use the following syntax:

xcopy "C:\SourceFolder" "C:\DestinationFolder1" /E /I /Y
xcopy "C:\SourceFolder" "C:\DestinationFolder2" /E /I /Y

This will copy all files and subfolders from C:\SourceFolder to both C:\DestinationFolder1 and C:\DestinationFolder2.

Step 3: Copy Files to Multiple Network Computers

If you need to copy files to network locations, use this command:

xcopy "C:\SourceFolder" "\\PC1\SharedFolder" /E /I /Y
xcopy "C:\SourceFolder" "\\PC2\SharedFolder" /E /I /Y

This sends the files to the shared folder on PC1 and PC2.

Step 4: Automate the Process (Optional)

You can create a batch file to automate the task:

  1. Open Notepad and paste the Xcopy commands.
  2. Save the file as copy_files.bat.
  3. Double-click the batch file to execute the copy process automatically.

Conclusion

If you value a user-friendly interface and advanced options like filtering and scheduling, Copywhiz is an ideal choice.

For more tutorial videos, click here .

Subscribe to our YouTube channel for regular updates and interesting videos!

Learn more about Copywhiz.

Download the free trial from here.

Check out our other cool products.

Have a good day.

Thanks for reading till the end :)

Copy Files to Multiple Folders or Computers in Windows using Fastcopy alternative replacement

Copying files to multiple folders or computers is an essential skill and a frequent task. In this guide, we’ll explore two powerful tools: Copywhiz and Fastcopy. We’ll walk through step-by-step methods for both tools. First we will cover Copywhiz.

Copywhiz copies files simultaneously to multiple locations. Saves time.

What is Copywhiz?

Copywhiz enhances your file-copy experience by letting you to have more flexibility & control over the file copying and backup process.

Here is how Copywhiz makes file copying a breeze:

  • Copy only new or modified files
  • Easily pick files by name, extension, folder etc from bunch of folders
  • Automatically organize files based on file attributes and metadata
  • Copy files to multiple folders/computers
  • Copy files from multiple folders and paste them at once
  • Sync files between source and destination
  • Pick files from multiple folders and compress in single .zip file
  • Schedule file backups
  • Verify copied files for data integrity
  • Retain security attributes of files & folders (ownership/user access)
  • Several more hidden nuggets designed to make your file-copy task easier.

Transcription:

  1. Select files using Windows Explorer, right-click on them and choose Copywhiz–>Copy from the menu.
  2. Right-click inside any folder and select Copywhiz–> Paste Advanced.
  3. Copywhiz window will open. You can add multiple folders by clicking on the Add button placed next to the Destination Folders text box. Alternatively, you can simply drag and drop target folders over the Destination Folders text box. When specifying the Destination Folders, you can suffix the name with %date% or %datetime% variables if you wish to have a dated folder name.
  4. Click on Paste Now. Files will now be copied to all the destination folders sequentially.

That’s it in this video.

Let’s have a look on step by step process using Fastcopy.

Using Fastcopy:

Step 1: Download and Install FastCopy

  1. Download FastCopy from https://fastcopy.jp/en/.
  2. Install the software and launch it.

Step 2: Select Source Files

  1. Open FastCopy.
  2. Click the Source button and select the folder or files you want to copy.

Step 3: Select Multiple Destination Folders

  1. Click the Destination button and enter multiple destination paths separated by |.
    • Example: C:\Folder1|C:\Folder2|\NetworkPC\SharedFolder
  2. Choose the appropriate copy method (Diff, Sync, Move, etc.).
  3. Click Execute to start copying files.

Step 4: Monitor the Copy Process

  • FastCopy provides a real-time progress bar.
  • If an error occurs, it logs the issue without stopping the entire process.

Similarly you can copy files to multiple computers by adding remote destination folders (Network folders/shares).

Conclusion

If you value a user-friendly interface and advanced options like filtering and scheduling, Copywhiz is an ideal choice.

For more tutorial videos, click here .

Subscribe to our YouTube channel for regular updates and interesting videos!

Learn more about Copywhiz.

Download the free trial from here.

Check out our other cool products.

Have a good day.

Thanks for reading till the end :)

Copy Files to Multiple Folders or Computers in Windows using Teracopy alternative replacement

Copying files to multiple folders or computers is a common task that can be accomplished efficiently using various methods. By duplicating files across multiple destinations, you can streamline file sharing, collaboration, and data management, saving time and increasing productivity.

In this post we’ll explore how to copy files to multiple folders or computers using Copywhiz and Teracopy.

Copywhiz copies files simultaneously to multiple locations, thus completing the tasks faster.

What is Copywhiz?

Copywhiz enhances your file-copy experience by letting you to have more flexibility & control over the file copying and backup process.

Here is how Copywhiz makes file copying a breeze:

  • Copy only new or modified files
  • Easily pick files by name, extension, folder etc from bunch of folders
  • Automatically organize files based on file attributes and metadata
  • Copy files to multiple folders/computers
  • Copy files from multiple folders and paste them at once
  • Sync files between source and destination
  • Pick files from multiple folders and compress in single .zip file
  • Schedule file backups
  • Verify copied files for data integrity
  • Retain security attributes of files & folders (ownership/user access)
  • Several more hidden nuggets designed to make your file-copy task easier.

Transcription:

  1. Select files using Windows Explorer, right-click on them and choose Copywhiz–>Copy from the menu.
  2. Right-click inside any folder and select Copywhiz–> Paste Advanced.
  3. Copywhiz window will open. You can add multiple folders by clicking on the Add button placed next to the Destination Folders text box. Alternatively, you can simply drag and drop target folders over the Destination Folders text box. When specifying the Destination Folders, you can suffix the name with %date% or %datetime% variables if you wish to have a dated folder name.
  4. Click on Paste Now. Files will now be copied to all the destination folders sequentially.

That’s it in this video.

Let’s have a look on step by step process using Teracopy.

Using Teracopy:

Step 1: Download and Install TeraCopy

  1. Download TeraCopy from https://www.codesector.com/teracopy.
  2. Install the software and launch it.

Step 2: Select Files to Copy

  1. Open File Explorer and navigate to the files or folders you want to copy.
  2. Right-click the files and select TeraCopy.
  3. Click Copy (or Move, if needed).

Step 3: Add Multiple Destination Folders

  1. Click on the Browse button to select the first destination folder.
  2. Click the “+” (plus) button to add more destination folders.
  3. Once all the destination folders are added, click Start to begin copying.

Step 4: Monitor the Copy Process

  • TeraCopy shows real-time transfer progress.
  • If an error occurs, TeraCopy retries the transfer instead of failing the entire process.
  • Once completed, a log report is available for review.

Conclusion

If you need greater flexibility, automation, and filtering options, Copywhiz is the superior tool.

For more tutorial videos, click here .

Subscribe to our YouTube channel for regular updates and interesting videos!

Learn more about Copywhiz.

Download the free trial from here.

Check out our other cool products.

Have a good day.

Thanks for reading till the end :)