This post will brief you on how to compress files into .zip files simultaneously at different destinations using Copywhiz.
In one of our previous articles, we told you how you could compress multiple files (from different locations) into a .zip file so that it is easier to share them or even create backups for that matter.
If you still haven’t read it, here is the post:
In this particular article, we will show how to create multiple .zip files at different locations, simultaneously.
Why .zip files?
Compressing files into a .zip file is very useful to reduce the size of the whole file set. Zipping files mean that you are reducing the size of your original data into a smaller size. Creating multiple such files will help you to take backups easily at different locations (local, remote, pen drive, etc.). Copywhiz will help you achieve this with ease.
What is Copywhiz?
Copywhiz enhances your file-copy experience by letting you to have more flexibility & control over the file copying and backup process.
Here is how Copywhiz makes file copying a breeze:
- Copy only new or modified files
- Easily pick files by name, extension, folder etc from bunch of folders
- Automatically organize files based on file attributes and metadata
- Copy files to multiple folders/computers
- Copy files from multiple folders and paste them at once
- Sync files between source and destination
- Pick files from multiple folders and compress in single .zip file
- Schedule file backups
- Verify copied files for data integrity
- Retain security attributes of files & folders (ownership/user access)
- Several more hidden nuggets designed to make your file-copy task easier.
Steps to create .zip files at multiple locations (folders)
Watch a short video depicting this feature:
Using Copywhiz
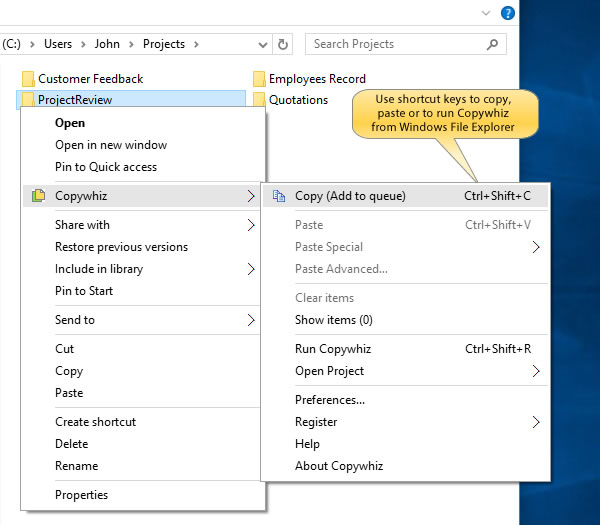
- Select the files from the source folder and right-click on them and choose Copywhiz–>Copy as shown below:
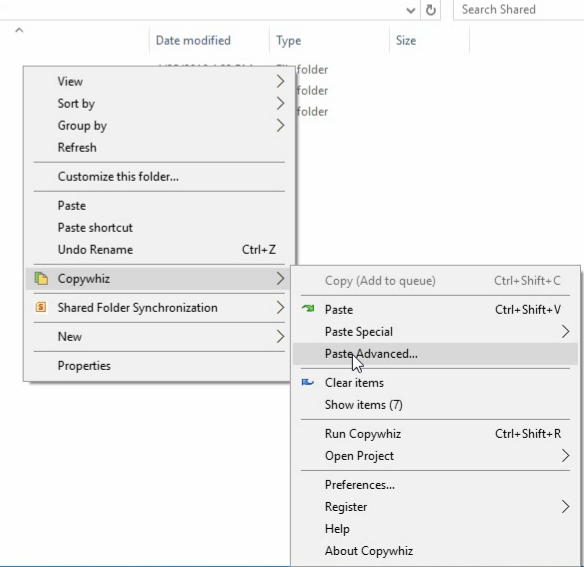
- Right-click inside the destination folder where you wish to create your first .zip file and select Copywhiz–>Paste Advanced:
- Copywhiz window will open with the destination folder already selected. Here you need to select ‘Paste as compressed .zip file’ option from the drop-down (under Paste tab) and then add multiple .zip file locations. Separate each file with a comma (,).
If you don’t want to type them manually, you can click on the ‘Add’ option next to the box. This option lets you browse to a destination folder and specify a .zip file name. This feature ensured that you create the file in the right place.
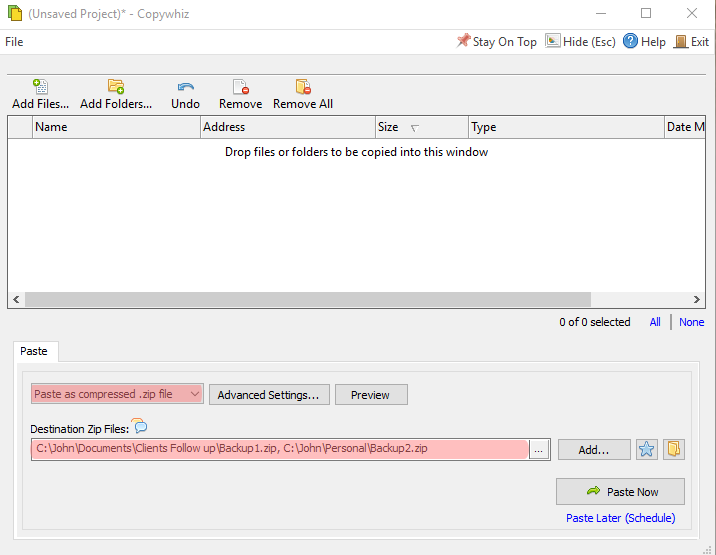
- Click on ‘Paste Now’ and it will automatically create .zip files at all those folders you specified.
- You can cross-check by clicking on the file icon next to the dialogue box. It will open the destination folders for you. All your files would have been copied there.
Scheduling it for your backups
With Copywhiz, you can even schedule your copying process according to your convenience by clicking on the “Paste Later” option. You get the facility of creating copies of your files every week, every day, or even every hour. You now have a complete file backup solution too.
For more tutorial videos, check out this page.
Subscribe to our YouTube channel for more such interesting videos.
Learn more about Copywhiz. Download the free trial from here.
Have a good day!
Thanks for your time :)