Hey Guys! Don’t let errors stop your backup or file transfer tasks. With the right tool, you can copy everything else and deal with the problematic files later. In this post, we’ll show you how to use Copywhiz and FastCopy to continue copying even when errors occur.
What is Copywhiz?
Copywhiz enhances your file-copy experience by letting you to have more flexibility & control over the file copying and backup process.
Here is how Copywhiz makes file copying a breeze:
- Copy only new or modified files
- Easily pick files by name, extension, folder etc from bunch of folders
- Automatically organize files based on file attributes and metadata
- Copy files to multiple folders/computers
- Copy files from multiple folders and paste them at once
- Sync files between source and destination
- Pick files from multiple folders and compress in single .zip file
- Schedule file backups
- Verify copied files for data integrity
- Retain security attributes of files & folders (ownership/user access)
- Several more hidden nuggets designed to make your file-copy task easier.
Below is a video describing this feature:
Video Transcription:
- As shown in the video, select the files, right-click and copy using Copywhiz.
- Before we paste the files in destination folder we will delete a file from here.
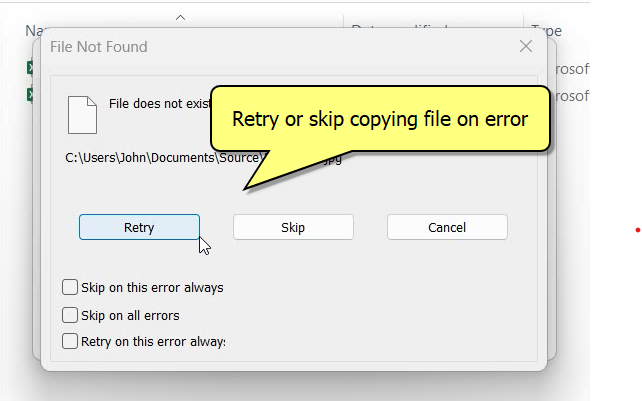
- We now know that an error message will pop-up since a source file does not exist.
- We will now paste the files into this folder and see how Copywhiz responds.
- Right click and choose Paste with Copywhiz.
- As expected, an error message has popped up. We now have the option to retry copying, skip copying this file or cancel the whole copy task.
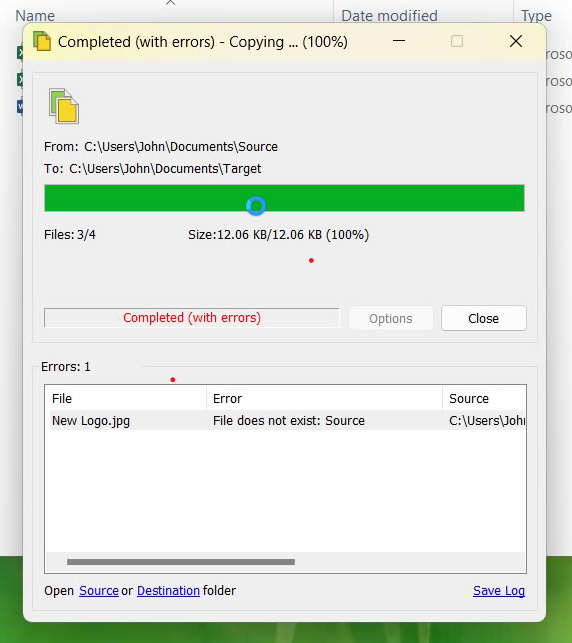
- After copying files, Copywhiz also generates a log with list of errors.
Using Fastcopy to Handle File Copy Errors:
- Download & Install FastCopy
- Go to https://fastcopy.jp and download the latest version.
- Launch FastCopy
- Open the application. You’ll see a clean interface with Source and Destination fields.
- Choose Source and Destination
- In the “Source” field, select the folder or files to copy.
- In the “DestDir” field, choose your destination folder.
- Set Operation Mode
- Select an operation mode from the drop-down menu (e.g., “Copy”, “Sync”, or “Move”).
- Enable Error Skipping
- Check the option “Enable ACL/ADS/Error Skip”.
- This will allow FastCopy to skip problematic files and continue with the rest of the job.
- Start Copying
- Click “Execute” to start the process.
- FastCopy will log skipped files and show summary statistics after completion.
Conclusion:
Copywhiz offers a user-friendly and robust solution, making it the ideal choice for professionals and everyday users alike.
Whether you’re managing backups or migrating data, choose Copywhiz to save time, reduce frustration, and ensure complete operations even when errors arise. Download Copywhiz today and experience the difference!
Learn more about Copywhiz. Download the free trial from here.
For short tutorial videos, Check out this page.
Subscribe to our YouTube channel for interesting videos.
Check out our other cool products.
Have a good day!
Thanks :)